AXIS Network Audio
Version: 1.0.2 ENG
Date: November 13, 2024
Product: CyberTwice CyberGate with AXIS Network Audio Devices
Introduction
Section titled “Introduction”Microsoft Teams is the hub for team collaboration in Microsoft Office 365 that integrates people, content, conversations, and tools your team needs. Via the CyberGate application that runs in Microsoft Azure, you can connect AXIS Network Audio devices to your Microsoft Teams environment.
Microsoft Teams users can set up calls to AXIS Network Audio devices with 2-way audio using the Teams desktop client, Teams desk phone, or Teams smartphone app.
What is CyberGate?
Section titled “What is CyberGate?”CyberGate is a subscription-based Software-as-a-Service (SaaS) hosted in Azure. With CyberGate there is:
- ✅ No need to setup a hosting environment
- ✅ No need to download or install any software from CyberTwice or a 3rd party
- ✅ No need to install additional Virtual Machines
- ✅ No need for a Session Border Controller (SBC) or extra licenses for your existing SBC
- ✅ No need for additional PSTN-like phone numbers for your SIP intercoms
Note: For instructions on how to purchase and configure the CyberGate service, see our Tech Note: Connect a SIP Intercom to MS Teams using the CyberGate service
Supported AXIS Products
Section titled “Supported AXIS Products”
This document uses the AXIS C8110 Network Audio Bridge and AXIS C1410 Network Mini Speaker as reference devices. All other AXIS Network Speakers and AXIS Audio System Devices are also compatible with CyberGate.
Document Contents
Section titled “Document Contents”| Section | Description |
|---|---|
| Single Device Configuration | Configure a standalone AXIS device for CyberGate |
| Multi-Device Configuration | Configure multiple devices using AXIS Audio Manager Edge |
| Appendix: CyberGate App | Installation and usage of the CyberGate Teams app |
CyberGate Teams App Features
Section titled “CyberGate Teams App Features”The CyberGate app for Microsoft Teams provides:
- 📊 Device status — View device online/offline status and initiate calls with one click
- 👥 Availability — Set your status in CyberGate Multi-ring groups
- 🚪 Door open — Open doors during calls with intercom devices
Recommendation: Installation of the CyberGate app for Microsoft Teams is highly recommended.
Part 1: Single Device Configuration
Section titled “Part 1: Single Device Configuration”This section describes configuring an AXIS device as a standalone device connected to CyberGate. The AXIS C1410 Network Mini Speaker is used as the example device.
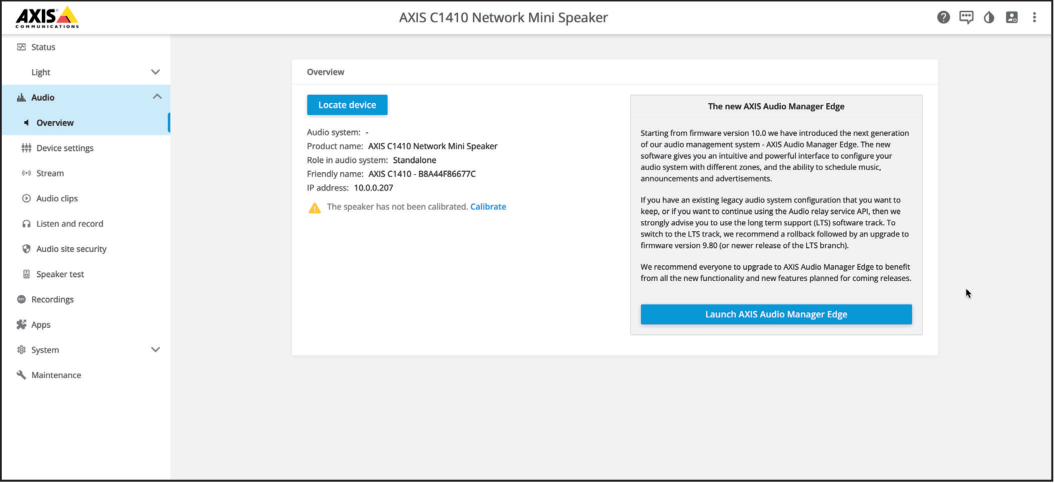
Step 1: Connect to the AXIS
Section titled “Step 1: Connect to the AXIS”- Connect the AXIS to the network
- Power it on
- Open a web browser and navigate to the device’s IP address
- Sign in with the configured or supplied password
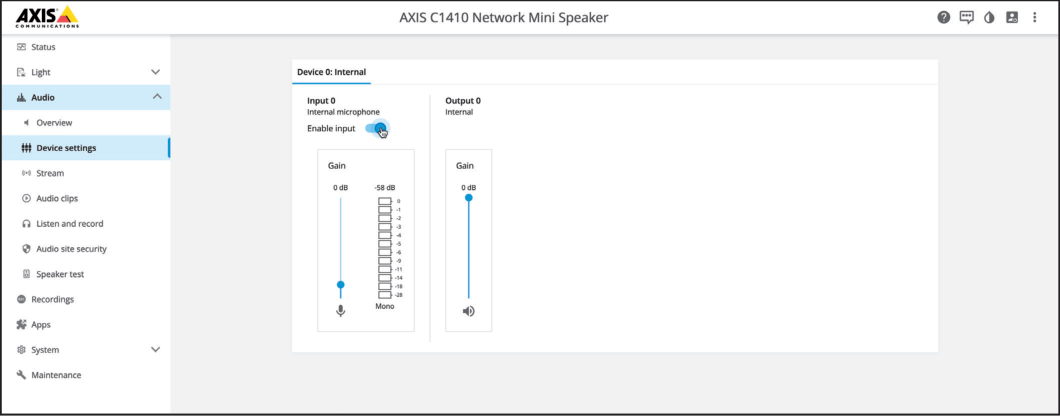
Step 2: Enable Microphone Input
Section titled “Step 2: Enable Microphone Input”- Navigate to Audio → Device Settings
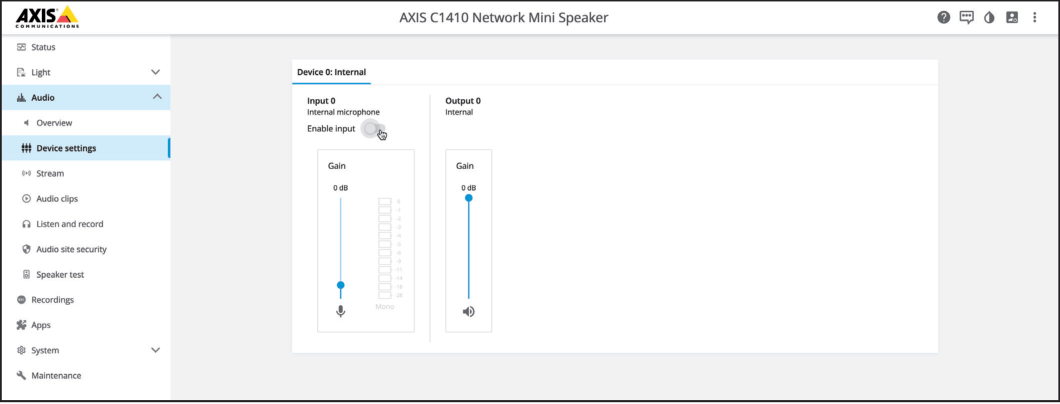
- Enable the internal microphone input
Step 3: Configure SIP Settings
Section titled “Step 3: Configure SIP Settings”- Navigate to System → SIP
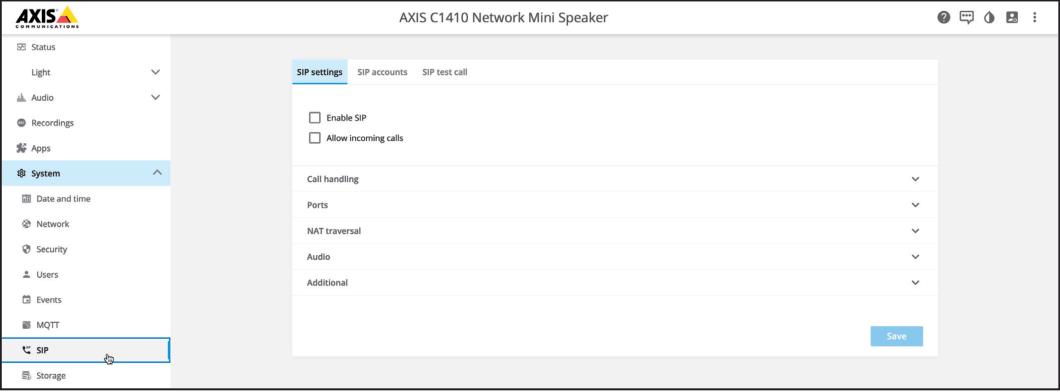
- Configure the following settings:
| Field | Value |
|---|---|
| Enable SIP | Enable |
| Allow incoming SIP calls | Enable |
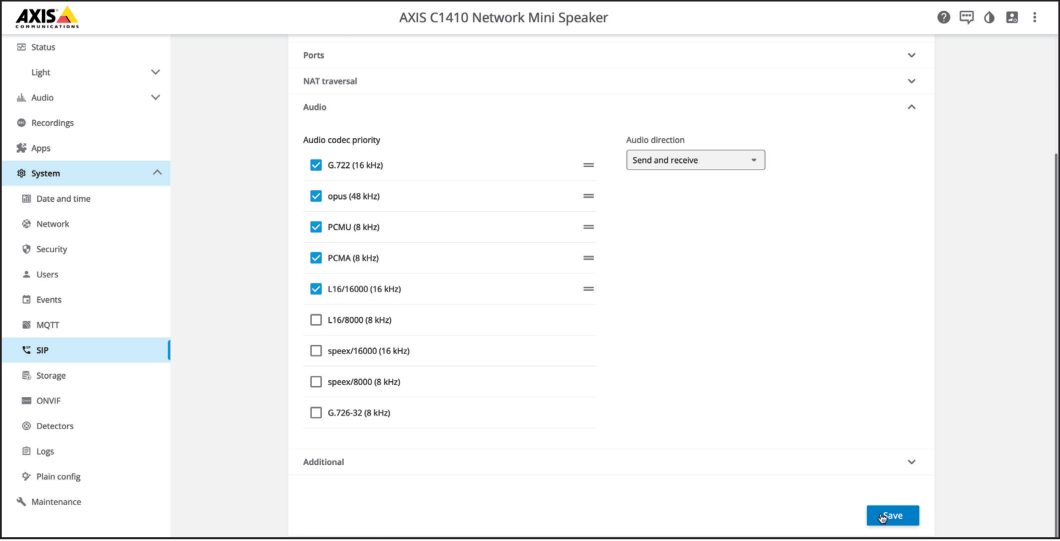
Audio Codec Settings
Section titled “Audio Codec Settings”| Field | Value |
|---|---|
| G.722 | Enable and move to top of list |
| Opus | Enable and move below G.722 |
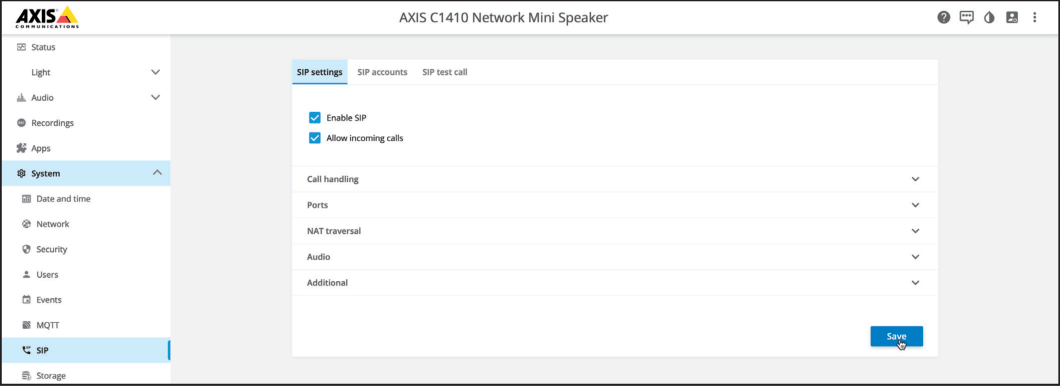
- Click ‘Save’
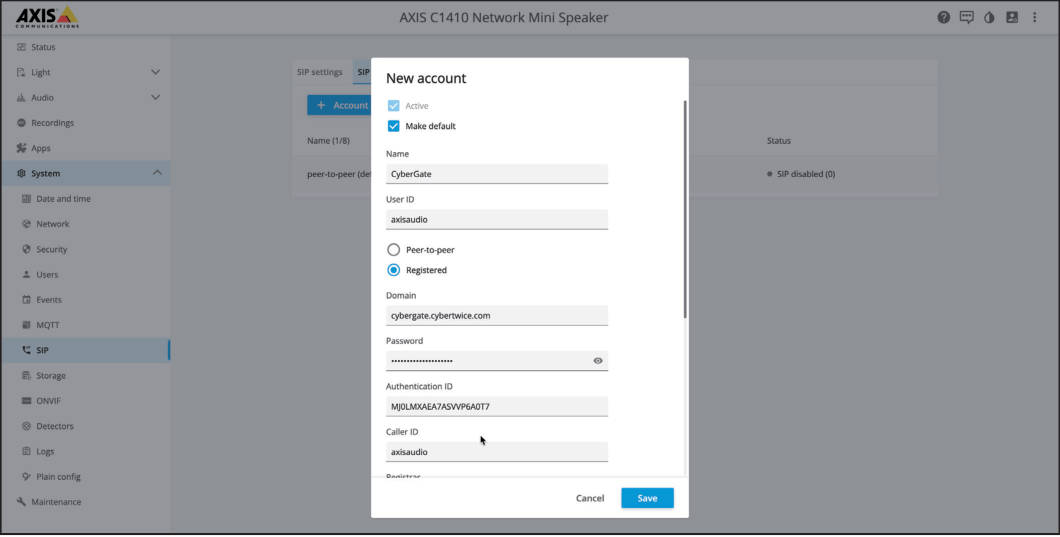
Step 4: Configure SIP Account
Section titled “Step 4: Configure SIP Account”- Navigate to SIP accounts
- Click to add a new account
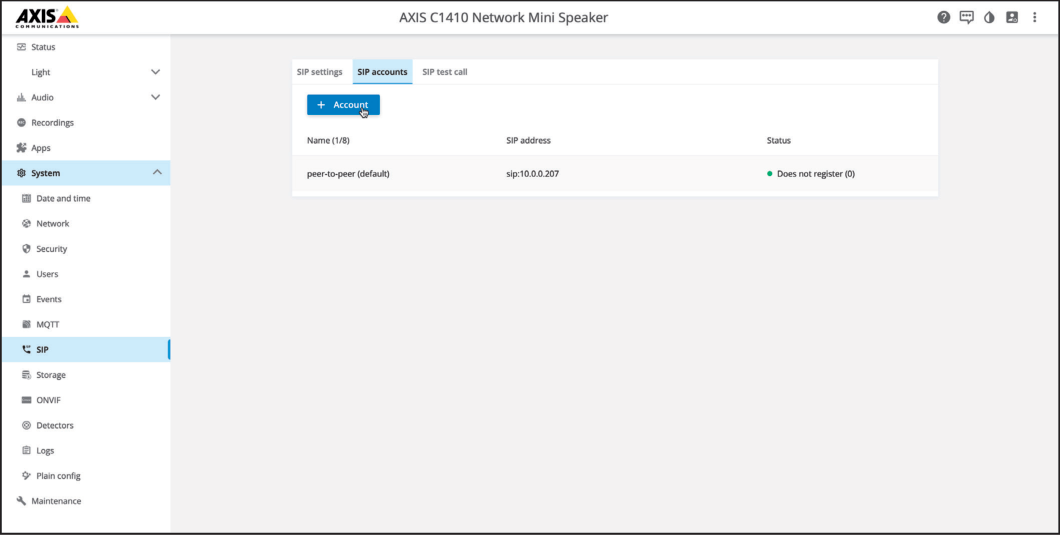
- Configure the following settings:
Basic Settings
Section titled “Basic Settings”| Field | Value |
|---|---|
| Active | Enable |
| Make default | Enable |
| Name | Use a descriptive name (e.g., CyberGate) |
| User ID | Define a name for this device (no spaces allowed) |
| Domain | cybergate.cybertwice.com |
| Password | Use the Password from CyberGate Management Portal |
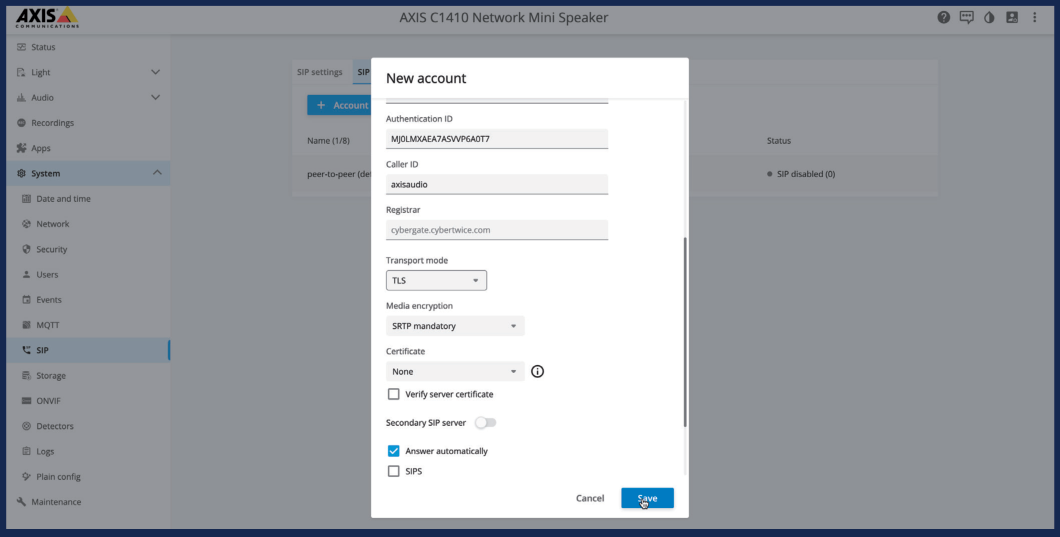
| Authentication ID | Use the Username from CyberGate Management Portal |
| Caller ID | Use the same name as User ID |
| Registrar | cybergate.cybertwice.com |
| Transport mode | TCP |
Secure SIP (Optional)
Section titled “Secure SIP (Optional)”| Field | Value |
|---|---|
| Transport mode | TLS |
| Media encryption | SRTP mandatory |

- Click ‘Save’
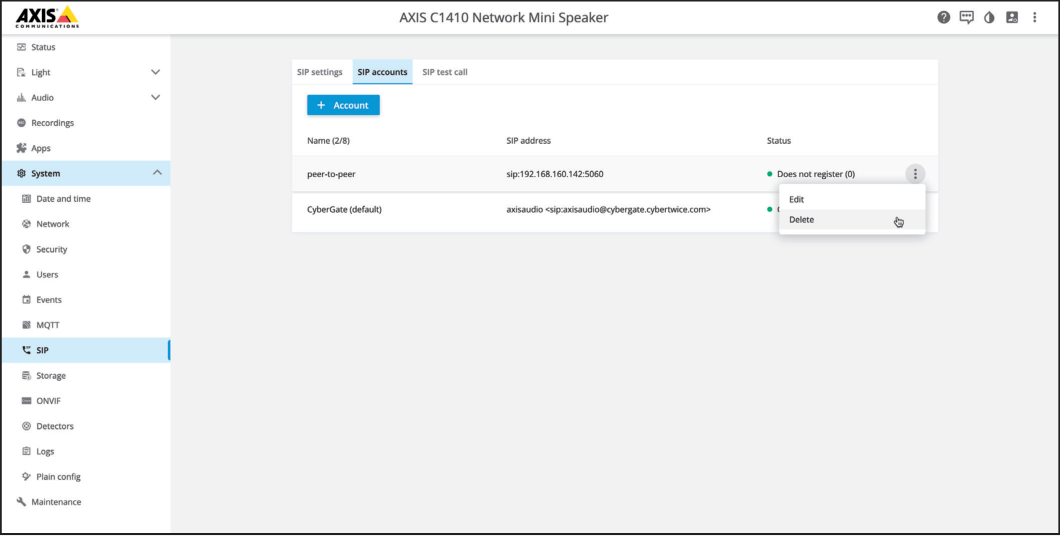
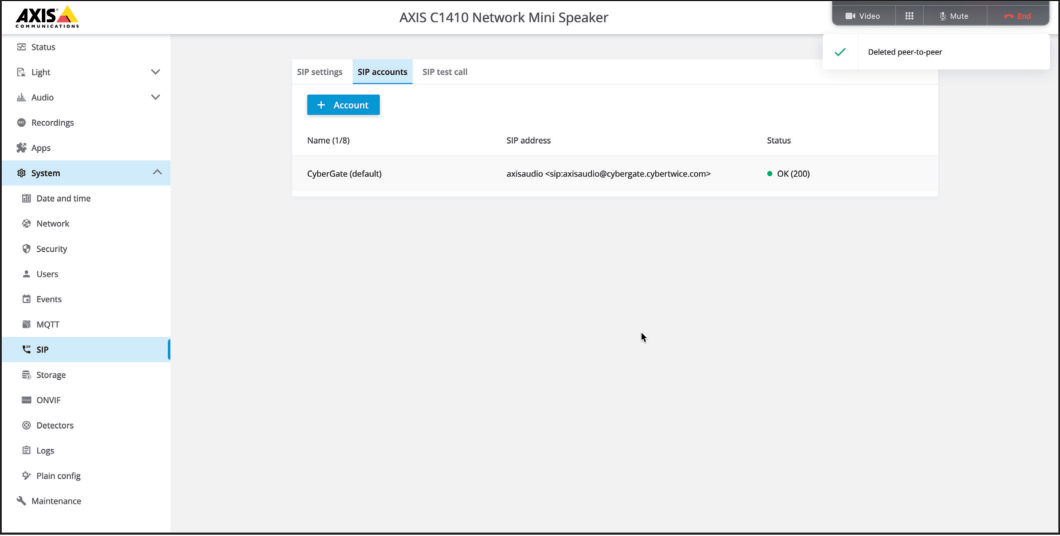
Step 5: Remove Default Peer-to-Peer Account
Section titled “Step 5: Remove Default Peer-to-Peer Account”- Click on the three vertical dots next to the default peer-to-peer account
- Select ‘Delete’ to remove it
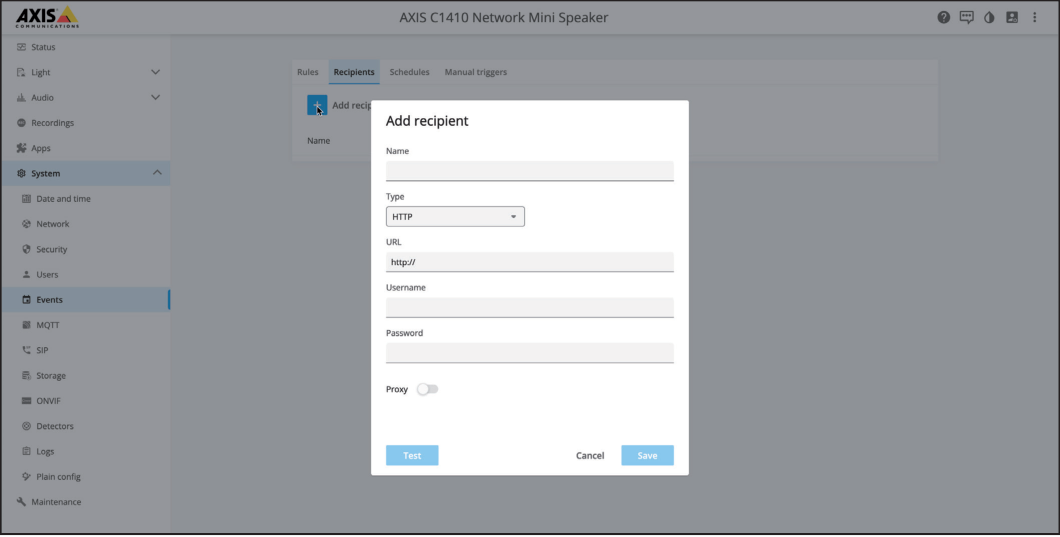
Step 6: Configure Call Recipients
Section titled “Step 6: Configure Call Recipients”- Navigate to System → Events
- Navigate to Recipients
- Add a new recipient with the following settings:
| Field | Value |
|---|---|
| Name | Descriptive name of the recipient |
| Type | SIP |
| To SIP address | Teams user address with CyberGate domain (see format below) |
Teams User Address Format
Section titled “Teams User Address Format”Use the format: username@cybergate.cybertwice.com
Example: For Teams user Koos Ridder with email
koos.ridder@mycompany.com, enter:koos.ridder@cybergate.cybertwice.com
- Click ‘Save’
Step 7: Create Event Rules
Section titled “Step 7: Create Event Rules”- Navigate to Rules
- Add a new rule with the following settings:
| Field | Value |
|---|---|
| Use this rule | Enable |
| Name | Descriptive name (e.g., Demo rule) |
| Condition | Audio detection (or other trigger as needed) |
| Action | Make a call |
| Recipient | Select the recipient to call |
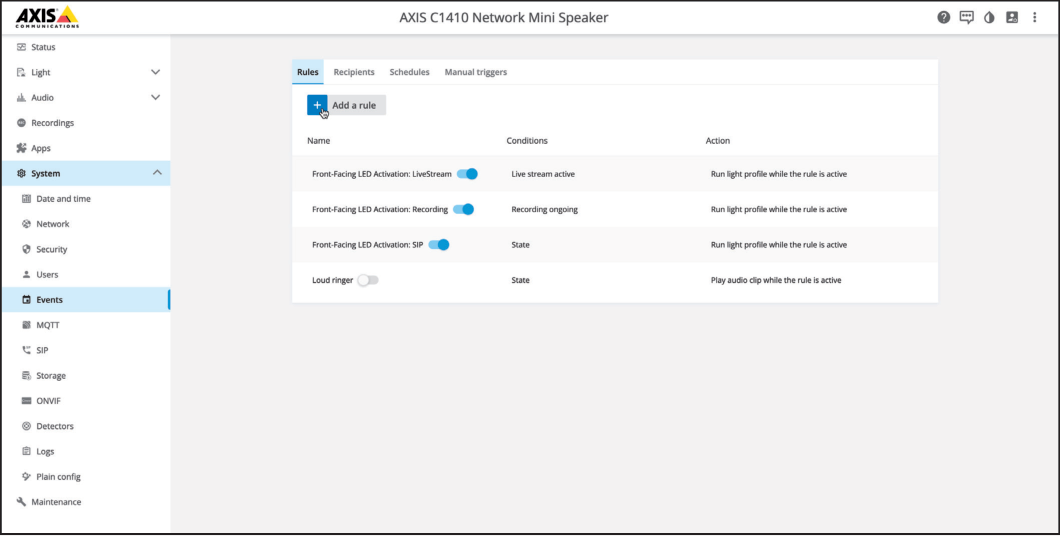
- Click ‘Save’
The rule is now in place. When the AXIS speaker detects the configured trigger (e.g., sound), it will call the configured recipient in Microsoft Teams.
Note: You can modify events to match your specific needs—this is just an example for creating outgoing calls.
Step 8: Configure CyberGate Admin Portal
Section titled “Step 8: Configure CyberGate Admin Portal”Before calls can be initiated from Microsoft Teams to the AXIS, additional configuration in the CyberGate Admin portal is necessary.
-
Navigate to: https://admin.cybergate.cybertwice.com
-
Log in using a Microsoft account with admin privileges
-
Navigate to Basic → Device menu
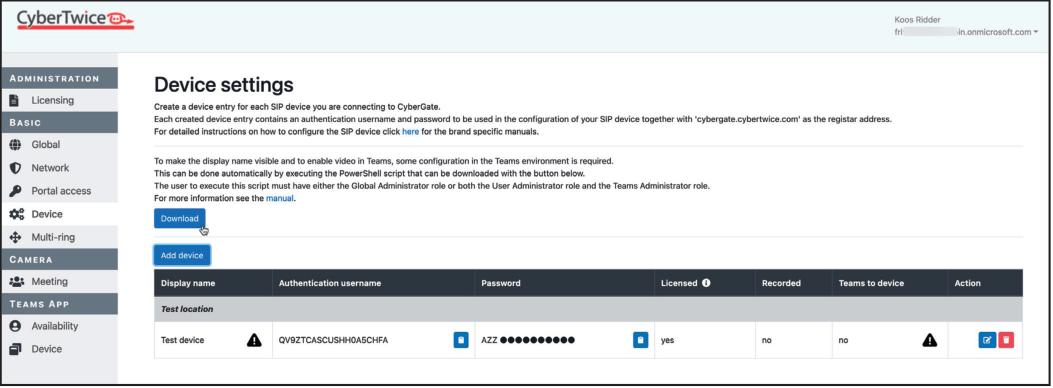
- If the display name shows a warning symbol ⚠️:
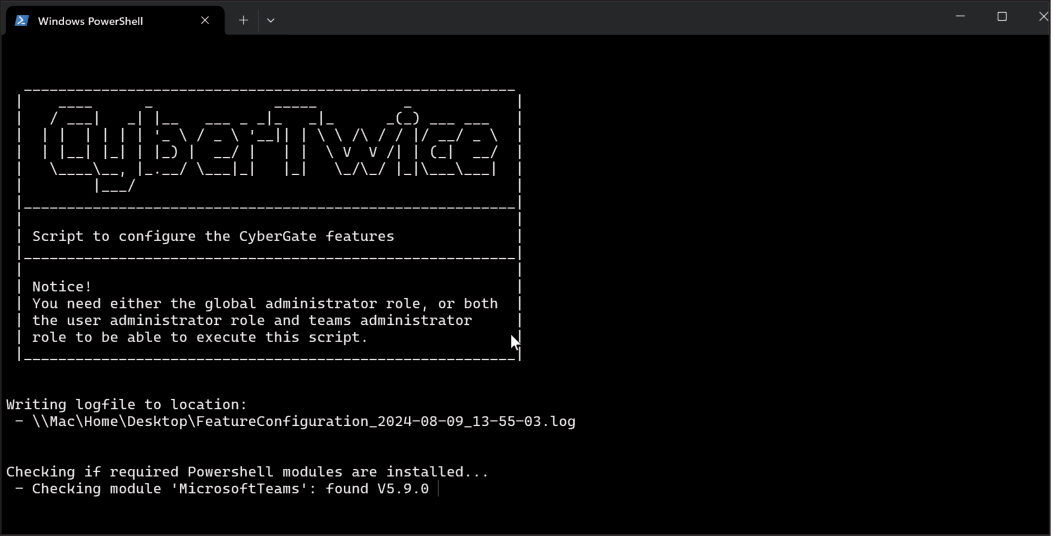
- Click the blue ‘Download’ button to download the PowerShell script
- Open PowerShell on your PC with administrator privileges
- Run:
./FeatureConfiguration.ps1 - When prompted, authenticate with the same Microsoft account used for the CyberGate Admin portal

After successful execution, the warning symbol will disappear.
Calling from Microsoft Teams
Section titled “Calling from Microsoft Teams”To initiate a call from Microsoft Teams to the AXIS, you have two options:
Option 1: Using the Teams Calls Menu
Section titled “Option 1: Using the Teams Calls Menu”- Log in to Microsoft Teams
- Navigate to the ‘Calls’ menu
- Either:
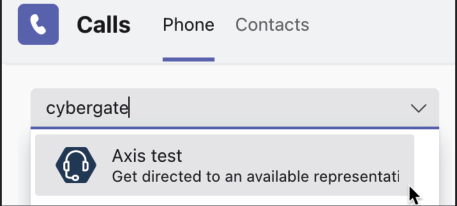
- Type the display name of the AXIS directly in the call field, or
- Search for ‘cybergate’ to see all your CyberGate devices
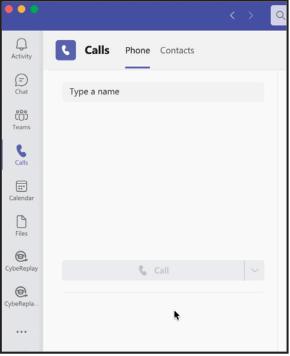
- Select the device to call and click the blue ‘Call’ button
- The AXIS will answer automatically
Tip for Multicast: When Multicast is enabled with multiple zones, click the three dots (…) in the call screen and select ‘Dial pad’. Use the dial pad to control zone features of the AXIS.
Option 2: Using the CyberGate Teams App
Section titled “Option 2: Using the CyberGate Teams App”A more convenient method is using the CyberGate for Microsoft Teams app. See the Appendix for installation and operating instructions.
Part 2: Multi-Device Configuration with AXIS Audio Manager Edge
Section titled “Part 2: Multi-Device Configuration with AXIS Audio Manager Edge”This section describes configuring multiple AXIS devices to receive simultaneous calls using AXIS Audio Manager Edge.
Note: This section assumes the AXIS C8110 Network Audio Bridge is already connected to the network, in factory defaults, and running the same firmware as the AXIS C1410 Network Mini Speaker.
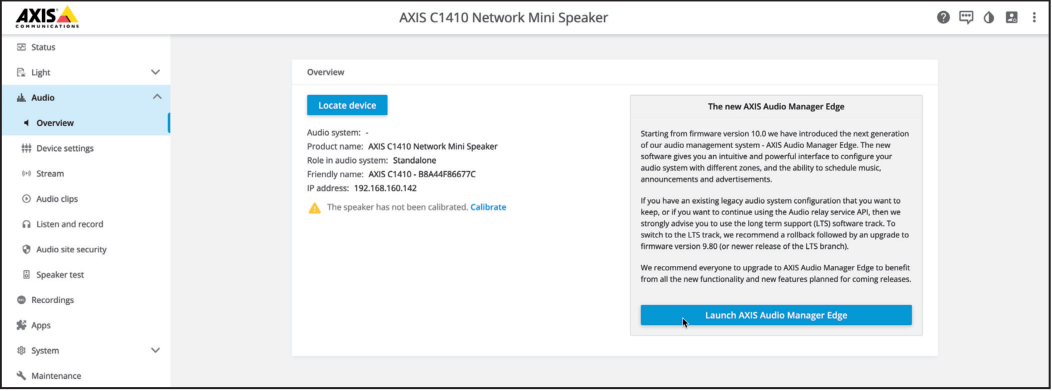
Step 1: Launch AXIS Audio Manager Edge
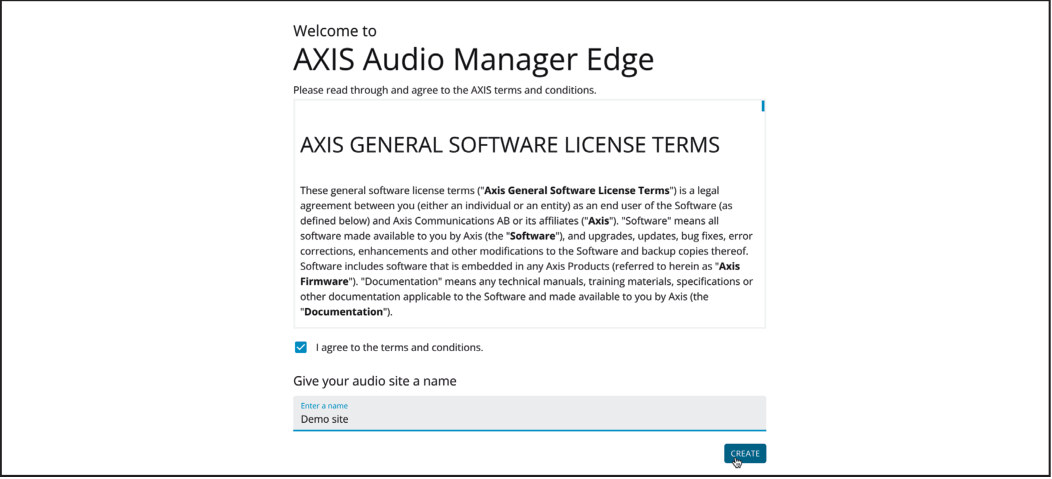
Section titled “Step 1: Launch AXIS Audio Manager Edge”From the AXIS C1410 (already connected to CyberGate), click the blue ‘Launch AXIS Audio Manager Edge’ button.
Name the audio site (e.g., Demo site).
Step 2: Create a Physical Zone
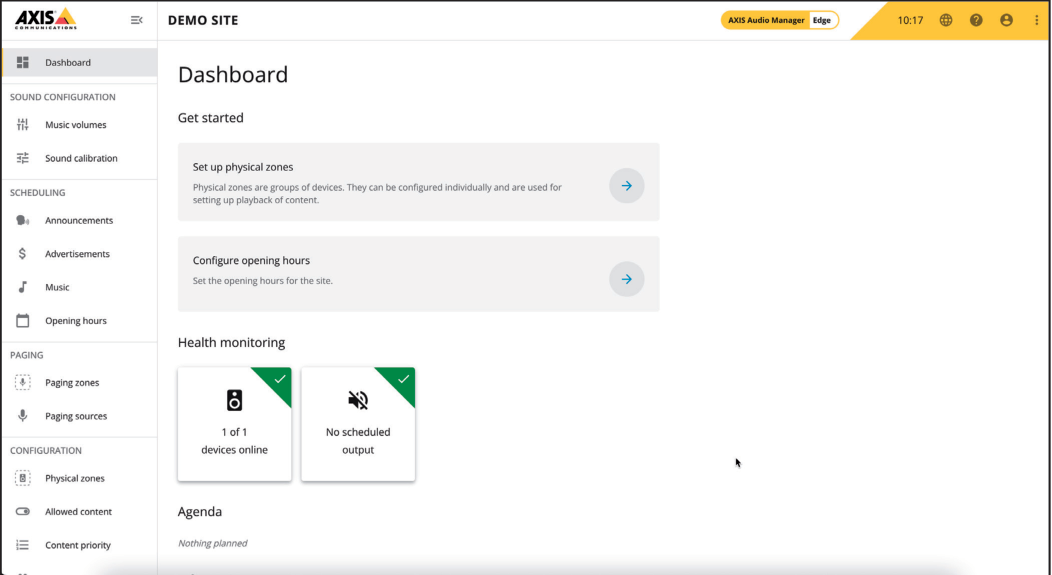
Section titled “Step 2: Create a Physical Zone”- After logging in, the dashboard is shown
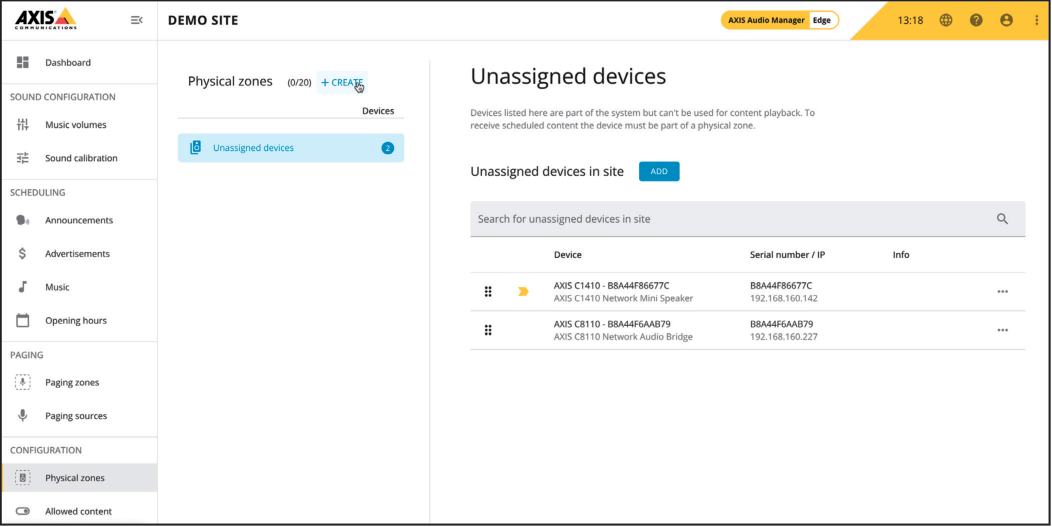
- Navigate to Configuration → Physical zones
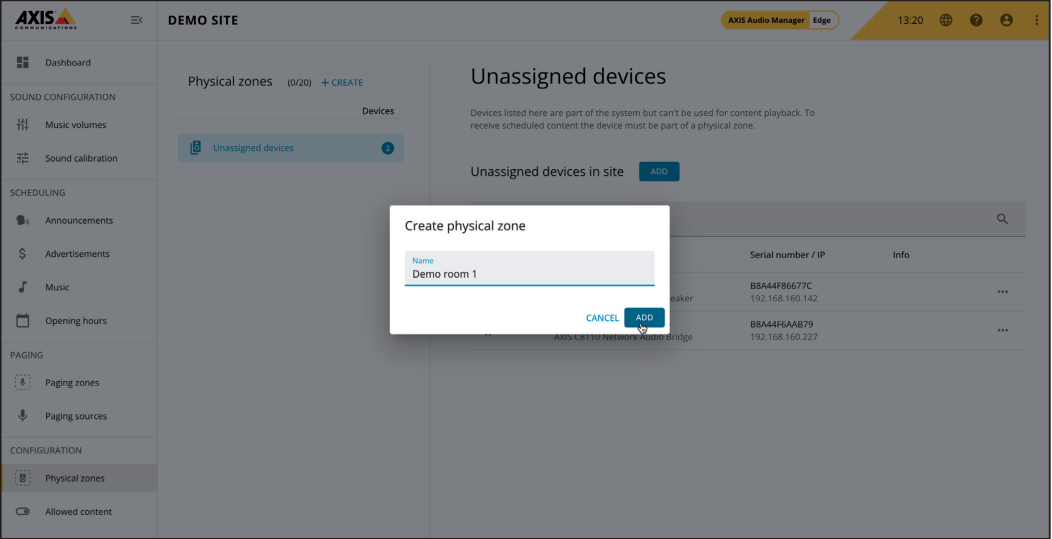
- Click ‘+CREATE’ to create a Physical zone
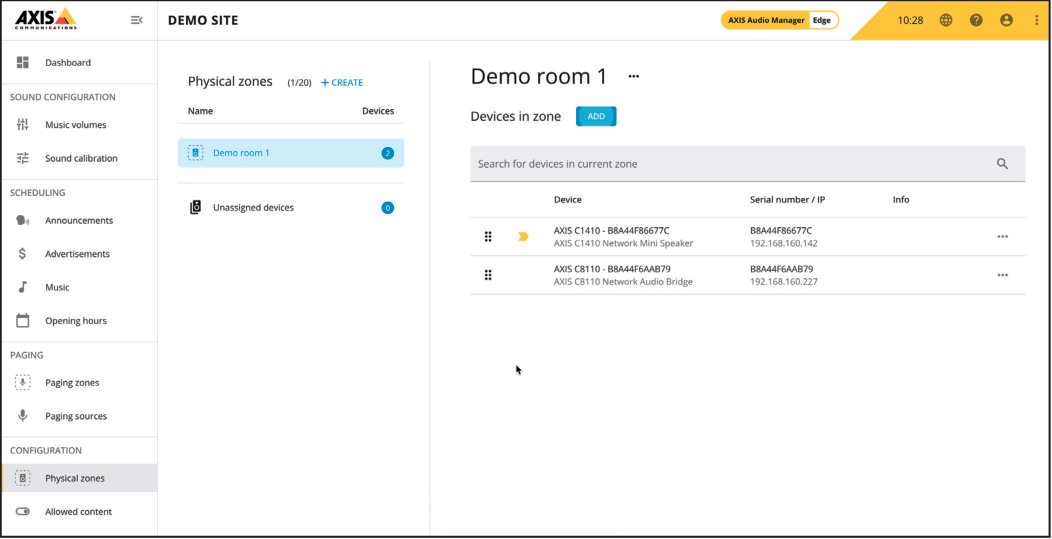
- Name the Physical zone (e.g.,
Demo room 1)
- Click ‘ADD’ to add devices to the Physical zone
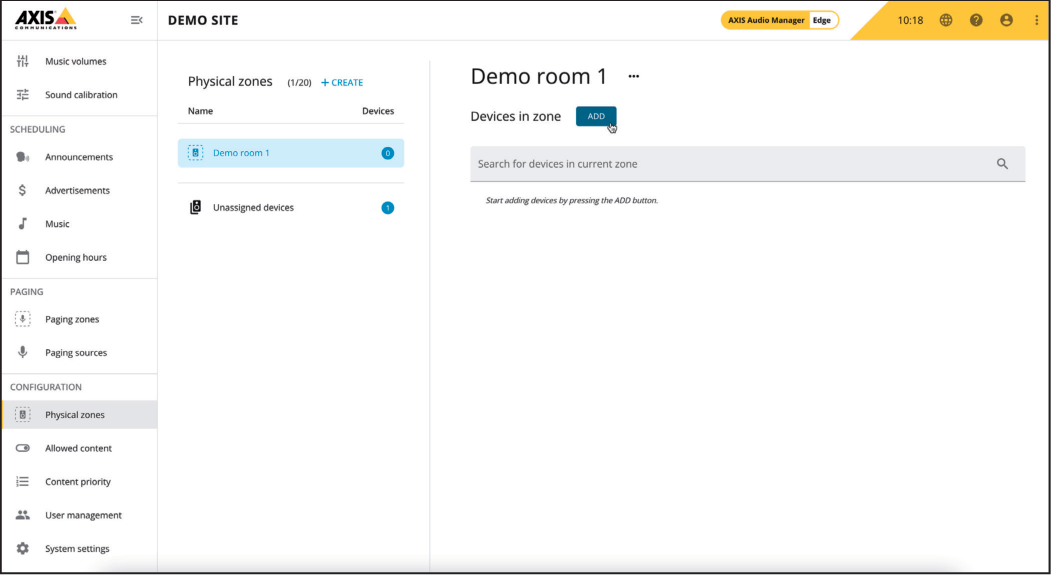
- Select the AXIS C1410 and AXIS C8110, then click ‘ADD’
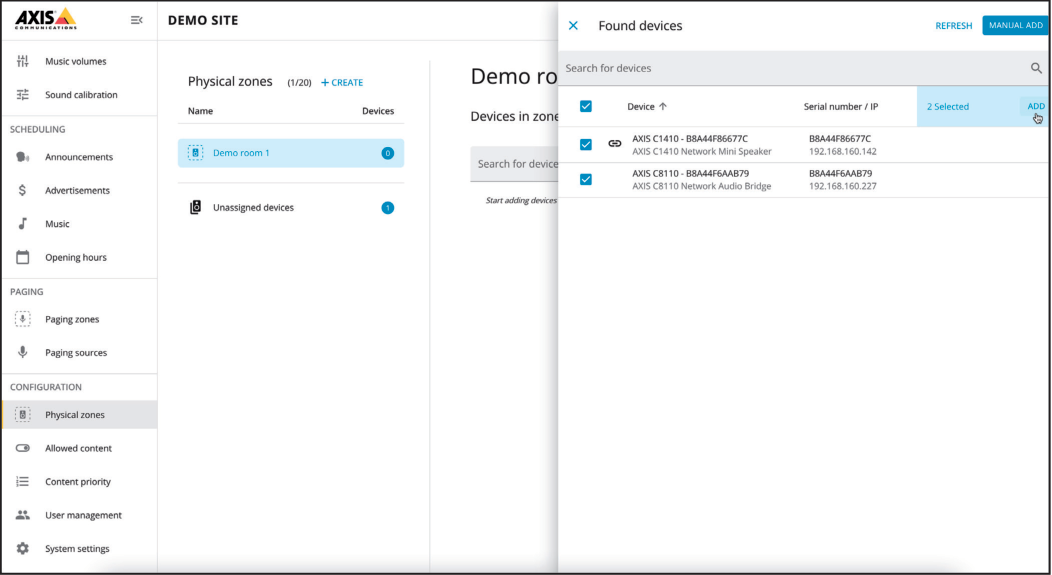
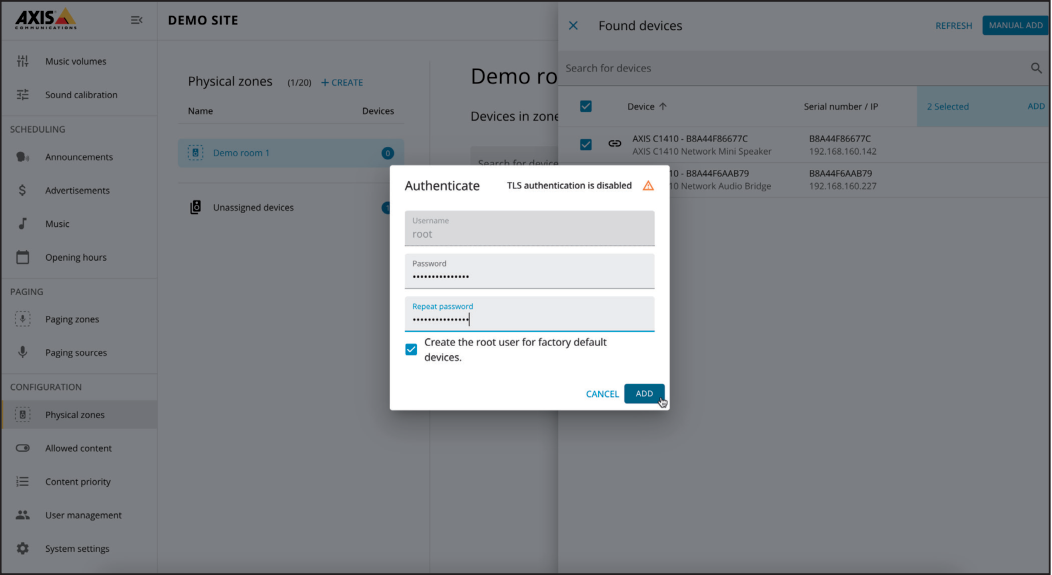
- Provide the passwords for the devices when prompted
The Physical zone is now created with both devices configured.
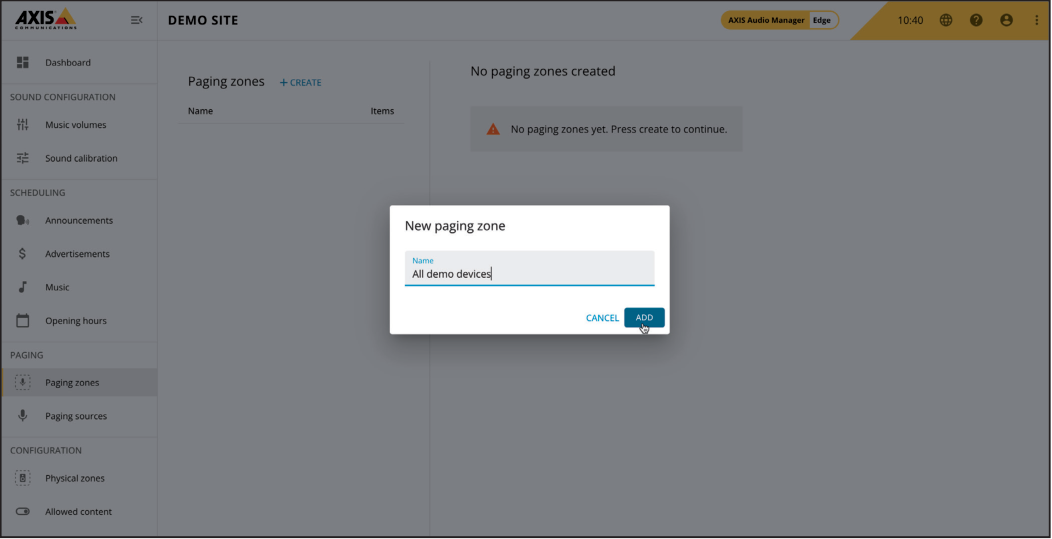
Step 3: Create a Paging Zone
Section titled “Step 3: Create a Paging Zone”- Navigate to Paging → Paging zones
- Click ‘+CREATE’ to create a new Paging zone
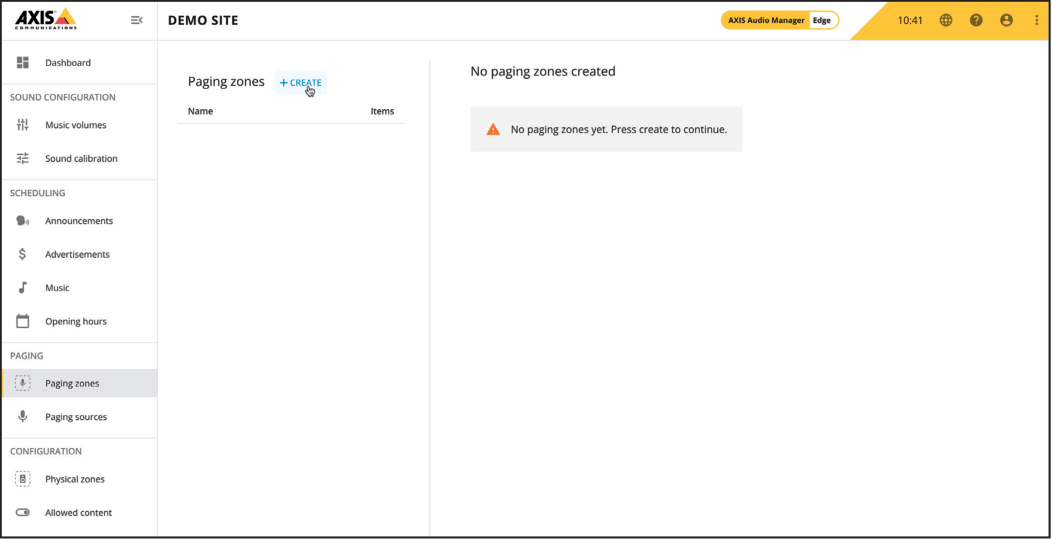
- Name the Paging zone (e.g.,
All demo devices)
- Click ‘ADD’ to add the Physical zone
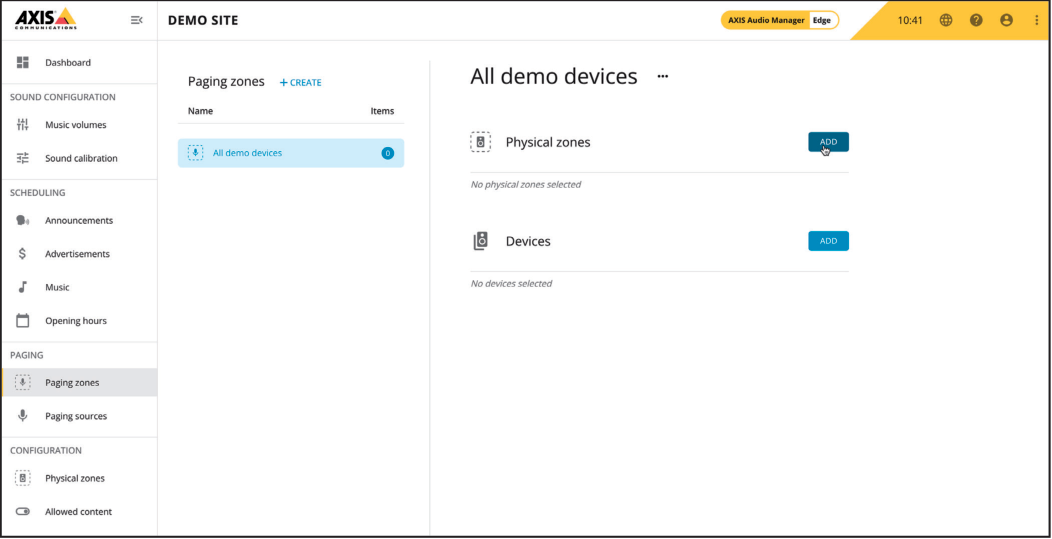
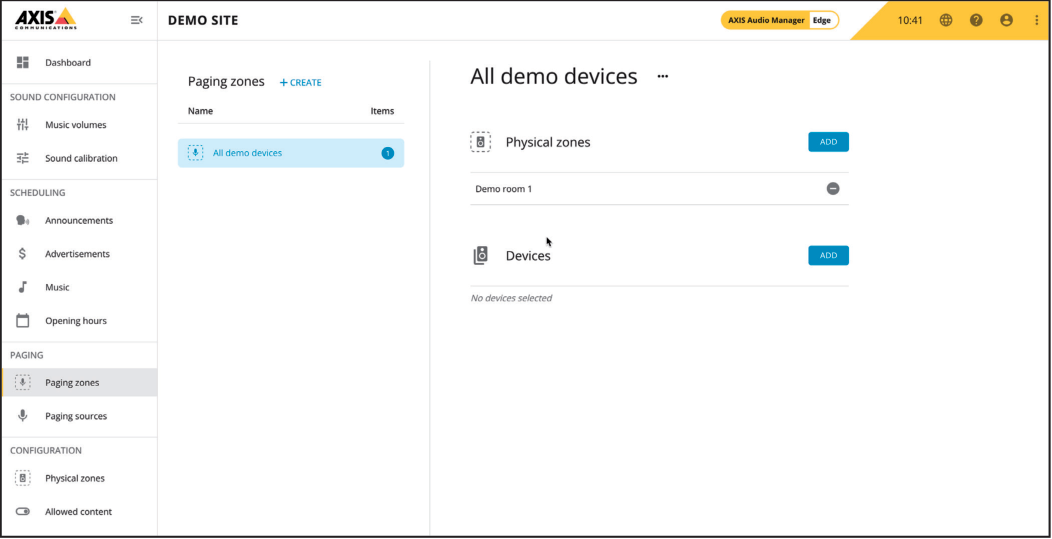
- Select the Physical zone you created
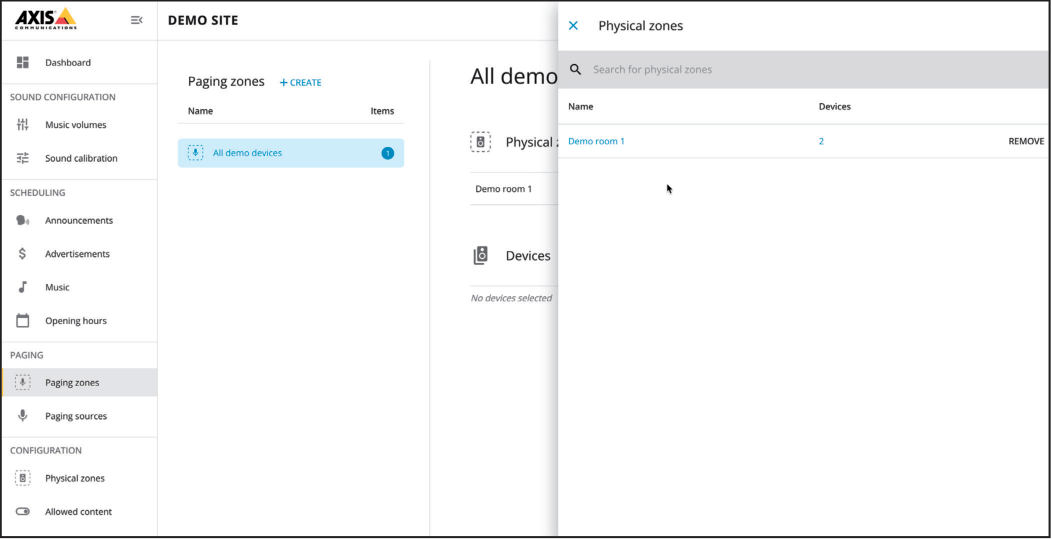
The Paging zone is now configured with the Physical zone.
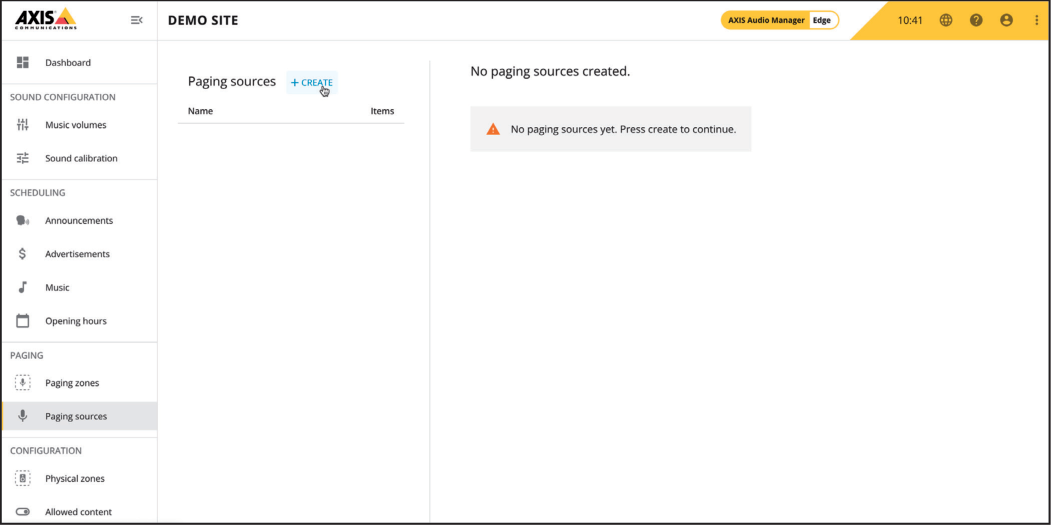
Step 4: Create a Paging Source
Section titled “Step 4: Create a Paging Source”- Navigate to Paging → Paging sources
- Click ‘+CREATE’ to create a new Paging source
Note: A Paging source is where the paging request originates. In this example, the AXIS C1410 is connected to CyberGate and serves as the paging source.
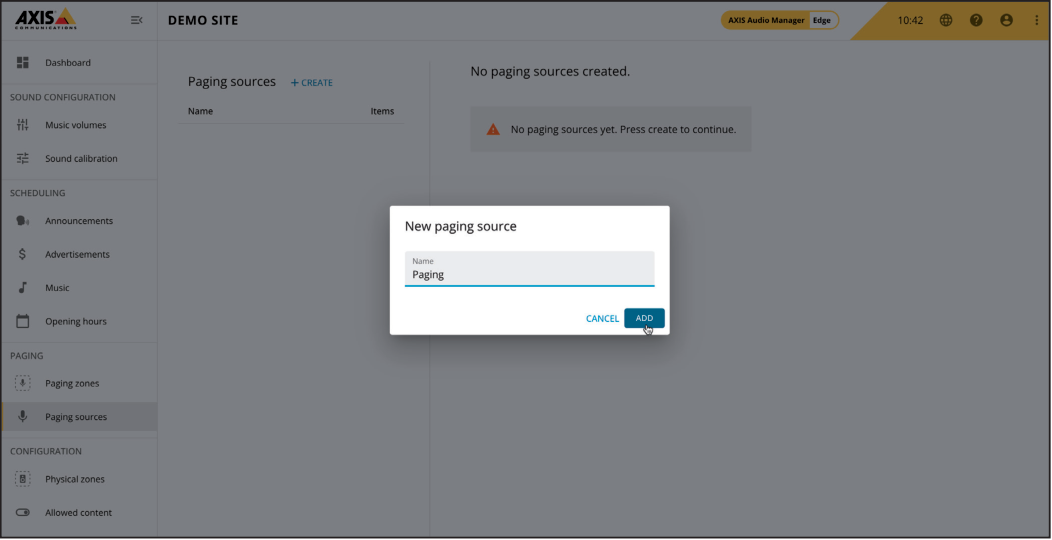
- Select ‘SIP Paging’ and name the source (e.g.,
Paging)
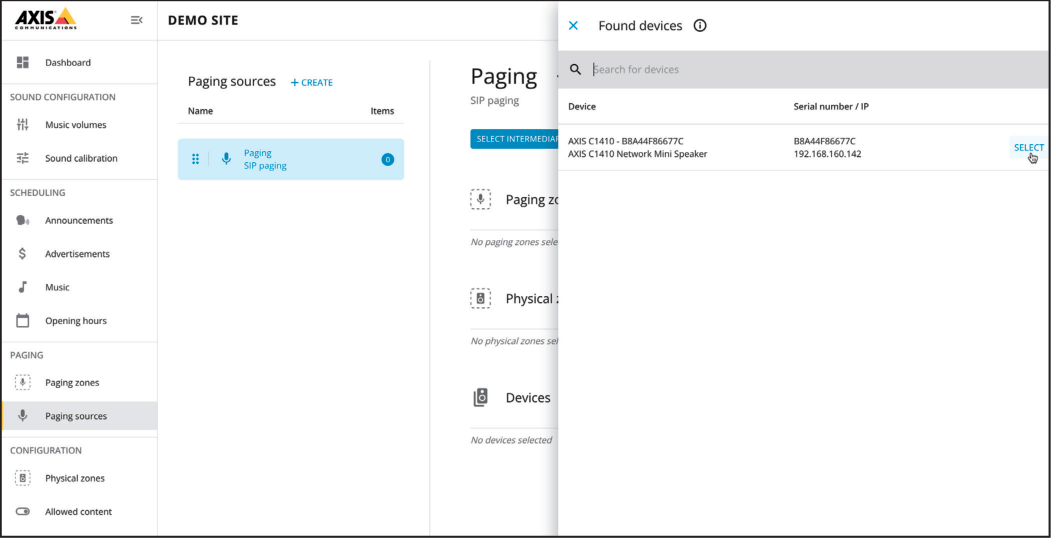
- Click ‘Select intermediary device’ and choose the AXIS C1410
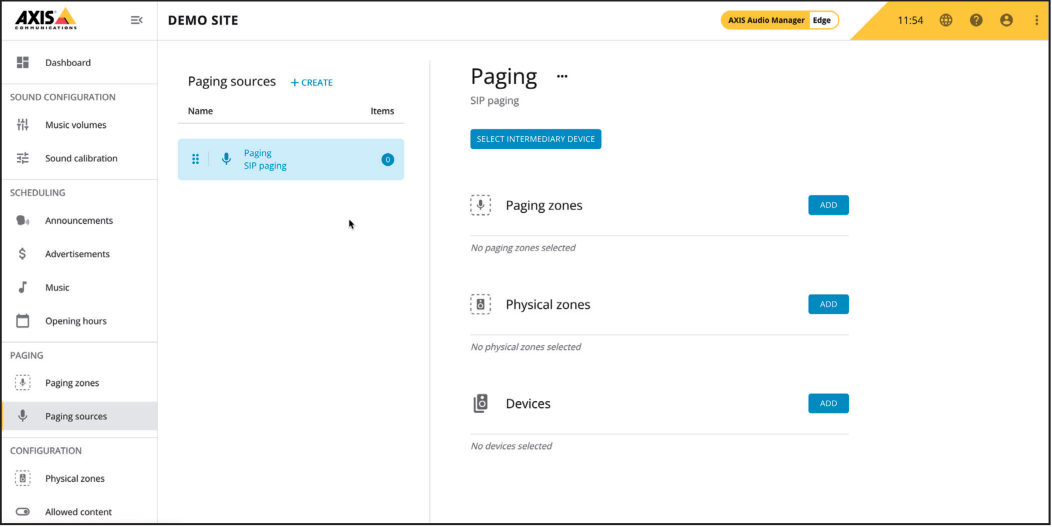
- Click ‘ADD’ to select the Paging zone to be paged
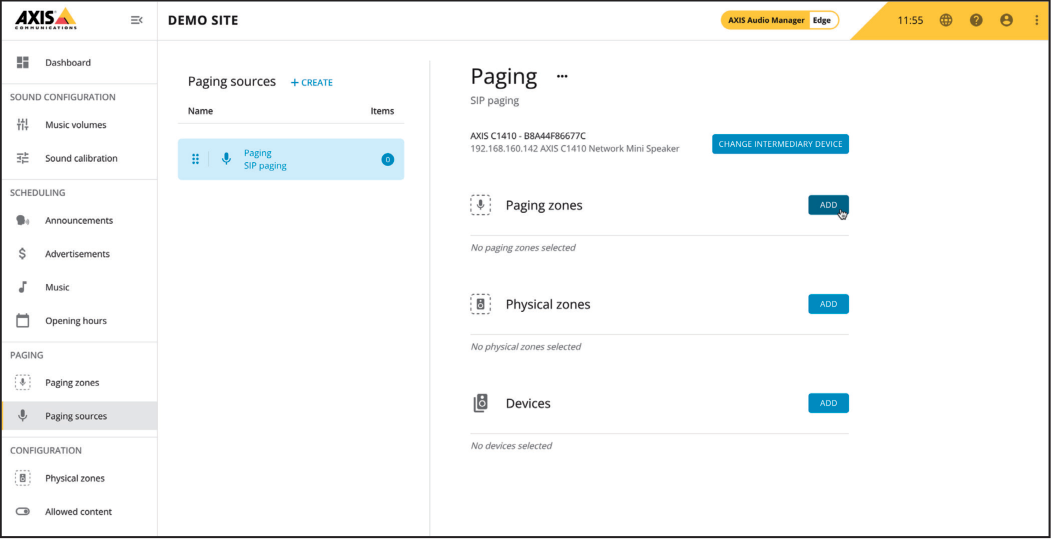
- Select the Paging zone
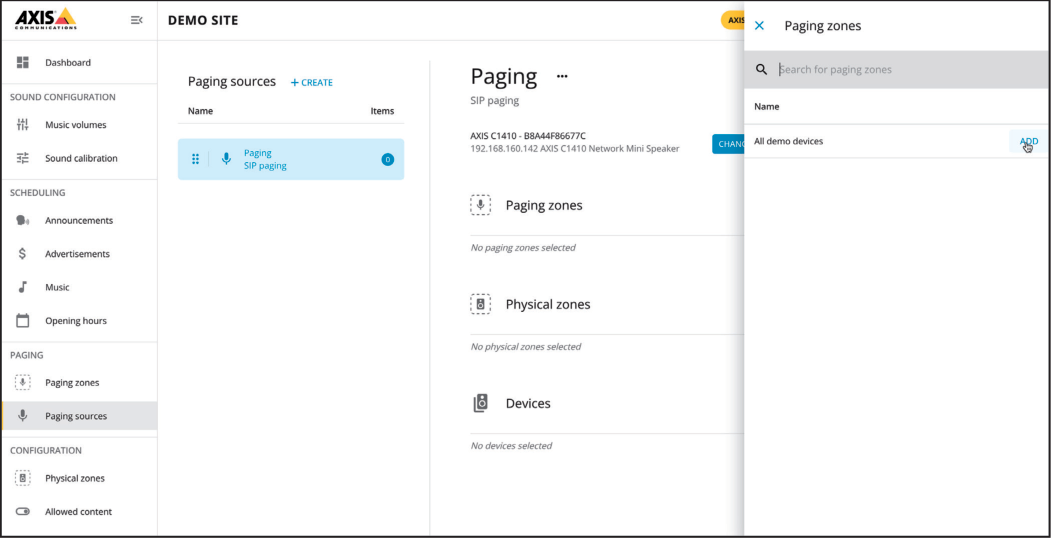
The basic configuration of AXIS Audio Manager Edge is now complete.

When you call the AXIS C1410 from Microsoft Teams, all audio devices configured in the Paging zone will sound simultaneously.
Note: AXIS Audio Manager Edge has many more features. For a complete instruction manual, visit: https://help.axis.com/en-us/axis-audio-manager-edge
Quick Reference
Section titled “Quick Reference”CyberGate Connection Details
Section titled “CyberGate Connection Details”| Setting | Value |
|---|---|
| Domain | cybergate.cybertwice.com |
| Registrar | cybergate.cybertwice.com |
| Transport (Standard) | TCP |
| Transport (Secure) | TLS |
| Media Encryption (Secure) | SRTP mandatory |
Audio Codec Priority
Section titled “Audio Codec Priority”| Priority | Codec |
|---|---|
| 1 | G.722 |
| 2 | Opus |
Teams User Address Format
Section titled “Teams User Address Format”username@cybergate.cybertwice.comReplace username with the Teams user’s email prefix (the part before @).
Appendix - CyberGate Teams App
Section titled “Appendix - CyberGate Teams App”Requirements
Section titled “Requirements”To use the CyberGate App, you need a subscription to one of the following CyberGate SaaS solutions:
- ✅ CyberGate for IP Cameras with Teams
- ✅ CyberGate for IP Paging with Teams
- ✅ CyberGate for IP Intercoms with Teams
App Features Overview
Section titled “App Features Overview”The CyberGate Teams app provides three main features:
| Feature | Description |
|---|---|
| Availability | Set your availability status in Multi-ring groups |
| Devices | View device status and initiate calls with one click |
| Door Open | Open doors during calls with a single button click |
Installation
Section titled “Installation”How to Install
Section titled “How to Install”-
Open Microsoft Teams and click on the ‘Apps’ button in the sidebar
-
Search for ‘cybergate’
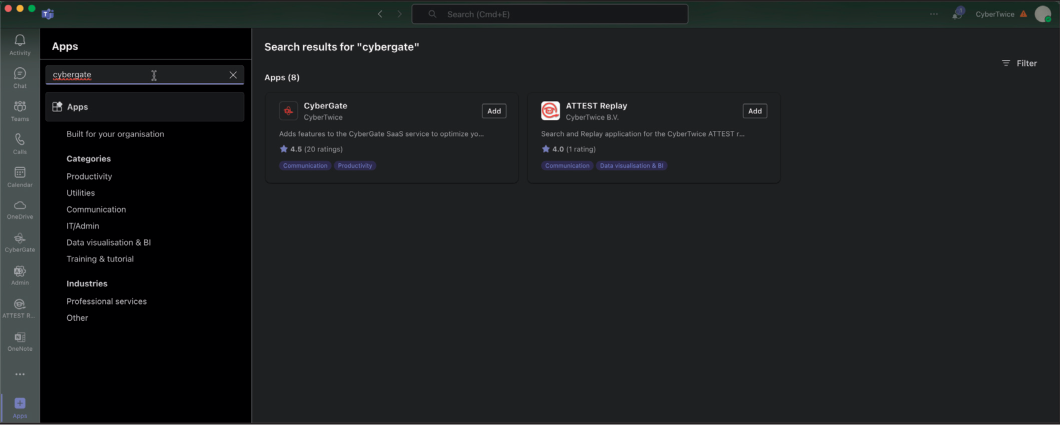
- Click ‘Add’ to add CyberGate to Microsoft Teams
Note: You may be asked to provide consent for basic permissions (View your basic profile, Maintain access to data you have given it access to). Accept these permissions to use the app.
-
After installation, the CyberGate app will open and show the availability menu
-
Pin the app (recommended): Right-click on the CyberGate icon and select ‘Pin’

Feature 1: Availability
Section titled “Feature 1: Availability”How It Works
Section titled “How It Works”The CyberGate app uses the same credentials as Microsoft Teams and automatically retrieves information about Multi-ring groups you belong to.
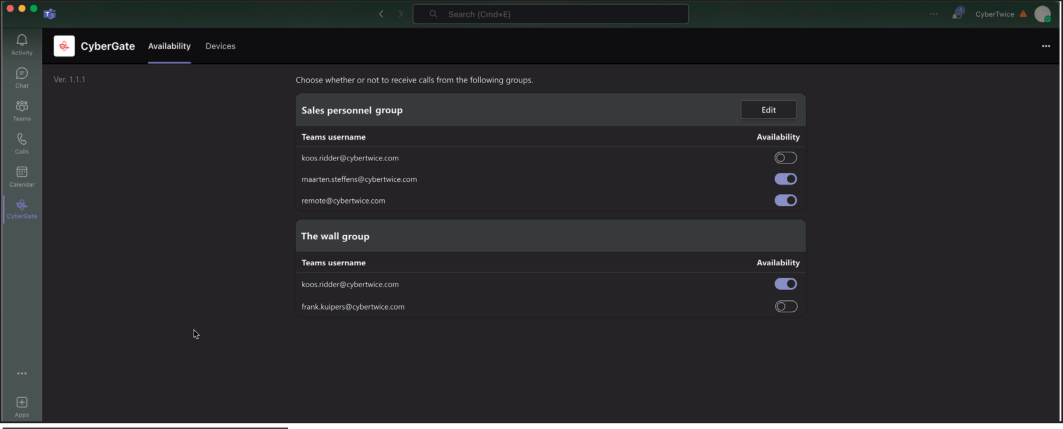
Example Scenario
Section titled “Example Scenario”In this example, the user koos.ridder@cybertwice.com is part of two Multi-ring groups:
| Group | Members | User Role |
|---|---|---|
| Sales personnel group | 3 users | Supervisor (*) |
| The wall group | 2 users | Normal user |
User Roles
Section titled “User Roles”| Role | Permissions |
|---|---|
| Supervisor | Can set availability for ALL users in the group, can add/remove users |
| Normal User | Can only set their OWN availability status |
Availability Status
Section titled “Availability Status”| Status | Effect |
|---|---|
| Available | You can be called by CyberGate |
| Unavailable | You won’t be called by CyberGate |
Note: Availability status changes take effect immediately.
Tip: To configure the supervisor role for a Multi-ring group, use the CyberGate Management Portal.
Feature 2: Devices
Section titled “Feature 2: Devices”How It Works
Section titled “How It Works”The Devices menu shows an overview of all configured devices in your Tenant, sorted by location. You can filter results to find specific devices.
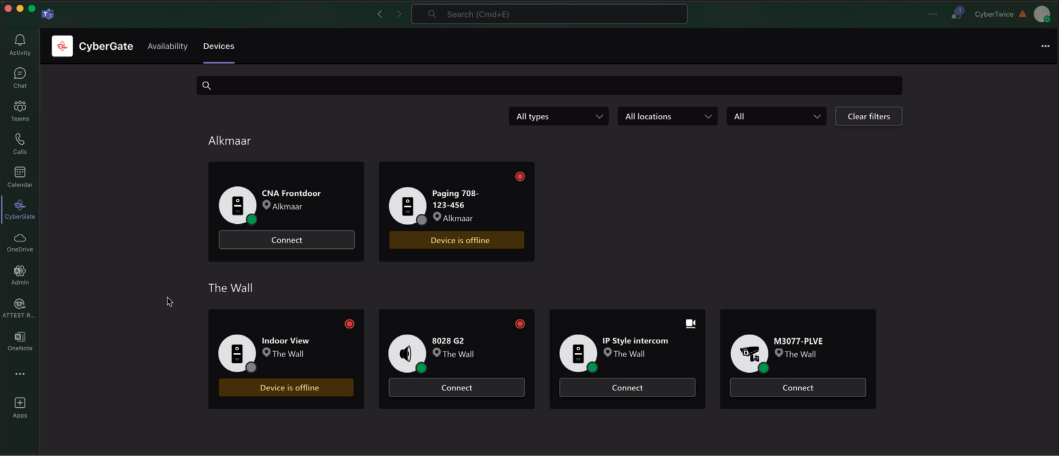
Device Tile Information
Section titled “Device Tile Information”Each device tile displays:
| Information | Description |
|---|---|
| Device Type | Intercom, camera, or audio/paging |
| Device Name | Configured name of the device |
| Online Status | Whether the device is online or offline |
| Recording Status | Whether recording is enabled |
| Two-Way Video | Whether two-way video is configured |
Connect Button
Section titled “Connect Button”If a device is configured to receive calls from Microsoft Teams, a Connect button will appear. Clicking this button initiates a call to the device.
Note: The devices shown to a user can be limited using the Device access settings in the CyberGate Management Portal.
Document History
Section titled “Document History”| Version | Date | Author | Change |
|---|---|---|---|
| 1.0.0 | 2023-06-06 | KR | Initial version |
| 1.0.1 | 2024-10-09 | KR | Modified screenshots |
| 1.0.2 | 2024-11-13 | KR | Fixed text and added CyberGate app appendix |