Robin SIP Intercom
Version: 1.0.7 ENG
Date: August 13, 2025
Product: CyberTwice CyberGate with Robin SIP Intercom
Robin SIP Intercom Overview
Section titled “Robin SIP Intercom Overview”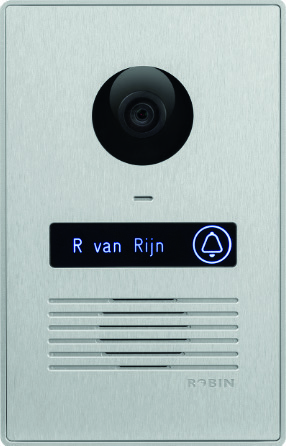
This document uses the Robin ProLine SIP Compact 5 MP IP camera Silver as the reference device. All Robin SIP Intercoms with a built-in camera running firmware version 3.6.10 or higher can connect to CyberGate.
Note: This manual covers the standard Robin Intercoms. For the special “For Teams” editions of Robin intercoms, use the manual available at: https://support.cybertwice.com/knowledgebase.php?article=4
Document Contents
Section titled “Document Contents”| Section | Description |
|---|---|
| Configuration Steps | Steps to configure the Robin for CyberGate |
| Testing the Configuration | How to verify the setup works |
| Appendix: CyberGate App | Installation and usage of the CyberGate Teams app |
CyberGate Teams App Features
Section titled “CyberGate Teams App Features”The CyberGate app for Microsoft Teams provides:
- 🚪 Open door — Click a button to open the intercom door during a call
- 📊 Device status — View device online/offline status and initiate calls with one click
- 👥 Availability — Set your status in CyberGate Multi-ring groups
Recommendation: Installation of the CyberGate app for Microsoft Teams is highly recommended.
Configuration Steps
Section titled “Configuration Steps”Step 1: Connect to the Robin
Section titled “Step 1: Connect to the Robin”- Connect the Robin to the network
- Power it on
- Open a web browser and navigate to the device’s IP address
- Login as ‘admin’ with the configured or default password (
123qwe) - Click ‘Login’

After successful login, you’ll be redirected to the Telephony → SIP page.
Step 2: Configure SIP Settings
Section titled “Step 2: Configure SIP Settings”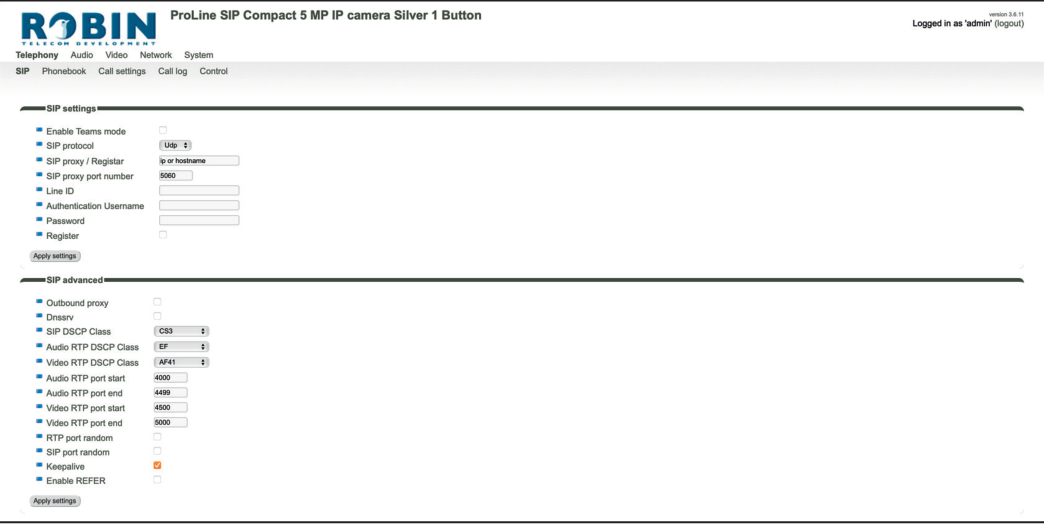
Configure the following settings:
SIP Settings
Section titled “SIP Settings”| Field | Value |
|---|---|
| Enable Teams mode | ✅ Enable (check the checkbox) |
| SIP protocol | TCP |
| SIP proxy / Registrar | cybergate.cybertwice.com |
| Line ID | Define a name (one word) for the intercom (e.g., Frontdoor) |
| Authentication Username | Use the Username from CyberGate service |
| Password | Use the Password from CyberGate service |
| Register | ✅ Enable (check the checkbox) |
SIP Advanced
Section titled “SIP Advanced”| Field | Value |
|---|---|
| Outbound proxy | ✅ Enable (check the checkbox) |
| Outbound proxy host | cybergate.cybertwice.com |
Click ‘Apply settings’.
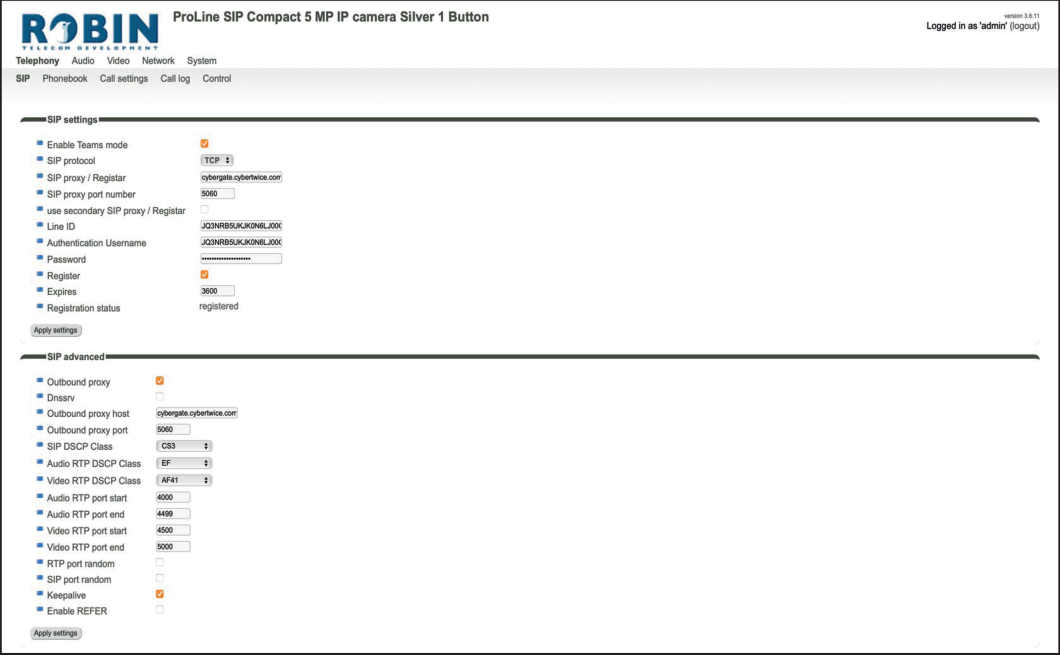
At ‘SIP settings’, the Registration status should change to ‘Registered’.
Troubleshooting: If the status doesn’t show ‘Registered’, check the account and server details for possible typos.
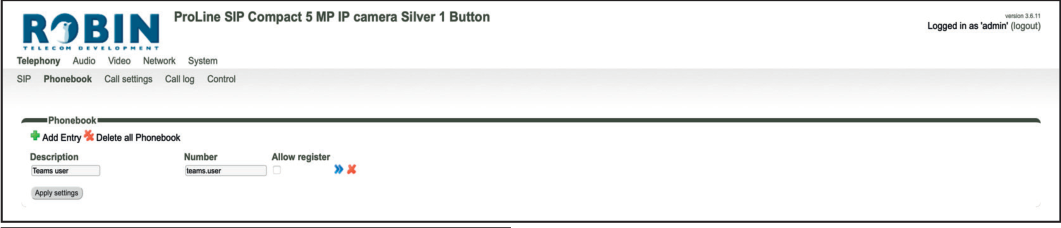
Step 3: Configure Phonebook Entry
Section titled “Step 3: Configure Phonebook Entry”- Navigate to Telephony → Phonebook
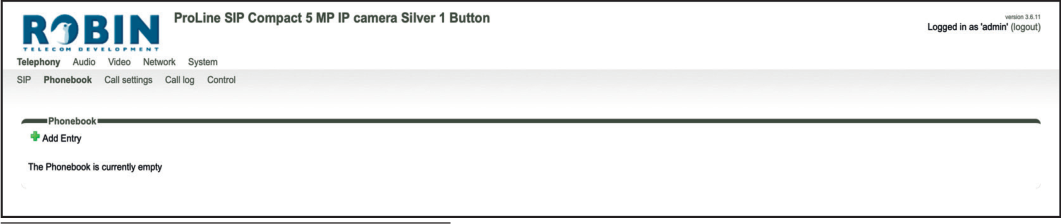
- Click the ’+’ symbol to add a phonebook entry
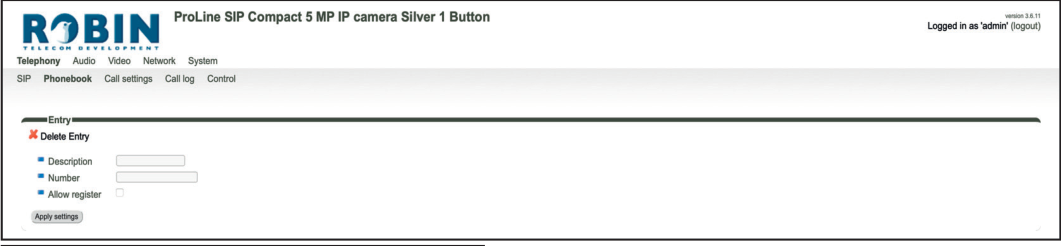
- Configure the following:
| Field | Value |
|---|---|
| Description | Name of the recipient (e.g., Teams user) |
| Number | Teams user address (either name.name@domain.com or just name.name) |
- Click ‘Apply settings’
Step 4: Configure Call Settings
Section titled “Step 4: Configure Call Settings”- Navigate to Telephony → Call settings
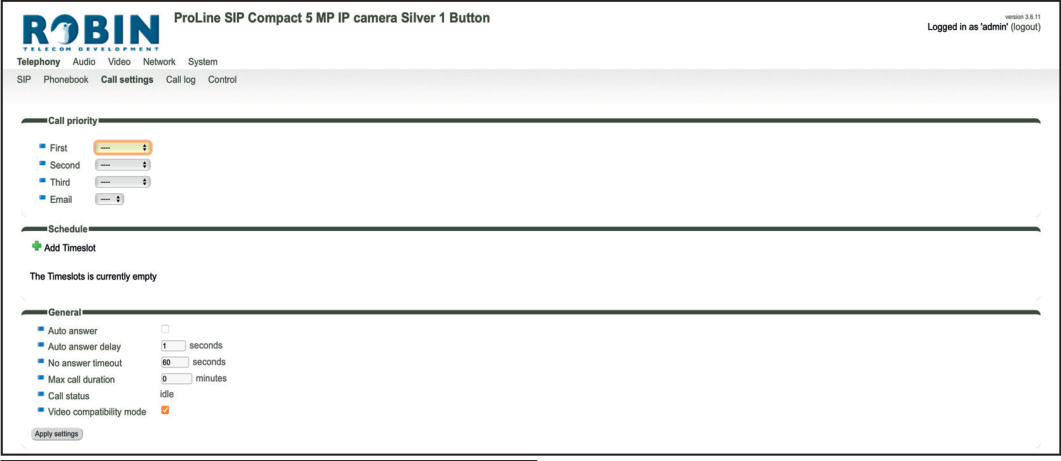
- Configure the call priority:
| Field | Value |
|---|---|
| First | Select the Teams user to call when the button is pressed |

The basic configuration of the Robin is now complete!
Testing the Configuration
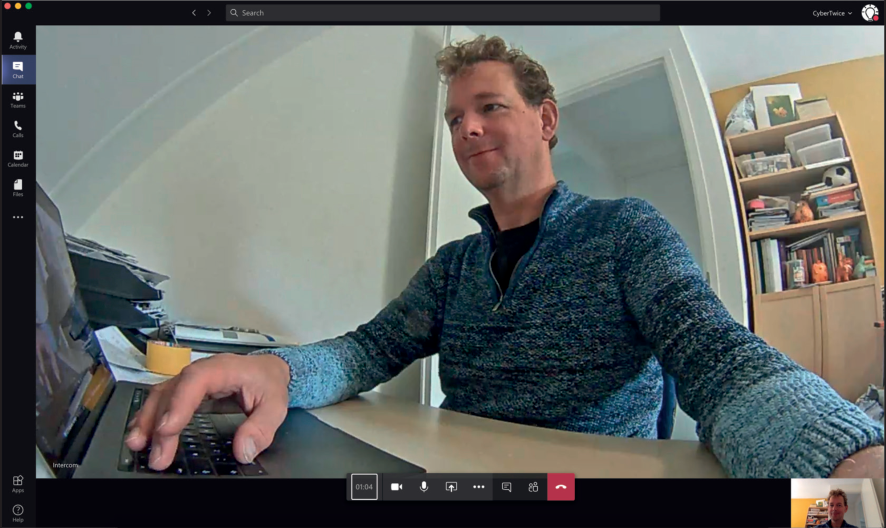
Section titled “Testing the Configuration”Making a Test Call
Section titled “Making a Test Call”-
Press the button on the Robin to initiate a call to the configured Teams user
-
If configured correctly, the Teams client will notify you of an incoming call
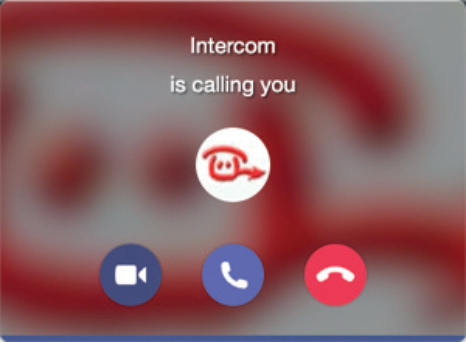
-
Answer the call by clicking the camera symbol
-
The call will be established and video will display within approximately 3 seconds
Opening the Door During a Call
Section titled “Opening the Door During a Call”-
Click on the Dial pad symbol in the Teams call screen
-
Use the default DTMF code
##to trigger the relay in the Robin and open the door
Quick Reference
Section titled “Quick Reference”CyberGate Connection Details
Section titled “CyberGate Connection Details”| Setting | Value |
|---|---|
| SIP proxy / Registrar | cybergate.cybertwice.com |
| Outbound proxy host | cybergate.cybertwice.com |
| SIP protocol | TCP |
| Default door open code | ## |
Appendix - CyberGate Teams App
Section titled “Appendix - CyberGate Teams App”Requirements
Section titled “Requirements”To use the CyberGate App, you need:
-
A subscription to one of the following CyberGate SaaS solutions:
- ✅ CyberGate for IP Cameras with Teams
- ✅ CyberGate for IP Paging with Teams
- ✅ CyberGate for IP Intercoms with Teams
-
Access to the Microsoft Teams admin portal
App Features Overview
Section titled “App Features Overview”The CyberGate Teams app provides three main features:
| Feature | Description |
|---|---|
| Availability | Set your availability status in Multi-ring groups |
| Devices | View device status and initiate calls with one click |
| Door Open | Open doors during calls with a single button click |
Installation
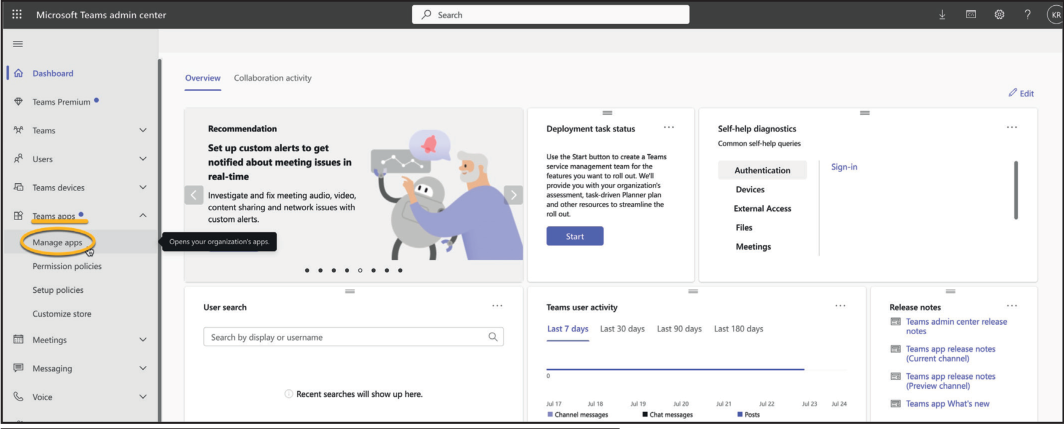
Section titled “Installation”How to Install (Admin Portal Method)
Section titled “How to Install (Admin Portal Method)”- Log in to the Microsoft Teams Admin Portal: https://admin.teams.microsoft.com
- Navigate to Teams apps → Manage apps
- Search for ‘CyberGate’ using the search box
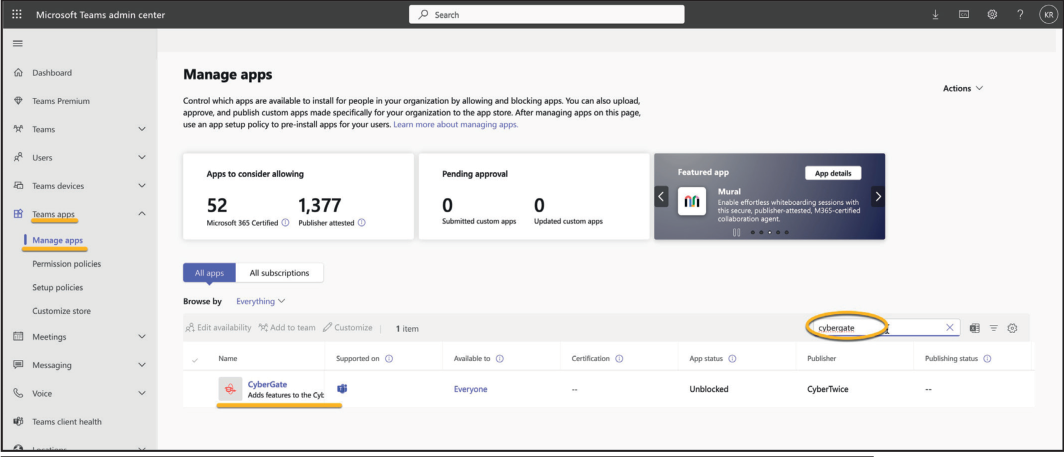
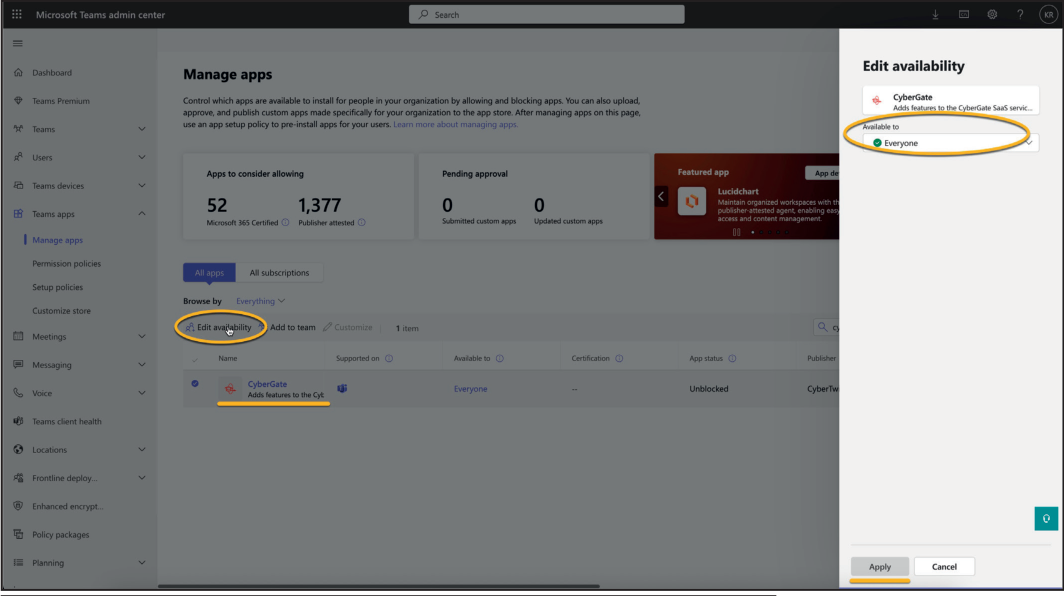
-
Select ‘CyberGate’ and click ‘Edit availability’
-
Set availability to ‘Everyone’ and click ‘Apply’
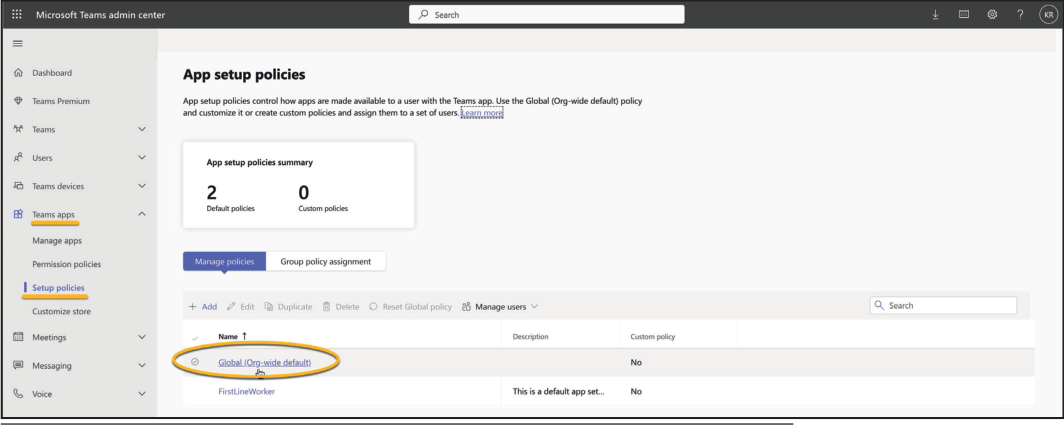
- Navigate to Teams apps → Setup policies
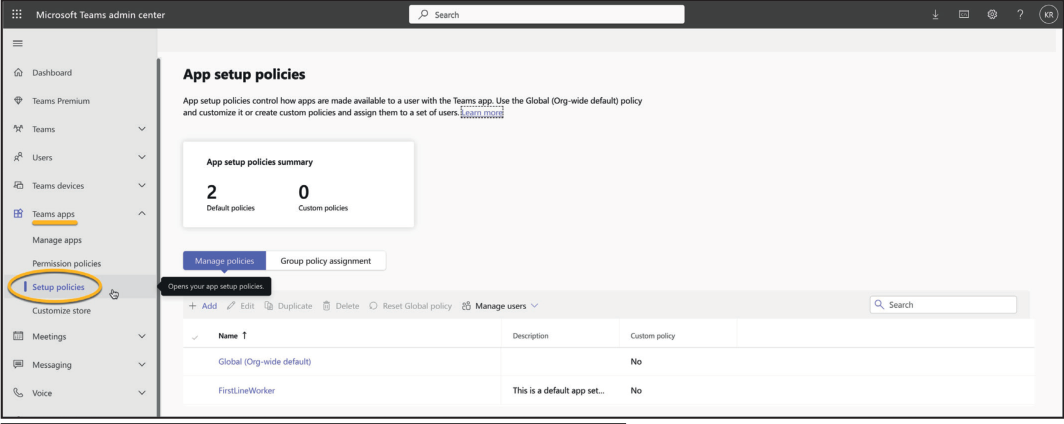
- Select the policy ‘Global (Org-wide default)’
- At ‘Installed apps’, click ‘Add apps’ and search for CyberGate
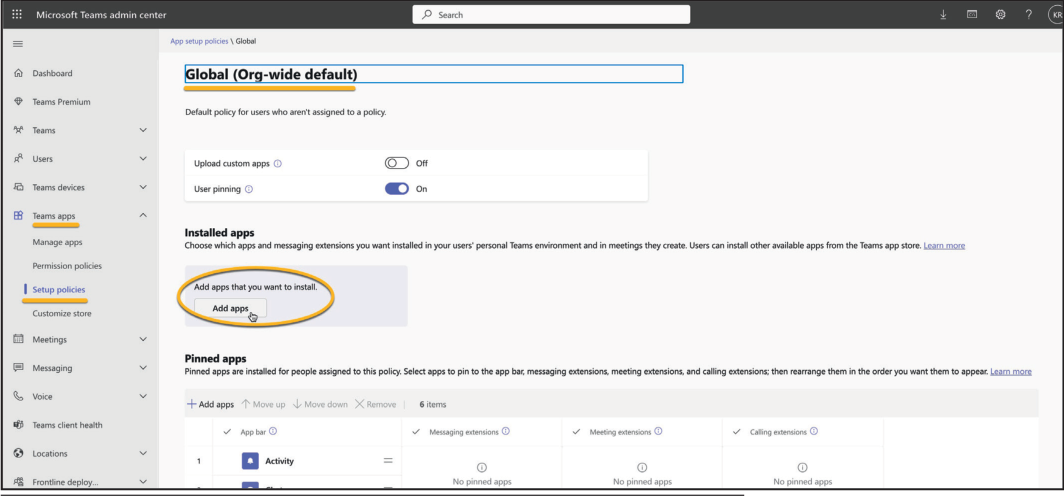
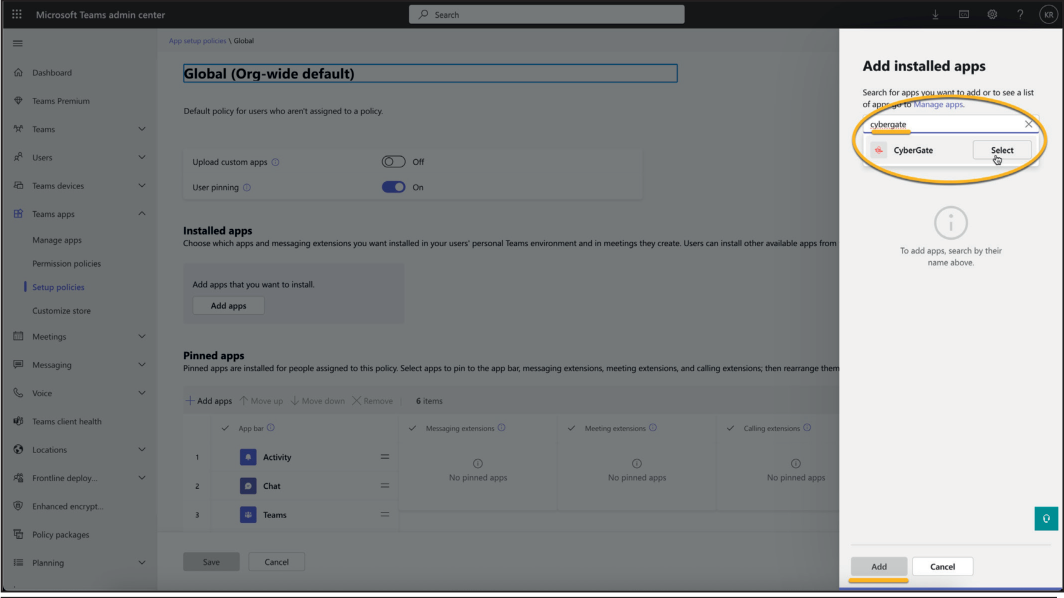
- At ‘Pinned apps’, click ‘Add apps’ and add CyberGate
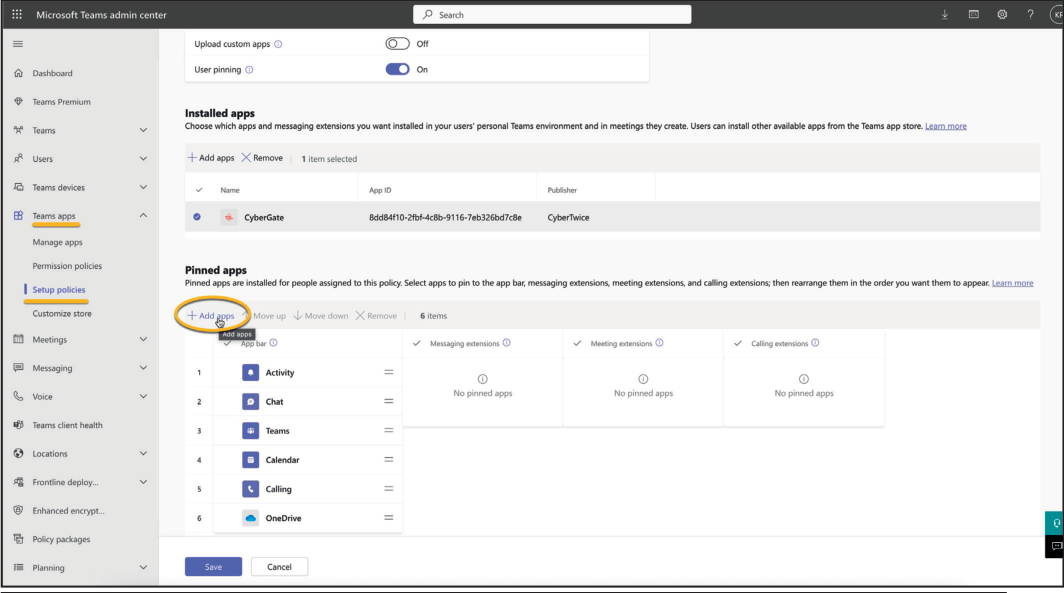
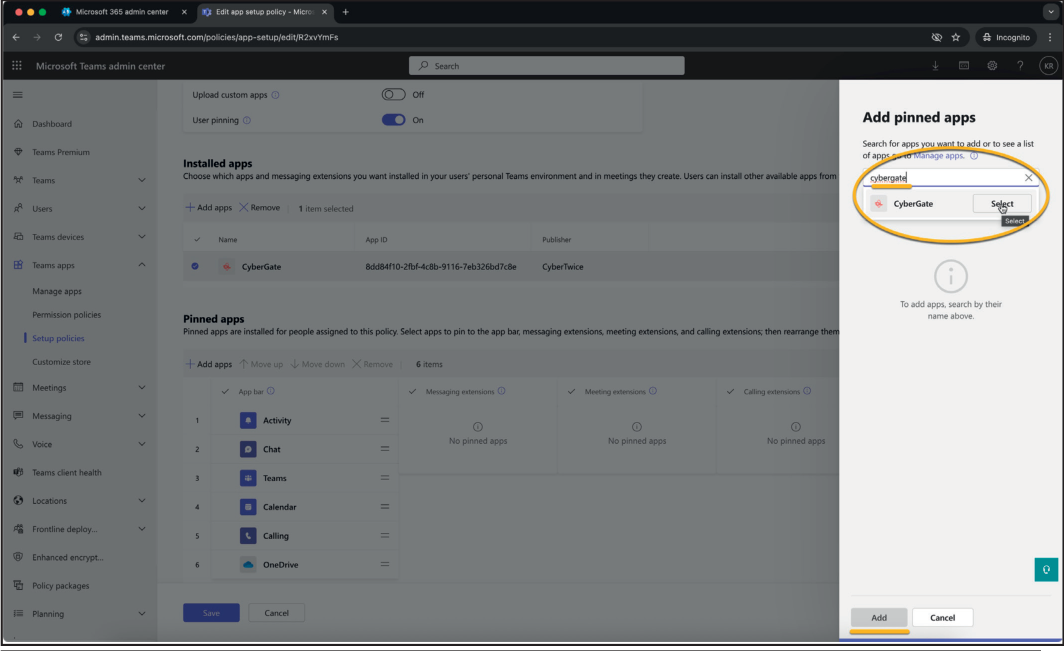
- The CyberGate app will show as pinned in the App bar and in ‘Calling extensions’
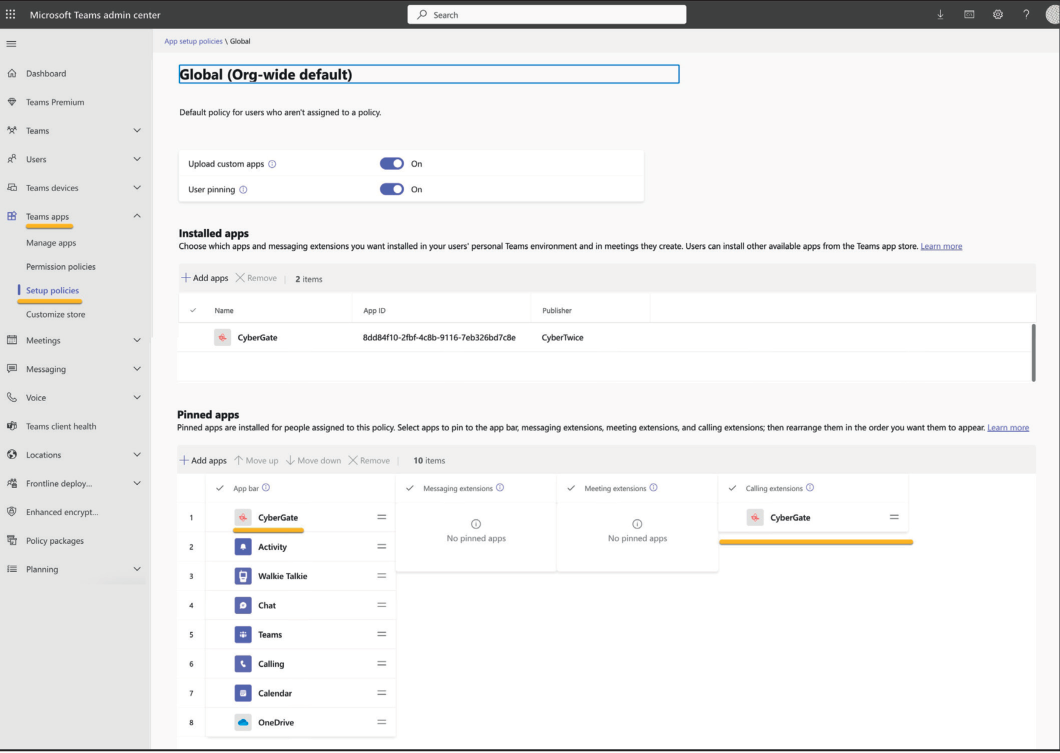
Note: The policy change will take up to 24 hours. After that, the CyberGate app will be available for Teams users in the organisation.
Feature 1: Availability
Section titled “Feature 1: Availability”How It Works
Section titled “How It Works”The CyberGate app uses the same credentials as Microsoft Teams and automatically retrieves information about Multi-ring groups you belong to.
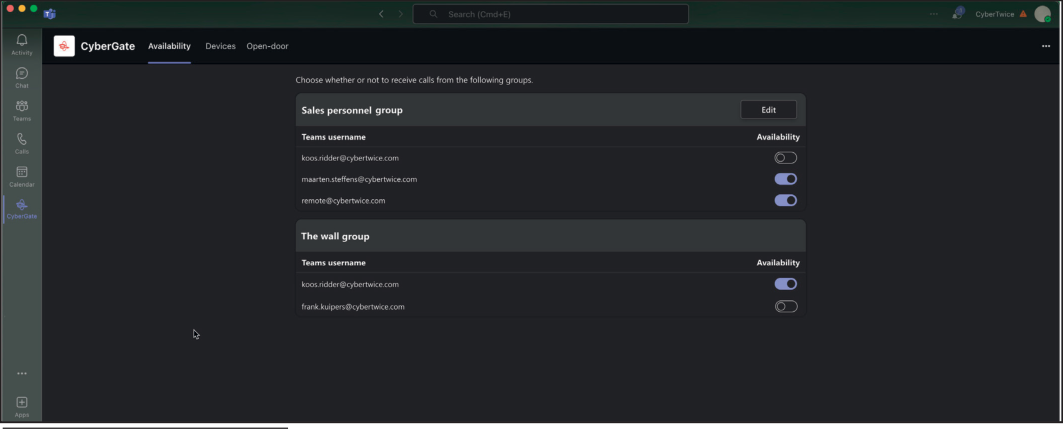
Example Scenario
Section titled “Example Scenario”In this example, the user koos.ridder@cybertwice.com is part of two Multi-ring groups:
| Group | Members | User Role |
|---|---|---|
| Sales personnel group | 3 users | Supervisor (*) |
| The wall group | 2 users | Normal user |
User Roles
Section titled “User Roles”| Role | Permissions |
|---|---|
| Supervisor | Can set availability for ALL users in the group, can add/remove users |
| Normal User | Can only set their OWN availability status |
Availability Status
Section titled “Availability Status”| Status | Effect |
|---|---|
| Available | You can be called by CyberGate |
| Unavailable | You won’t be called by CyberGate |
Note: Availability status changes take effect immediately.
Tip: To configure the supervisor role for a Multi-ring group, use the CyberGate Management Portal.
Feature 2: Devices
Section titled “Feature 2: Devices”How It Works
Section titled “How It Works”The Devices menu shows an overview of all configured devices in your Tenant, sorted by location. You can filter results to find specific devices.
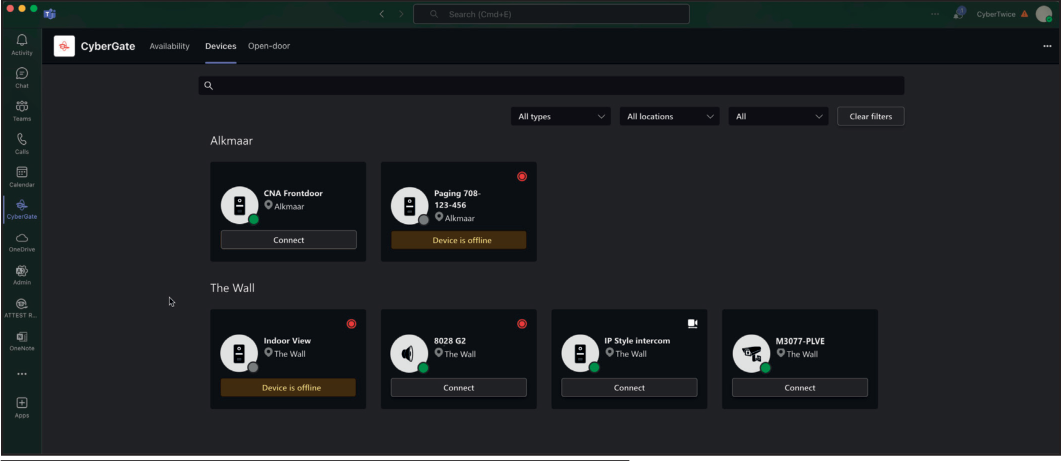
Device Tile Information
Section titled “Device Tile Information”Each device tile displays:
| Information | Description |
|---|---|
| Device Type | Intercom, camera, or audio/paging |
| Device Name | Configured name of the device |
| Online Status | Whether the device is online or offline |
| Recording Status | Whether recording is enabled |
| Two-Way Video | Whether two-way video is configured |
Connect Button
Section titled “Connect Button”If a device is configured to receive calls from Microsoft Teams, a Connect button will appear. Clicking this button initiates a call to the device.
Note: The devices shown to a user can be limited using the Device access settings in the CyberGate Management Portal.
Feature 3: Door-Open Button
Section titled “Feature 3: Door-Open Button”Introduction
Section titled “Introduction”During a call between the intercom and a Teams user, you can easily open the door by clicking a button on the sidebar.
How to Activate
Section titled “How to Activate”Step 1: Configure Open Door Code
Section titled “Step 1: Configure Open Door Code”-
Log in to the CyberGate Management Portal
-
Navigate to Basic → Device
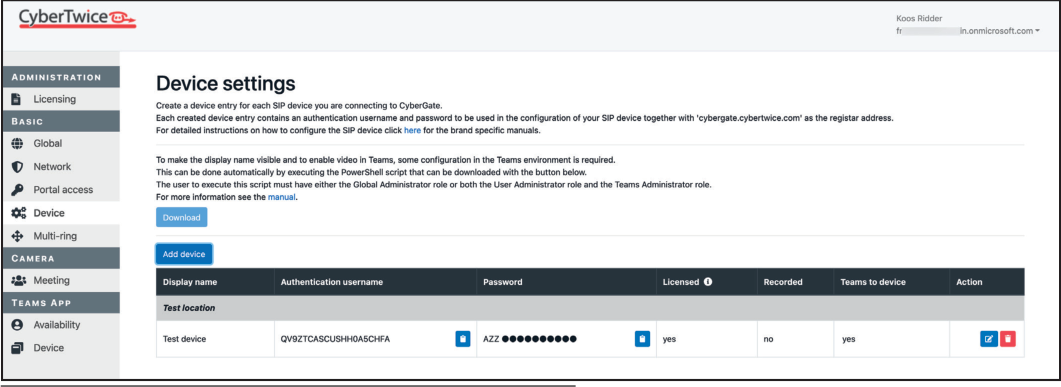
-
Click the blue edit button to open device details
-
Fill in the ‘Open door code’
Important: The ‘Open door code’ must match the configured open door code in the intercom device!
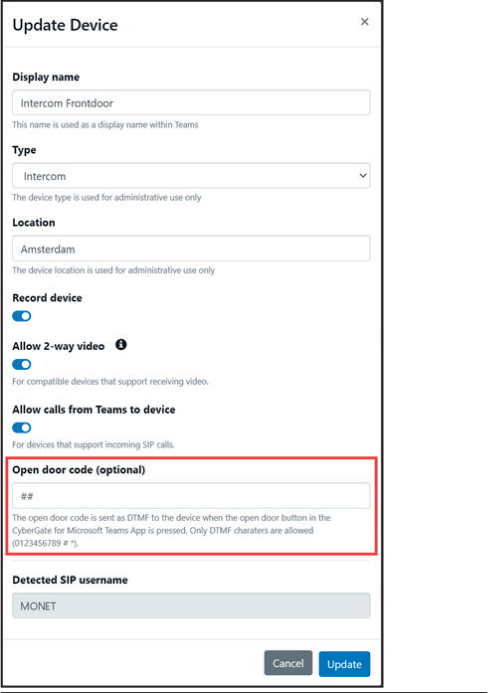
- Click the blue ‘Update’ button
Step 2: Use the Door-Open Button
Section titled “Step 2: Use the Door-Open Button”-
During a call from the intercom, click on the CyberGate logo in the top bar
-
A side panel will open revealing the Open door button
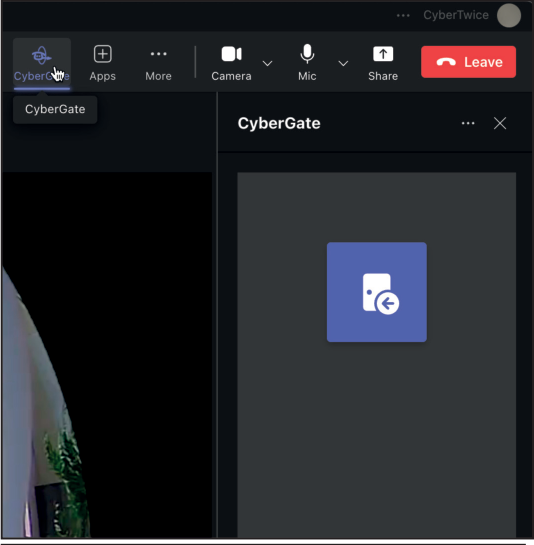
-
Click the button to open the door
-
End the call when finished
Note: The Open door button is available automatically during intercom calls.
Document History
Section titled “Document History”| Version | Date | Author | Change |
|---|---|---|---|
| 1.0.3 | 2022-02-14 | KR | Fixed typos |
| 1.0.4 | 2024-10-14 | KR | Fixed text and screenshots |
| 1.0.5 | 2024-11-05 | KR | Fixed text and added “CyberGate app” appendix |
| 1.0.6 | 2025-05-02 | KR | Modified layout |
| 1.0.7 | 2025-08-13 | KR | Update CyberGate app appendix |