CyberGate How-To
Version: 1.5.1 ENG
Date: November 17, 2025
Product: CyberTwice CyberGate
Introduction
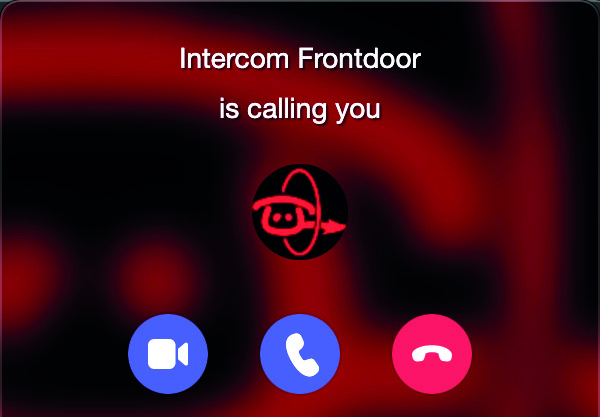
Section titled “Introduction”With CyberGate you can connect a SIP audio or video intercom, a SIP pager, or SIP camera to your Microsoft Teams environment.
Teams users can:
- Answer incoming calls or initiate outgoing calls
- Experience 2-way audio and live video on Teams desktop client, Teams desk phone, and the Teams smartphone app
- Control relay switches on devices (e.g., to open a door or gate)
About This Manual
Section titled “About This Manual”This manual describes the procedure to purchase and configure CyberGate. Follow the three main steps to get CyberGate up and running in the default configuration.
Quick Start Steps
Section titled “Quick Start Steps”| Step | Description |
|---|---|
| Step 1 | Purchase CyberGate |
| Step 2 | Configure in Management Portal |
| Step 3 | Configure Your Device |
Appendices
Section titled “Appendices”| Appendix | Topic |
|---|---|
| A | How to Use the CyberGate Management Portal |
| B | Configure the Display Name of the Device |
| C | Call Recording |
| D | Network Requirements |
Note: The configuration of the intercom, pager, speaker, camera, or amplifier is not described in this manual as each compatible device has its own manual. Device configuration manuals can be found at: https://support.cybertwice.com
Prerequisites
Section titled “Prerequisites”To purchase and use CyberGate, the following prerequisites apply:
- ✅ Microsoft Office 365 Business subscription with Teams
- ✅ A device (IP Intercom, IP Pager, IP Camera) compatible with CyberGate
Important: Log in to Microsoft Marketplace with global administrator privileges of your organization. At the end of the purchase & activation process, you will be redirected to the CyberGate Management Portal where you must activate your subscription using the same user with global administrator privileges.
Step 1: Purchase of CyberGate
Section titled “Step 1: Purchase of CyberGate”Already purchased? Skip to Step 2: Configure CyberGate
Purchase in Microsoft Marketplace
Section titled “Purchase in Microsoft Marketplace”-
Go to Microsoft Marketplace
-
Search for ‘cybergate’. Depending on your device type, choose:
- CyberGate for IP Video Intercoms with Teams
- CyberGate for IP Cameras with Teams
- CyberGate for IP Paging with Teams
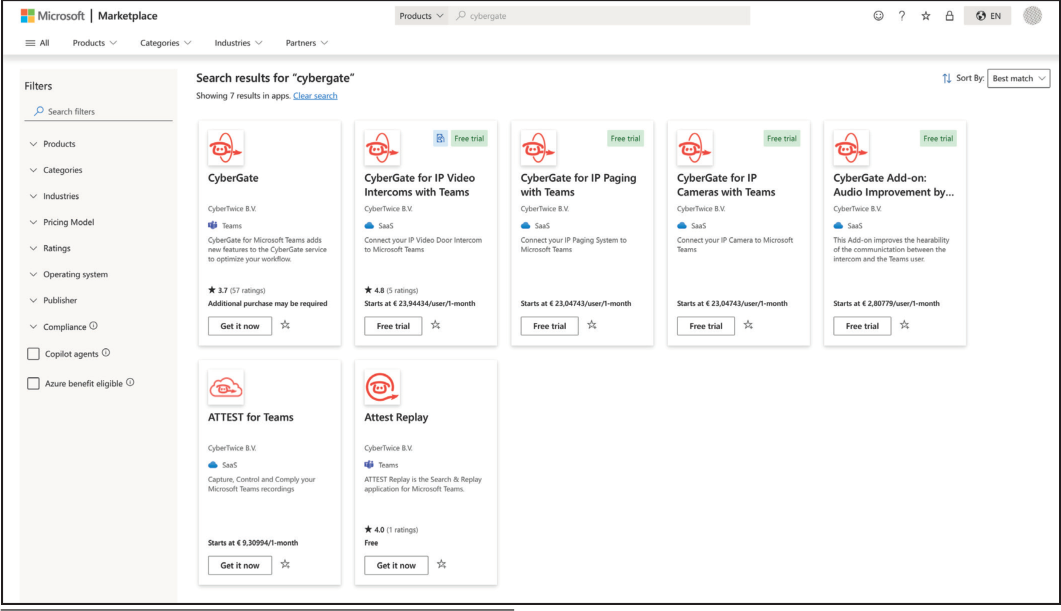
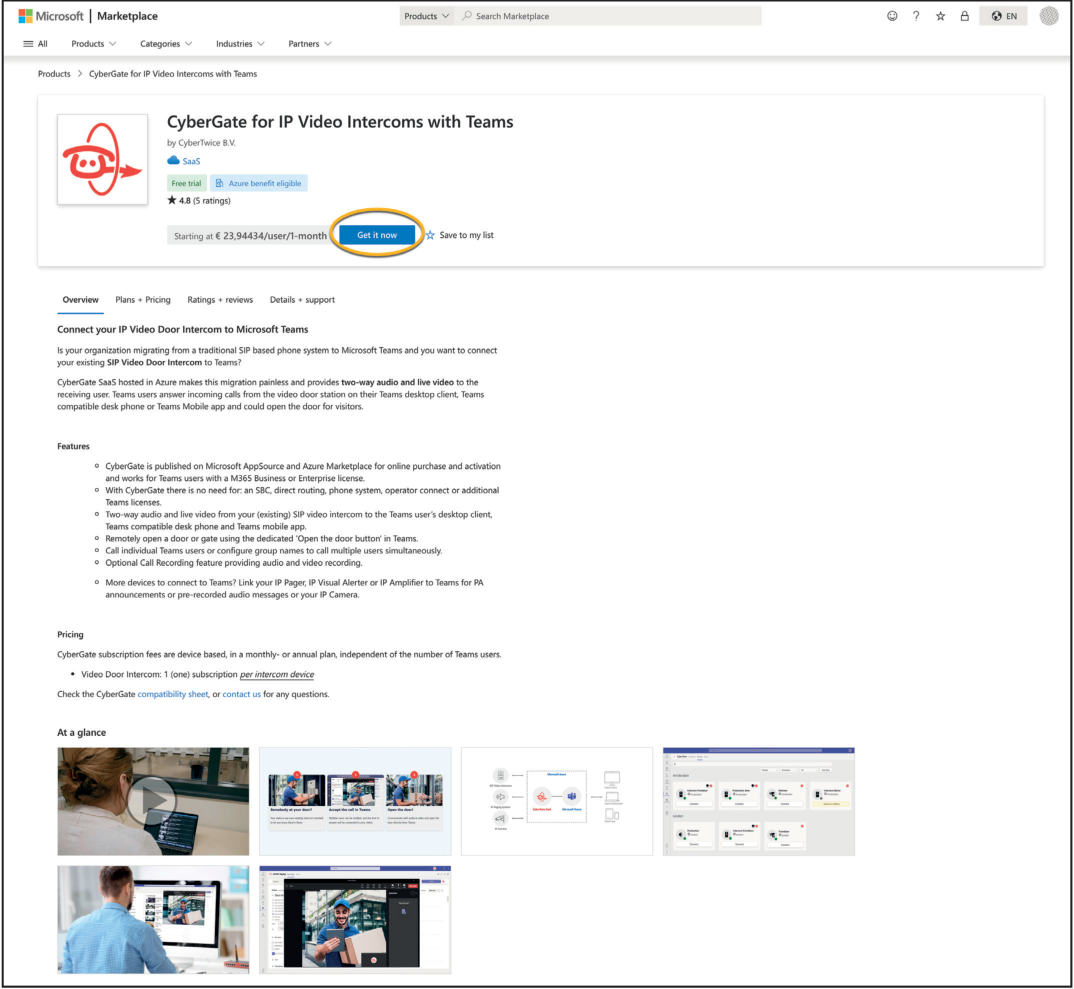
- Click ‘Free trial’ to start the purchasing procedure
- On the overview page, click ‘Get it now’
- Select the CyberGate flex plan and click ‘Next’
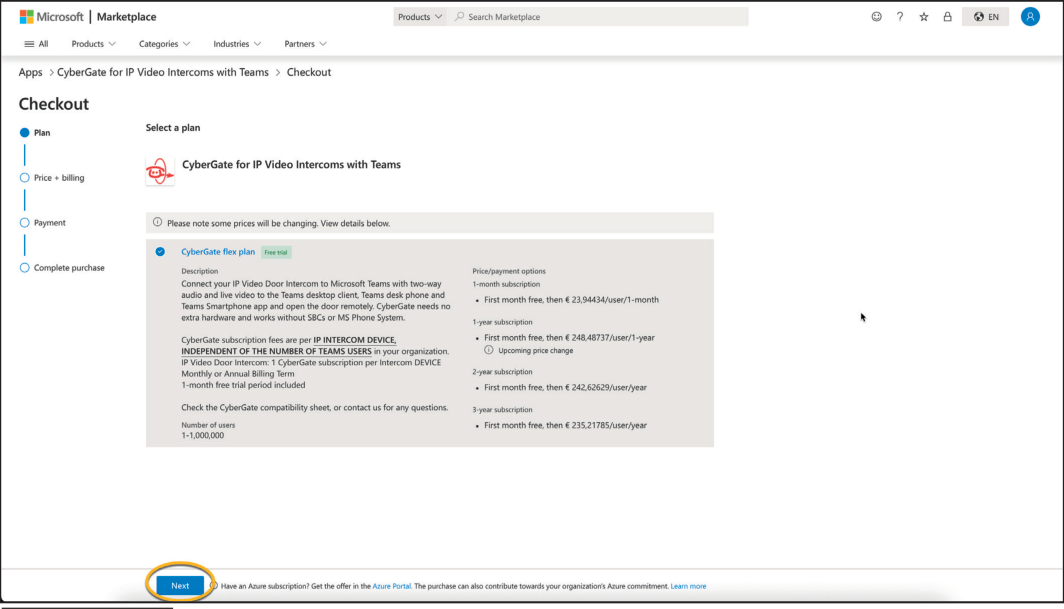
- Select the billing term
- For pricing, check the CyberGate pricing page
Note: All CyberGate Billing Terms come with a 30-day free trial period.
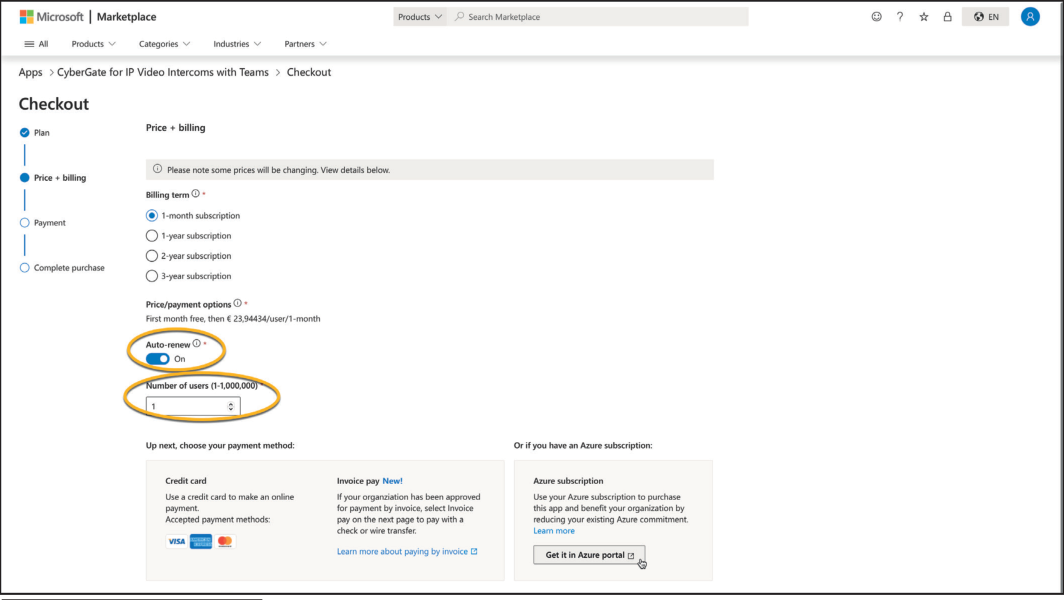
- Configure your subscription:
- Ensure ‘Auto-renew’ is On
- Select the ‘Number of Users’ (this equals the number of devices)
Important: You need 1 subscription per device connected to CyberGate, independent of the number of Teams users in your organization.
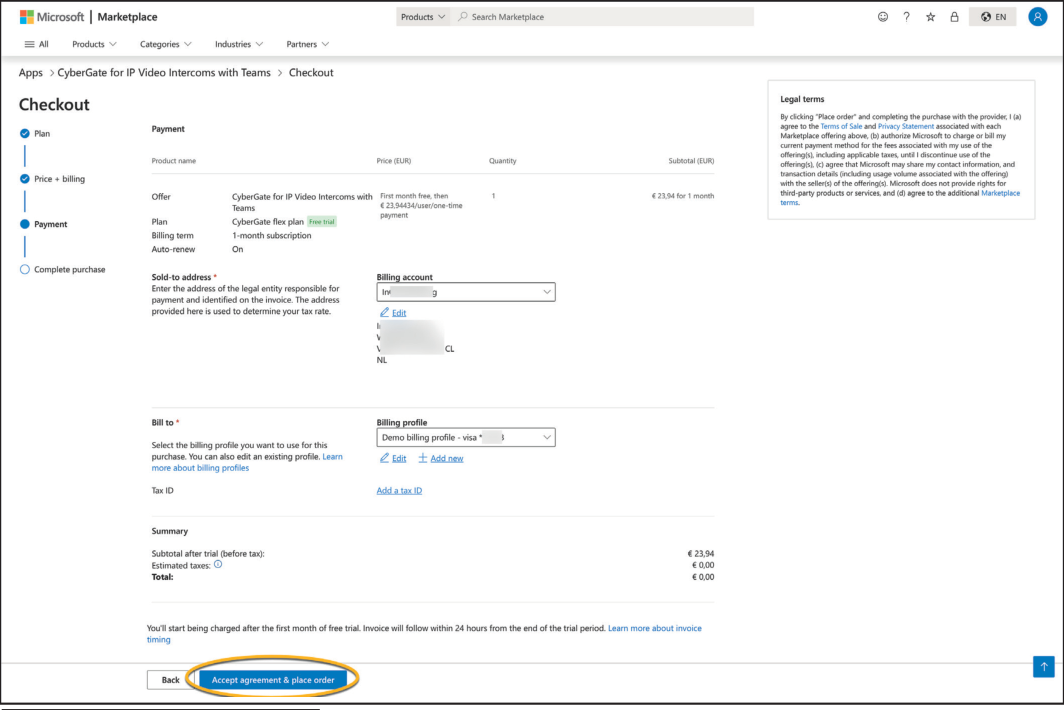
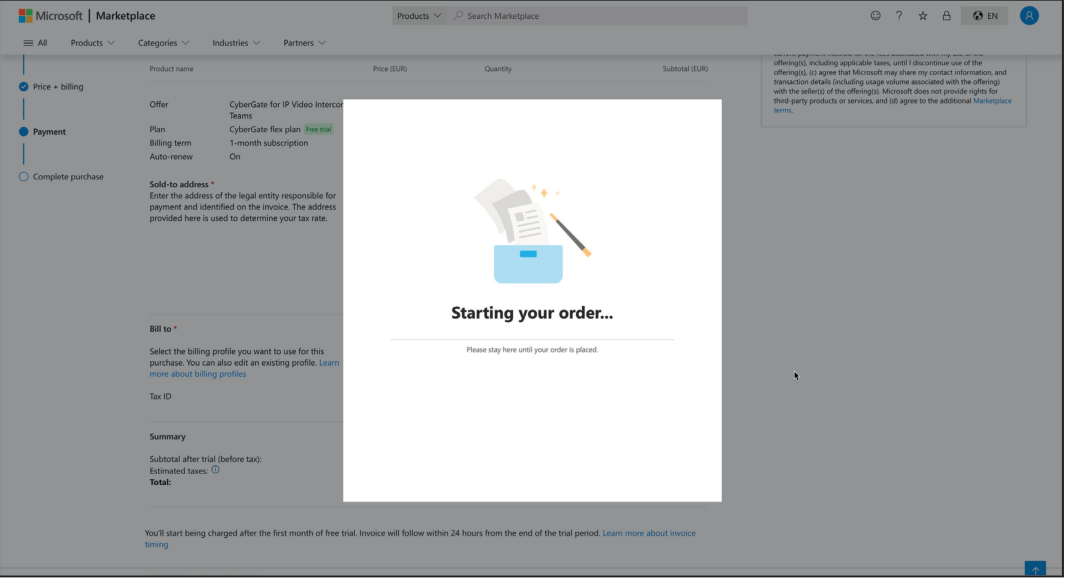
- Review details (address & payment method) and click ‘Accept agreement & place order’
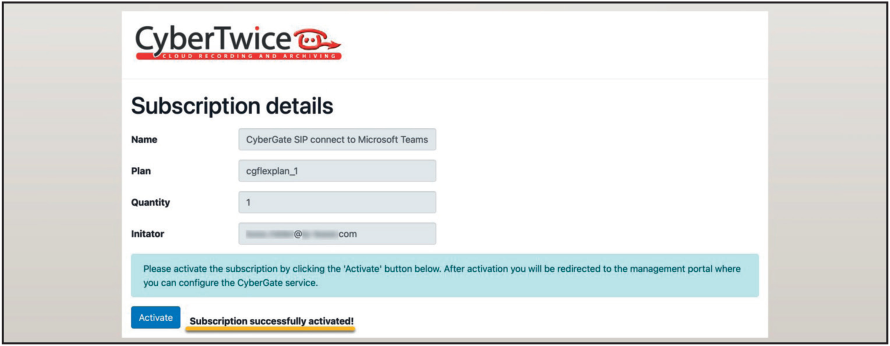
-
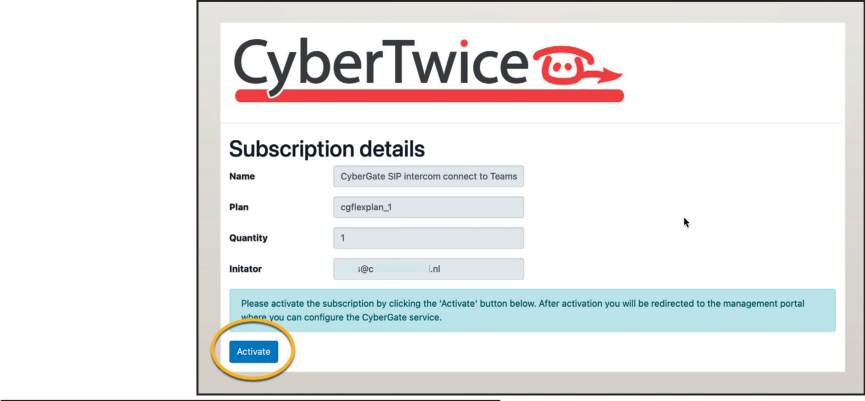
You will be redirected to the CyberGate Management Portal
-
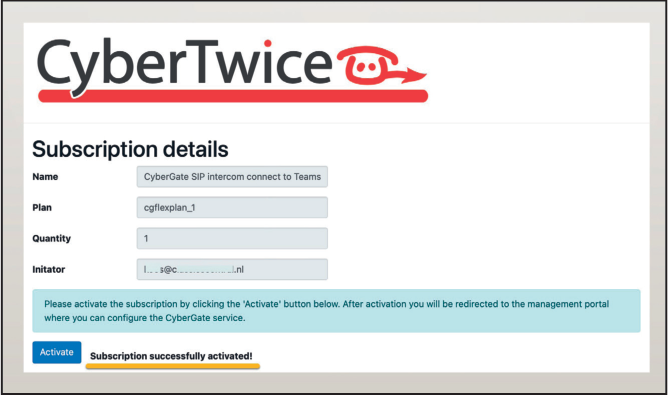
Click ‘Activate’ to activate your CyberGate subscription
Purchase in Microsoft Azure
Section titled “Purchase in Microsoft Azure”If your Tenant has an Azure subscription, you can purchase CyberGate through Azure:
-
In Azure, the CyberGate offer opens automatically
-
Configure:
- Select or create a Resource group
- Name the CyberGate subscription
- Select billing term and payment method
- Select the number of users
- Ensure ‘Recurring billing’ is On

-
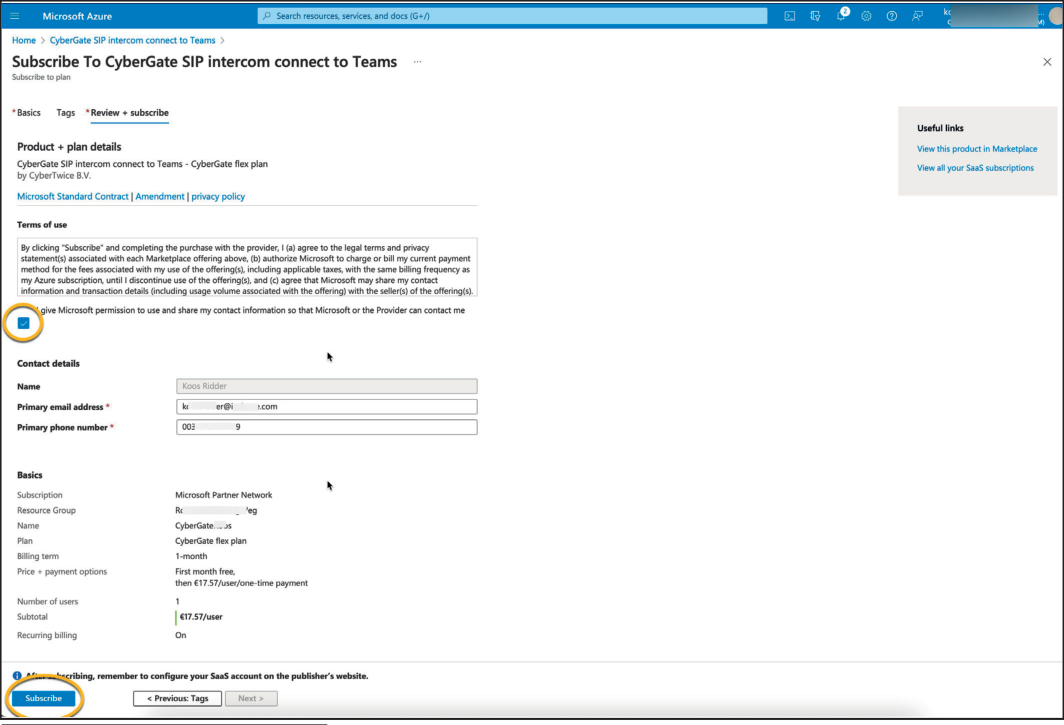
Click ‘Review + Subscribe’
-
Review all details, accept terms, and click ‘Subscribe’
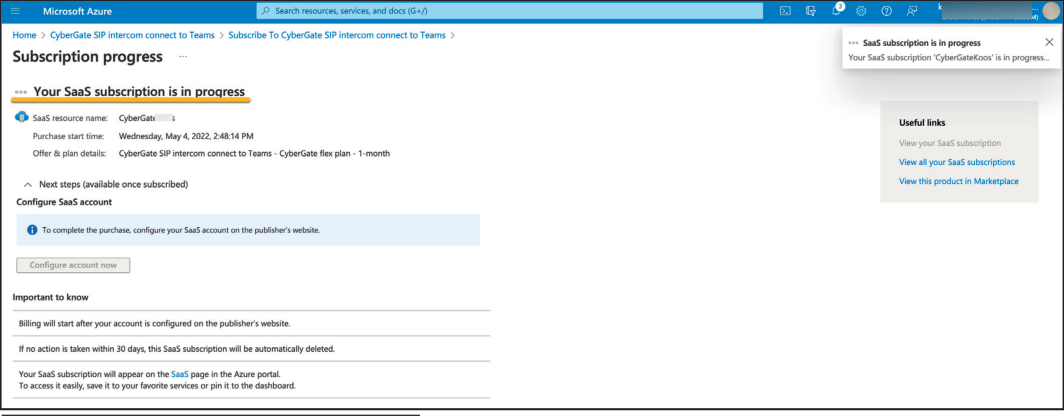
- Wait for subscription completion, then click ‘Configure account now’
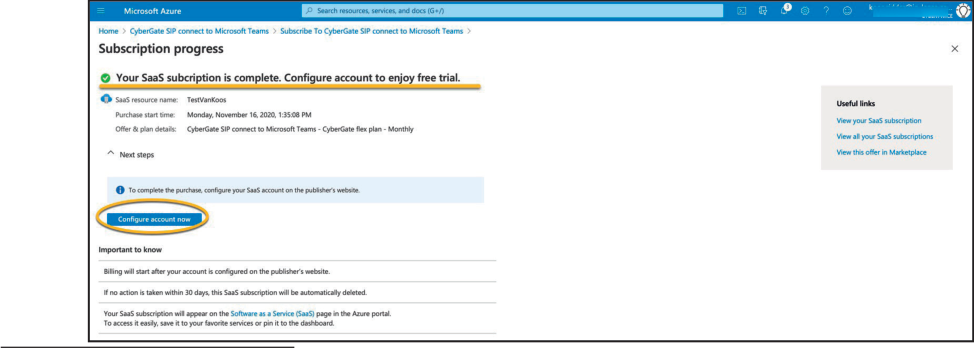
- In the CyberGate Management Portal, view subscription details and click ‘Activate’

Step 2: Configure CyberGate in the Management Portal
Section titled “Step 2: Configure CyberGate in the Management Portal”Access the CyberGate Management Portal at: https://admin.cybergate.cybertwice.com
Configuration Steps Overview
Section titled “Configuration Steps Overview”| Step | Action |
|---|---|
| 1 | Provide Admin Consent |
| 2 | Configure Network Settings |
| 3 | Configure Device Settings |
Provide Admin Consent
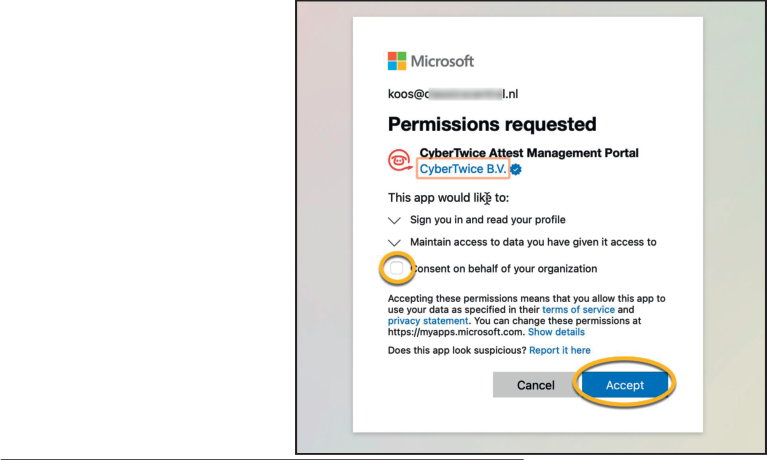
Section titled “Provide Admin Consent”In the ‘Global’ section, grant CyberGate limited access to your Azure environment. This is mandatory for calling Teams users in your organization.
- Click ‘Provide admin consent’
Requirement: You must be a Global Administrator to provide admin consent.
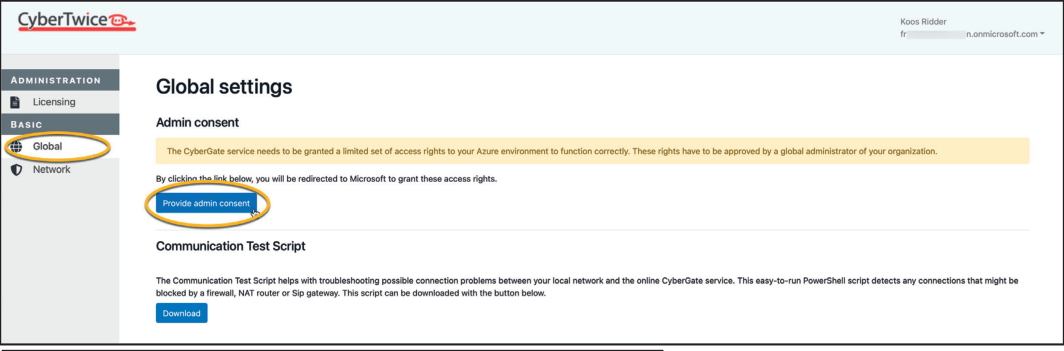
- Click ‘Basic-Network’ for the next step
Network Settings
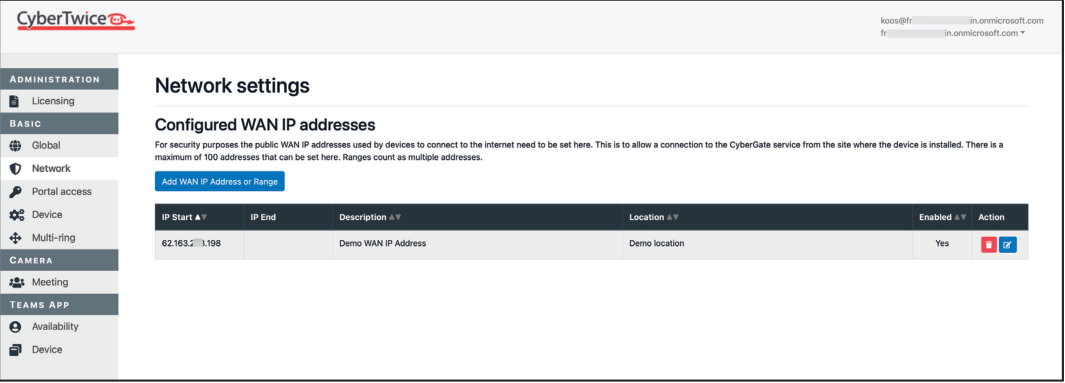
Section titled “Network Settings”CyberGate uses a whitelist containing public WAN IP addresses for security.
- Navigate to Basic → Network
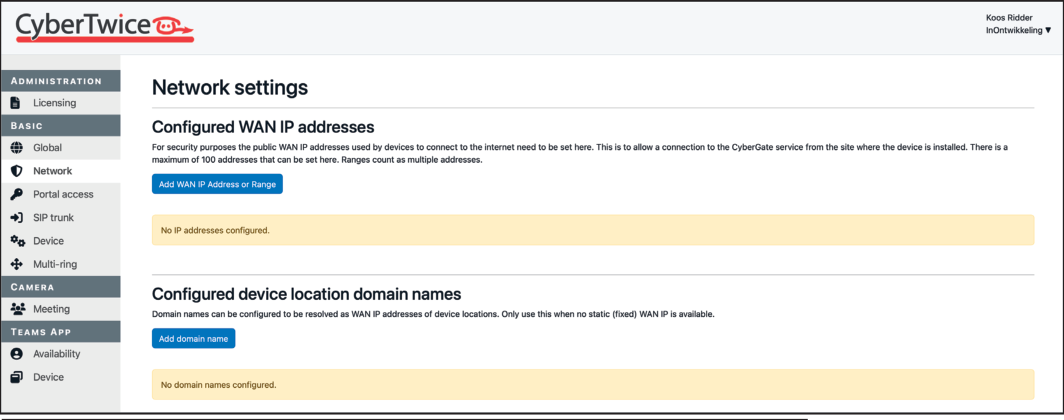
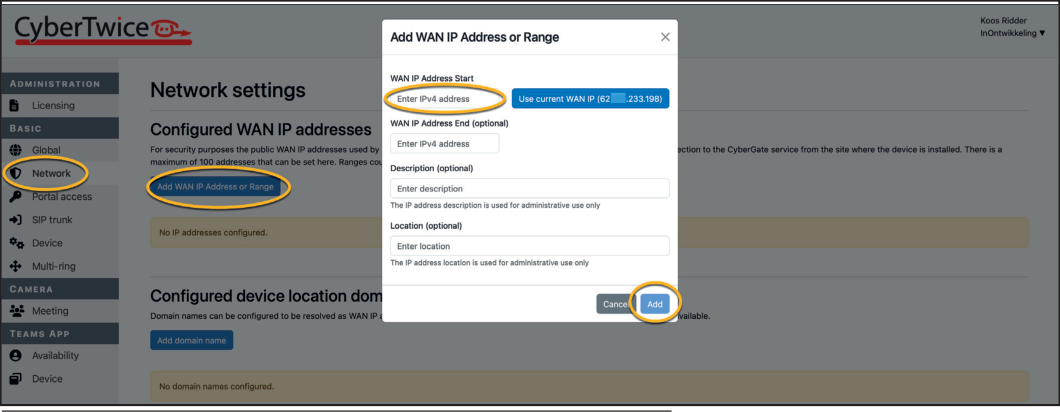
-
Click ‘Add WAN IP Address or Range’
-
Enter:
- WAN IP address (optional: define a range)
- Description and/or location (optional)
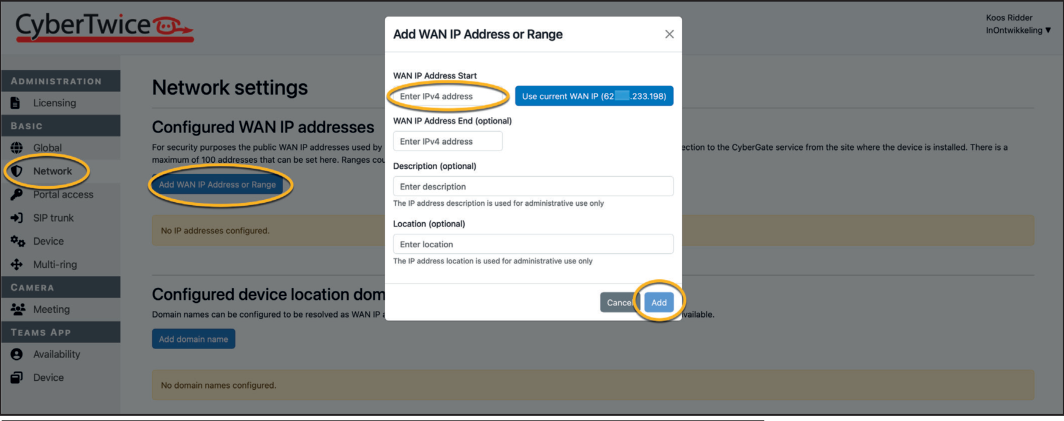
- Settings save automatically
- Click ‘Basic-Device’ for the next step
Device Settings
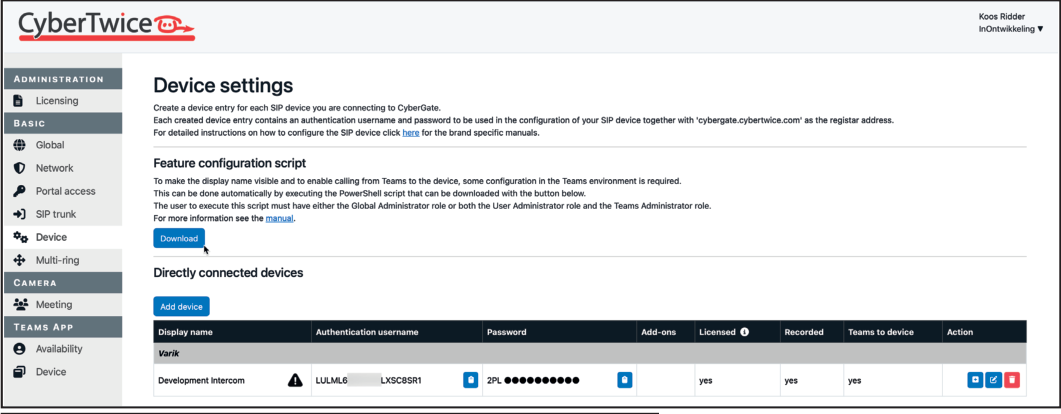
Section titled “Device Settings”In the ‘Device’ section, add a device for each intercom/pager/camera. This generates SIP credentials.
-
Click ‘Add device’
-
Configure:
- Display Name: A descriptive name for this device
- Type: Intercom, Pager, or Camera
- Location: Device location
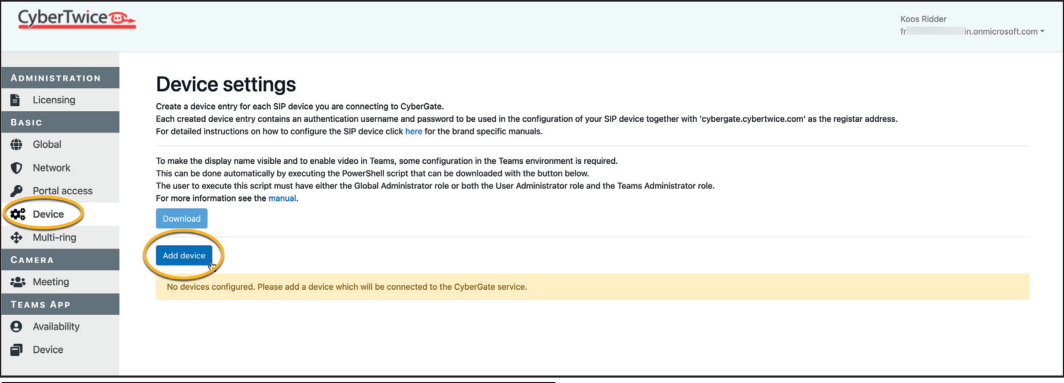
-
Click ‘Add’
-
Note the generated credentials:
- Authentication username — Required for SIP device configuration
- Password — Required for SIP device configuration
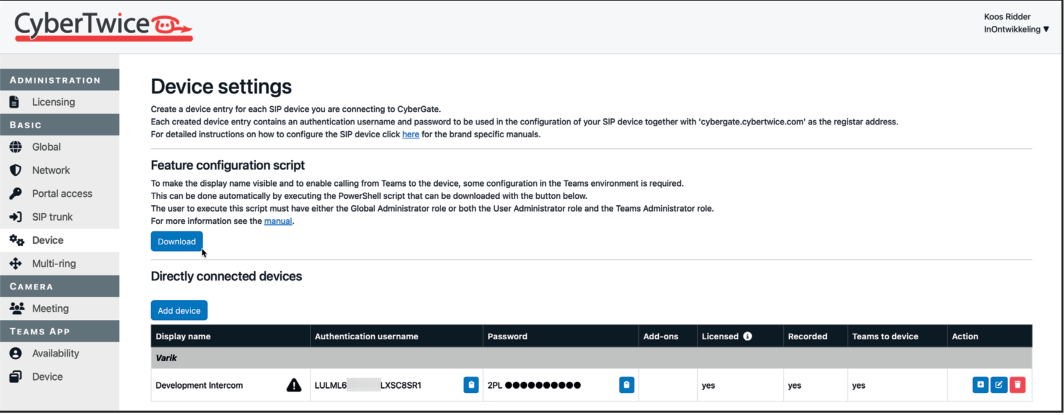
Tip: Use the blue copy buttons to conveniently copy credentials when configuring your device.
Note: If the Display name shows an exclamation mark, the device will call Teams but display as “Intercom” until you run the PowerShell script. See Appendix B.
Step 3: Configure the Device
Section titled “Step 3: Configure the Device”Configure your device through its web interface. Each make/model has its own configuration method.
📥 Download Device Installation Manuals
Compatible Manufacturers
Section titled “Compatible Manufacturers”| 2N | Akuvox | Algo | Alphatech |
| Amphitech | Axis | Avigilon | Barix |
| BAS-IP | Behnke | Castel | Commend |
| Dnake | Doorbird | IPDoor | Fanvil |
| Fasttel | Fermax | Grandstream | Hanwha |
| Mobotix | PortaDial | Robin | Suprema |
| Valcom | Verkada | Zenitel |
Appendix A: How to Use the CyberGate Management Portal
Section titled “Appendix A: How to Use the CyberGate Management Portal”Access the portal at any time with one of these Microsoft admin accounts:
- Global Administrator
- Application Administrator
- Cloud Application Administrator
- Teams Administrator
Tip: You can assign a Microsoft Group to grant portal access to non-administrator users. See ‘Portal Access’ section.
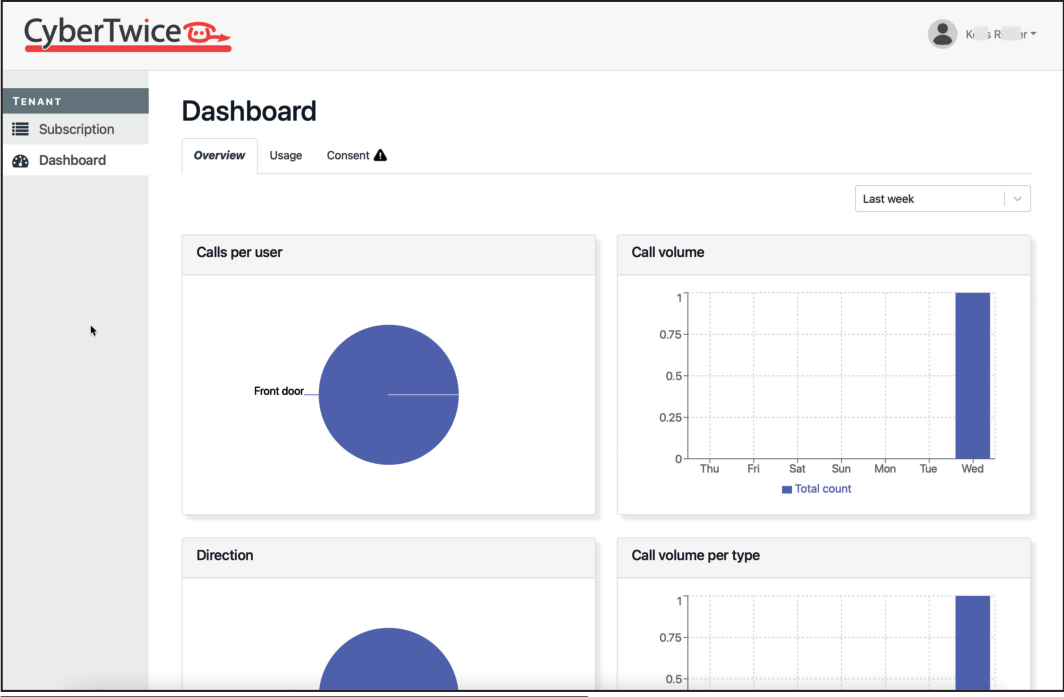
Portal Capabilities
Section titled “Portal Capabilities”Licensing
Section titled “Licensing”- Increase/decrease device count without visiting Microsoft Marketplace
Global Settings
Section titled “Global Settings”- Modify global CyberGate settings
- Enable/disable call recording globally
- Download communication test script
Network
Section titled “Network”- Manage allowed public WAN IP addresses
Portal Access
Section titled “Portal Access”- Manage non-admin user access
Device Management
Section titled “Device Management”- Add/remove/rename devices
- Enable/disable recording per device
- Enable/disable Teams-to-device calling
Multi-ring
Section titled “Multi-ring”- Create groups to ring multiple Teams users simultaneously
Teams App
Section titled “Teams App”- Modify CyberGate for Teams app settings
Administration Section
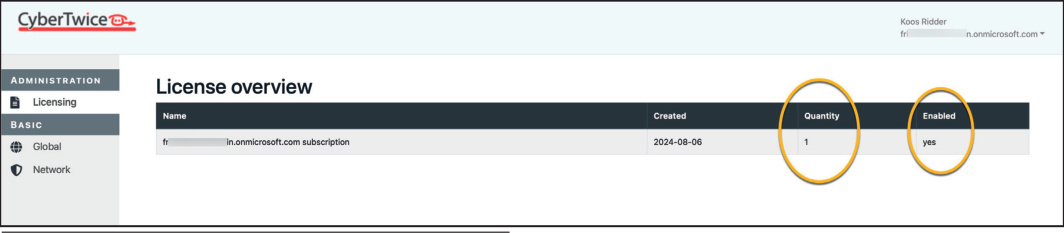
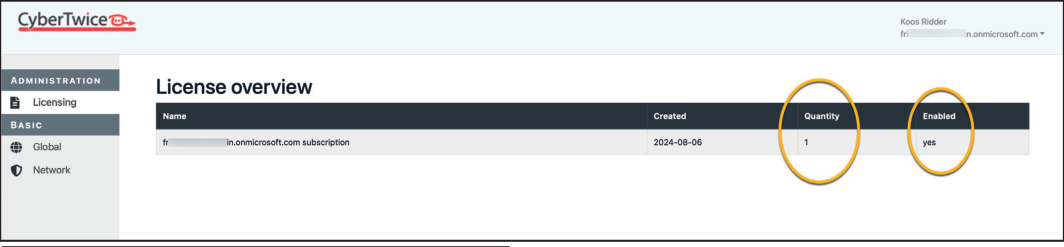
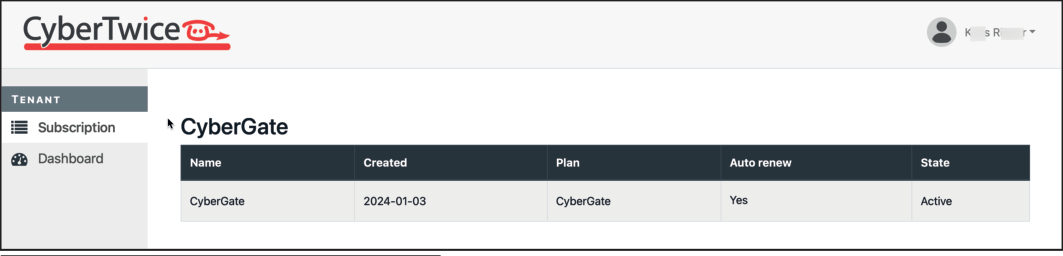
Section titled “Administration Section”Licensing
Section titled “Licensing”| Field | Description |
|---|---|
| Name | Subscription name |
| Created | Creation date |
| Plan | Chosen plan name |
| Quantity | Licensed device count |
| Requested quantity | Requested device licenses |
| Enabled | License status (yes/no) |
To modify device count: Click the blue edit symbol, then use ’+’ or ’-’.
Note: After modifying quantities, synchronization with Microsoft may take up to 10 minutes.
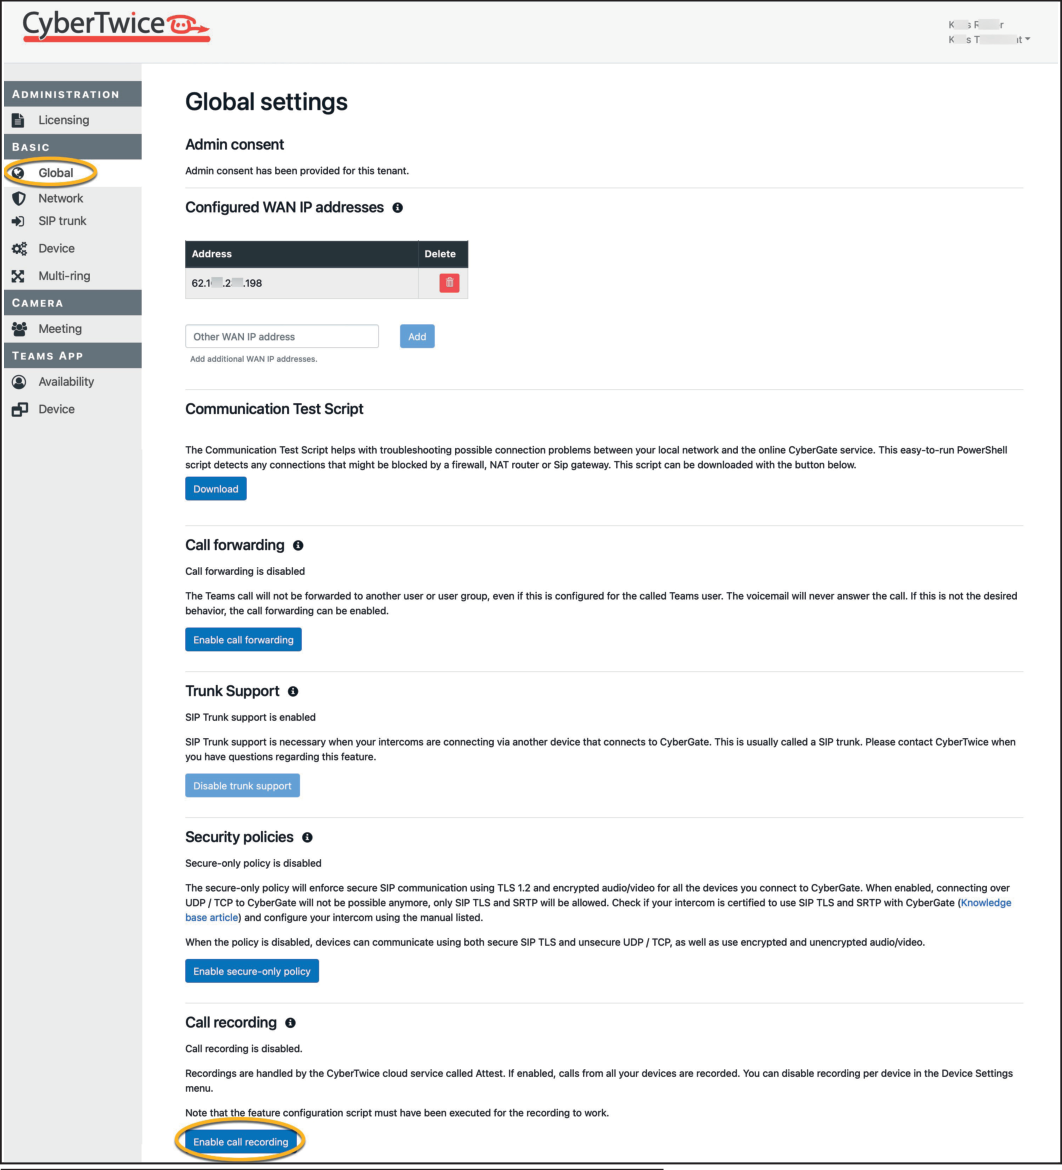
Basic Section
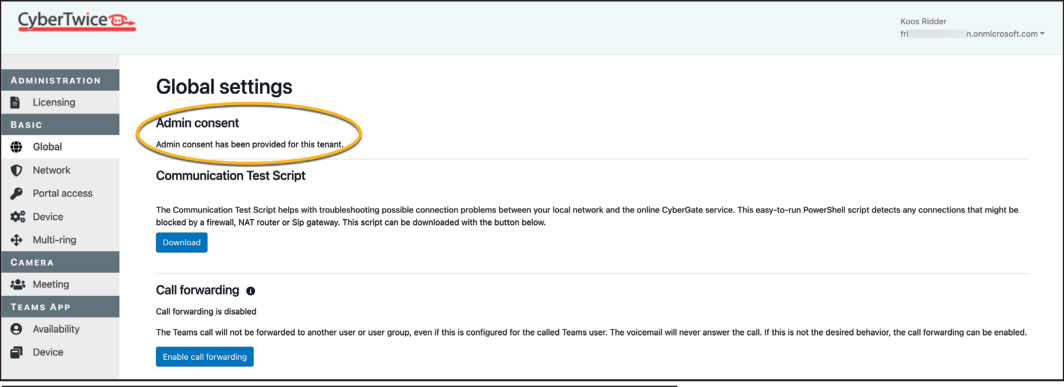
Section titled “Basic Section”Global
Section titled “Global”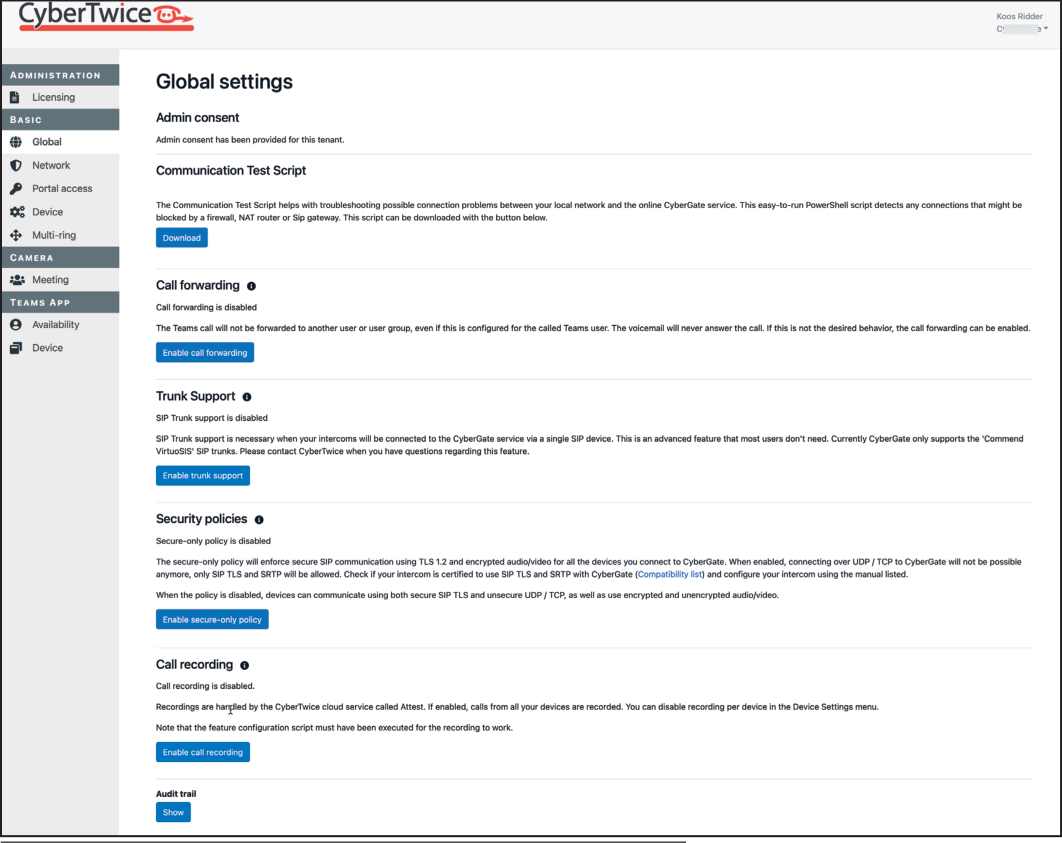
Admin Consent
Section titled “Admin Consent”Must be provided for CyberGate to communicate with your Teams environment. Future updates may require re-consent.
Communication Test Script
Section titled “Communication Test Script”PowerShell script for troubleshooting connection issues between your network and CyberGate.
Call Forwarding
Section titled “Call Forwarding”- Disabled (default): Calls to forwarded destinations (including voicemail) are ignored
- Enabled: Allows forwarding to other Teams users and voicemail
Trunk Support
Section titled “Trunk Support”Enables SIP trunk connections to CyberGate (for Commend and Genetec).
Security Policies
Section titled “Security Policies”Secure-only policy enforces:
- TLS 1.2 for SIP communication
- Encrypted audio/video (SRTP)
- Blocks UDP/TCP connections
Call Recording
Section titled “Call Recording”When enabled, all device calls are recorded via CyberTwice ATTEST cloud service.
⚠️ Warning: Check applicable national and state legislation before activating call recording.
Audit Trail
Section titled “Audit Trail”Displays all user activity in the portal.
Network
Section titled “Network”Configure the whitelist of public WAN IP addresses.
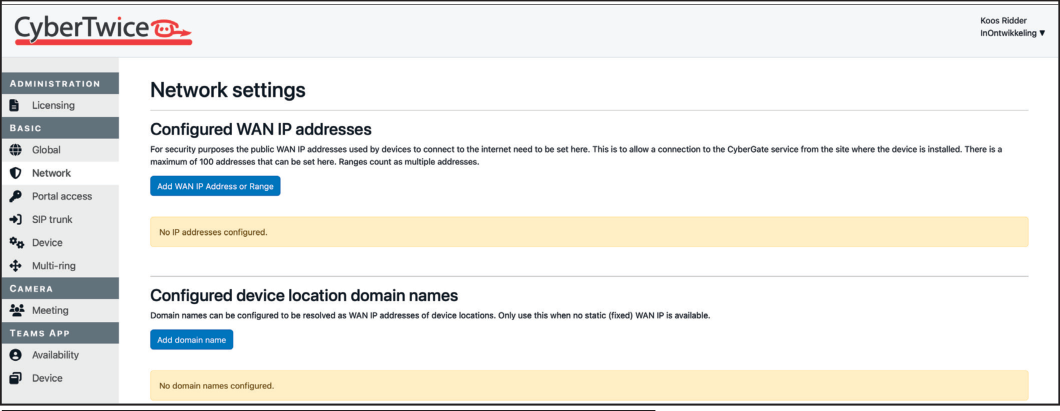
- Click ‘Add WAN IP Address or Range’
- Enter IP address and optional description/location
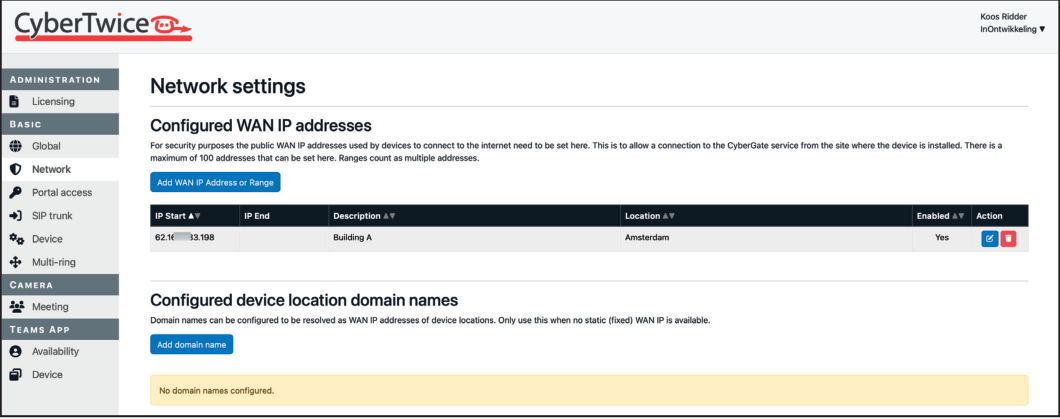
Note: The ‘Configured device location domain names’ option is limited to Genetec Sipelia Cloud deployments.
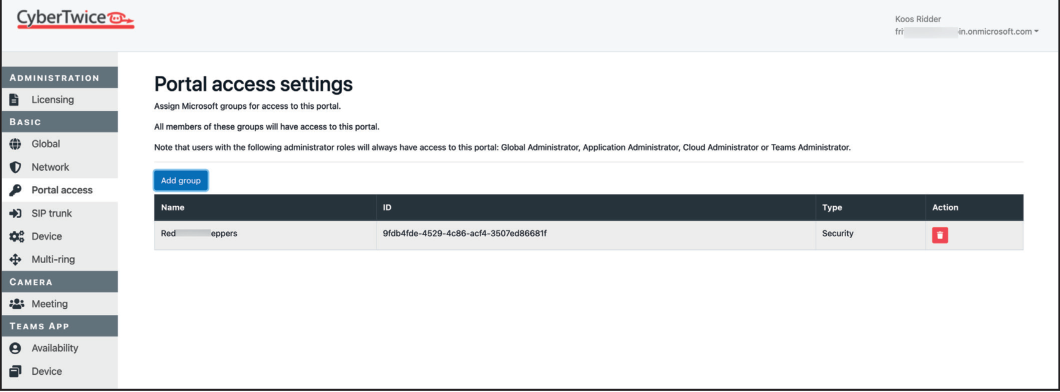
Portal Access
Section titled “Portal Access”Grant non-admin users access via Microsoft Groups:
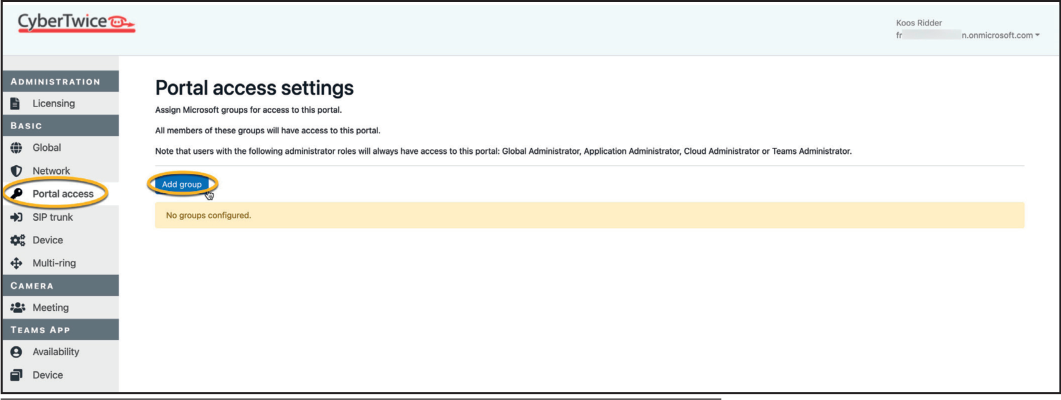
- Click ‘Add group’
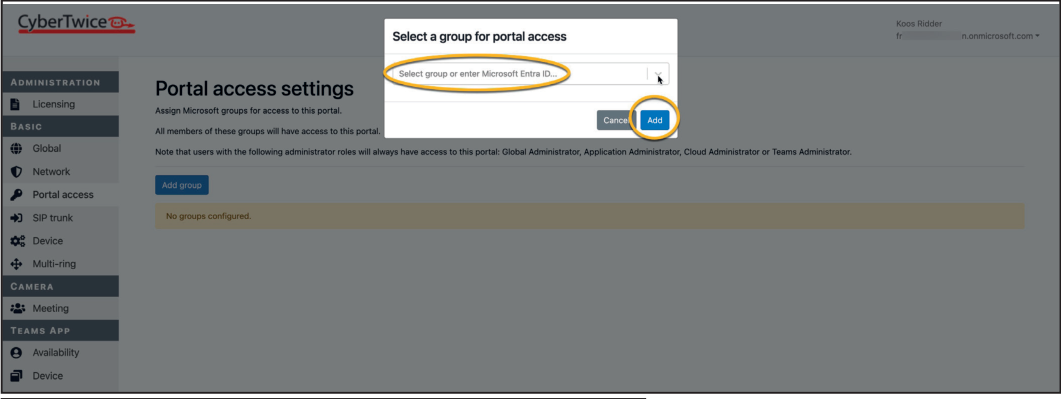
- Select a group from the dropdown or enter a group ID
Device
Section titled “Device”Add a Device
Section titled “Add a Device”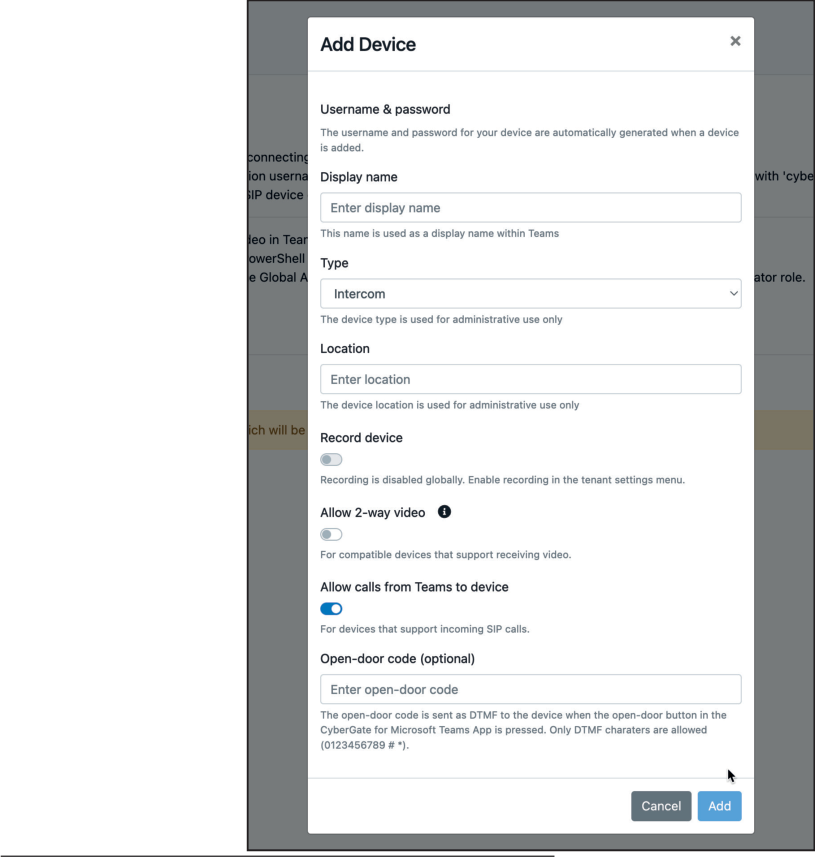
- Click ‘Add device’
- Configure display name, type, and location
- Copy the generated username and password
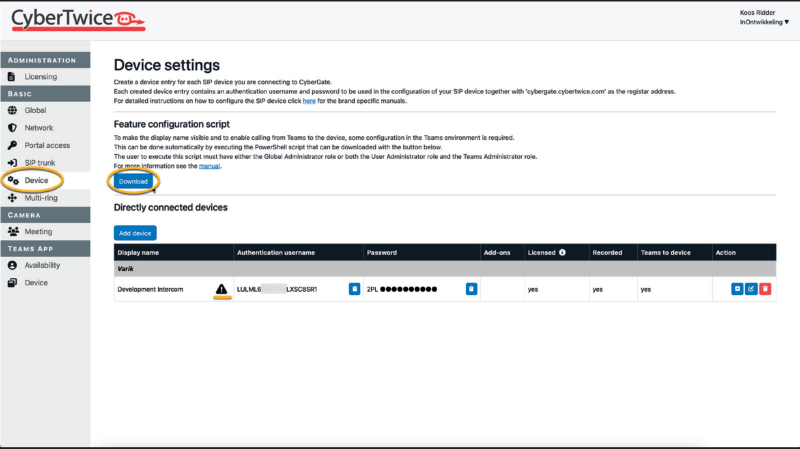
Device Properties
Section titled “Device Properties”| Property | Description |
|---|---|
| Display name | Name shown in Teams during calls |
| Authentication username | SIP configuration username |
| Password | SIP configuration password |
| Add-ons | Installed optional features |
| Licensed | License status |
| Recorded | Recording enabled status |
| Teams to device | Outbound calling enabled status |
Multi-ring
Section titled “Multi-ring”Create groups to ring multiple Teams users simultaneously:
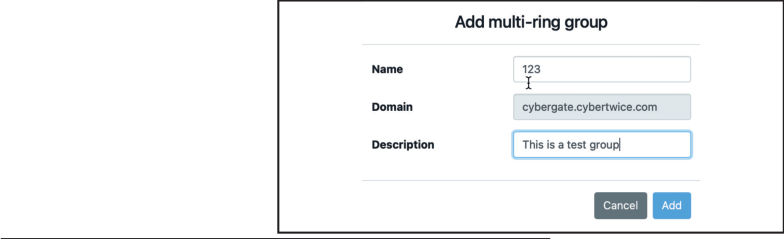
- Click ‘Add multi-ring group’
- Name the group and add description
- Add Teams users
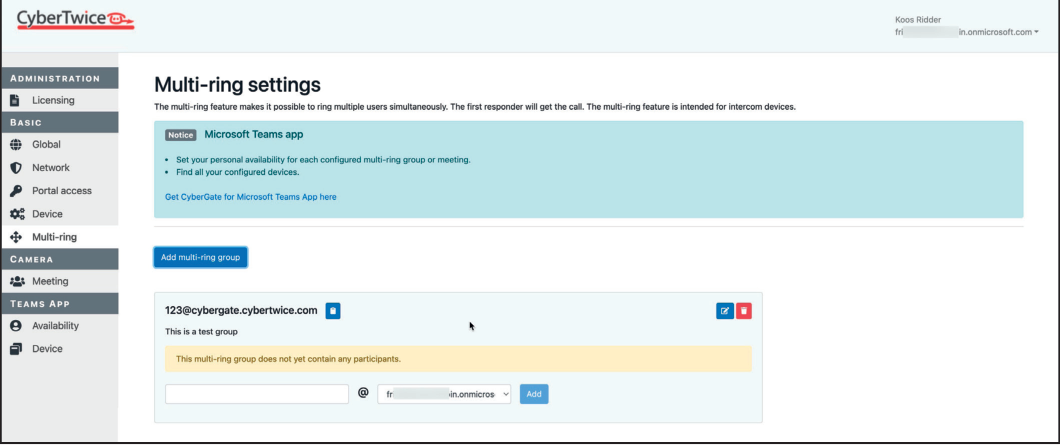
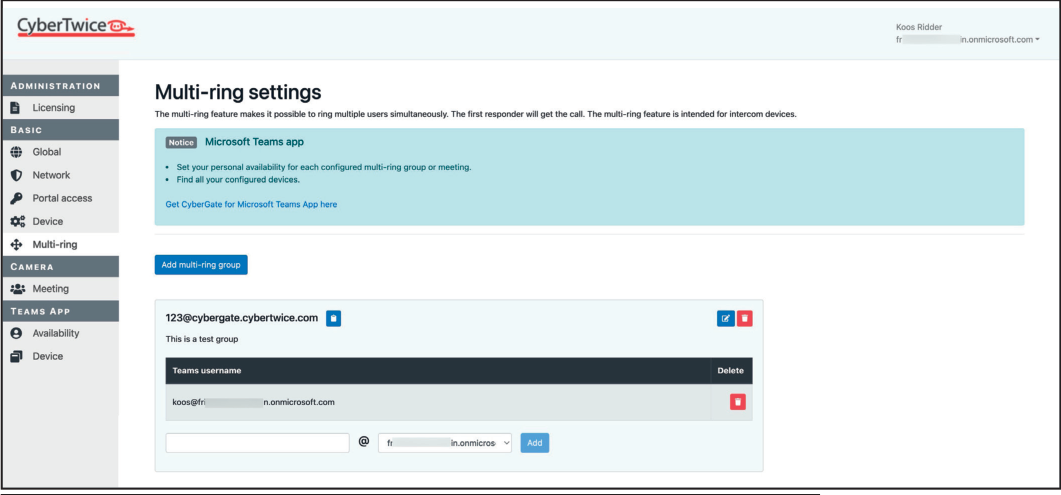
Dial format: groupname@cybergate.cybertwice.com
Example: If the name is
123, dial123@cybergate.cybertwice.com
SIP Trunk Settings
Section titled “SIP Trunk Settings”Note: Only visible when ‘Enable trunk support’ is enabled in Global settings.
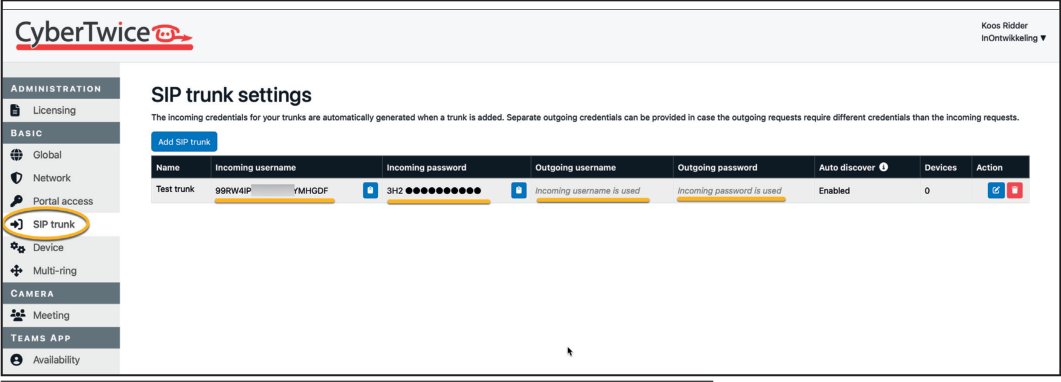
Currently certified for:
- Commend
- Genetec
Each trunk generates unique authentication credentials. Configure outgoing credentials via the blue edit symbol.
Camera Section
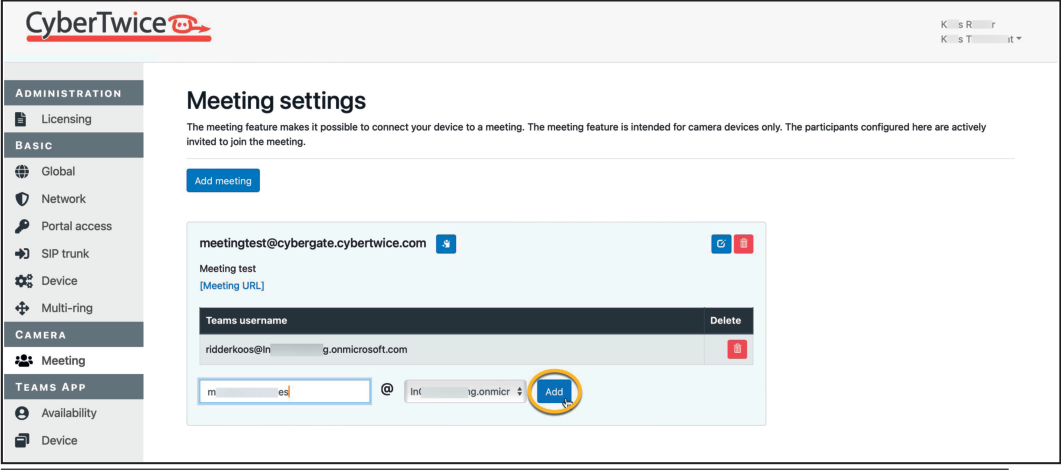
Section titled “Camera Section”Meeting
Section titled “Meeting”Enable devices to join existing Teams meetings instead of calling individual users.
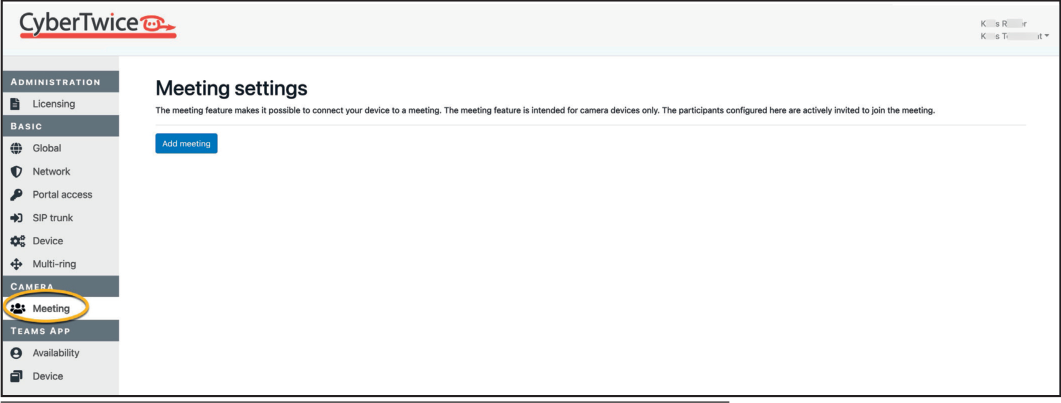
- Click ‘Add meeting’
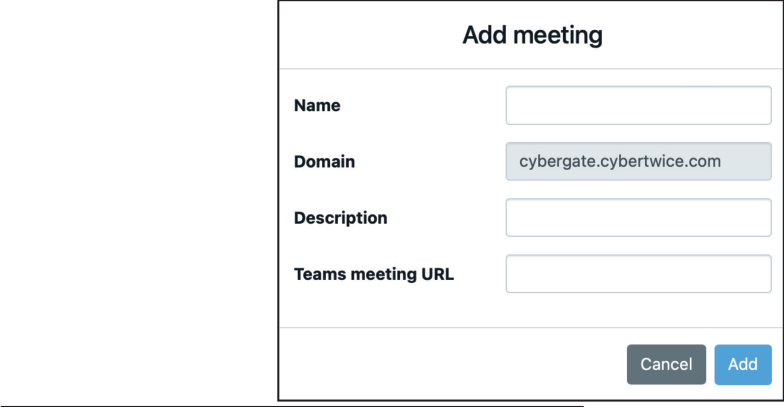
- Configure:
- Meeting name
- Description
- Teams meeting URL
Auto-call users: Add Teams users to automatically call them when a device joins.
Teams App Section
Section titled “Teams App Section”Configure permissions for the CyberGate for Teams app.
Direct link: CyberGate for Teams App
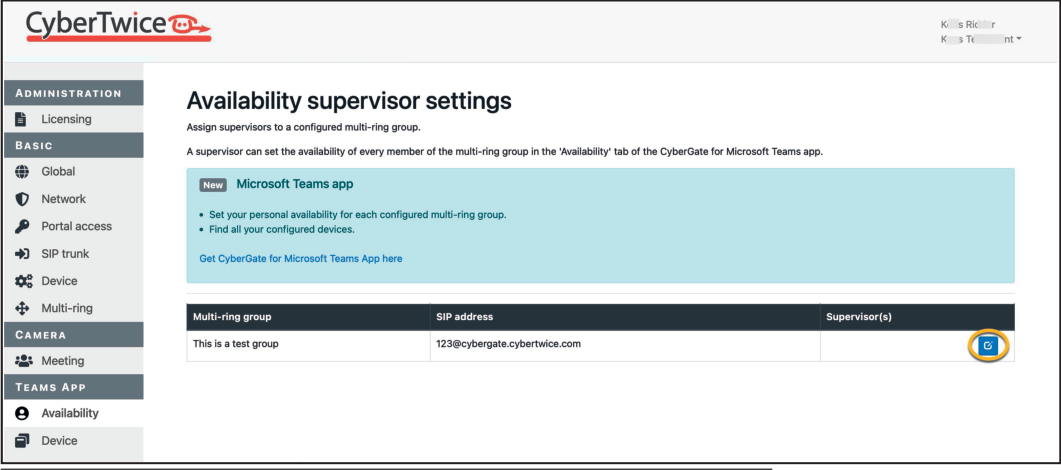
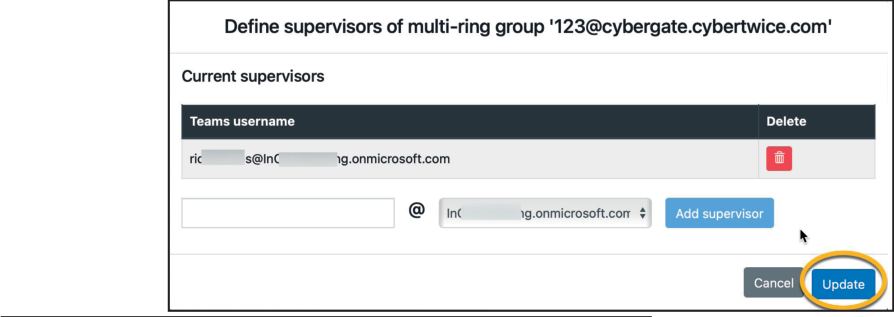
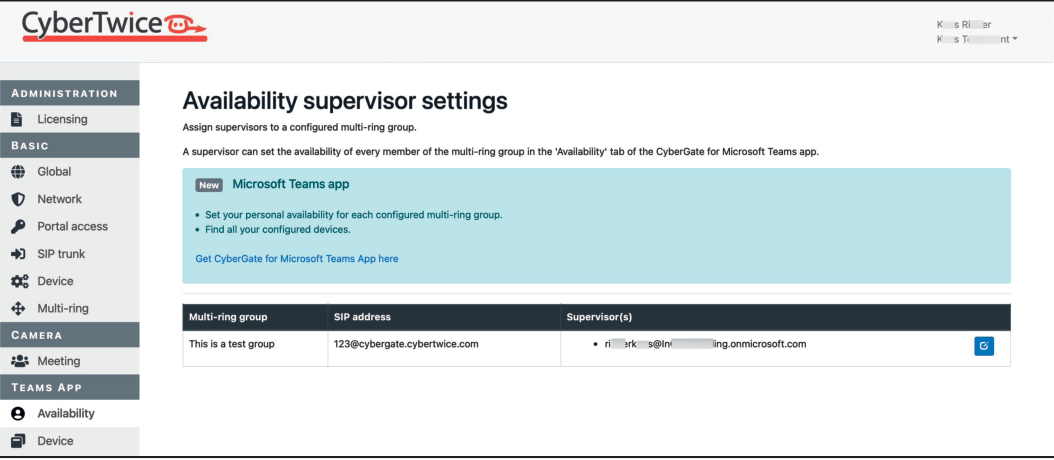
Availability
Section titled “Availability”Assign supervisors to Multi-ring groups. Supervisors can:
- Add/delete users in their Multi-ring group
- Set availability for all group users
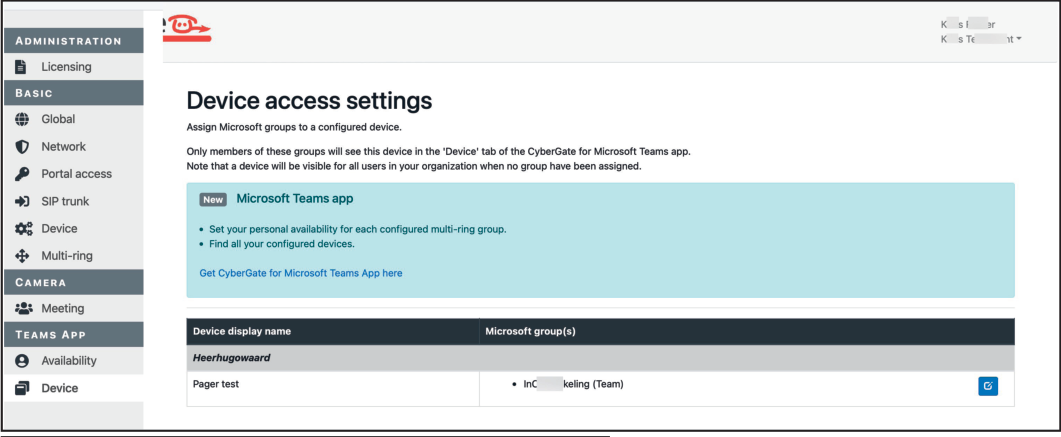
Device Visibility
Section titled “Device Visibility”Restrict which groups can see devices in the Teams app:

- Click the blue edit symbol on a device
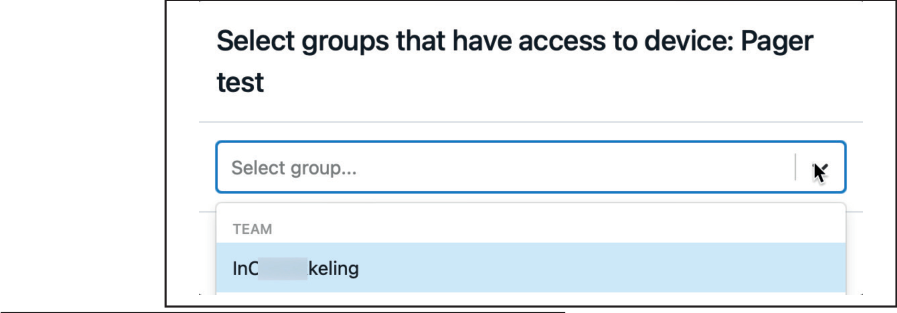
- Select one or more groups
- Click ‘Update’
Appendix B: Configure the Display Name of the Device
Section titled “Appendix B: Configure the Display Name of the Device”By default, incoming calls display as “Intercom” in Teams.
To customize the display name:
- Navigate to Basic → Device in the Management Portal
- Click the blue edit button under ‘Action’
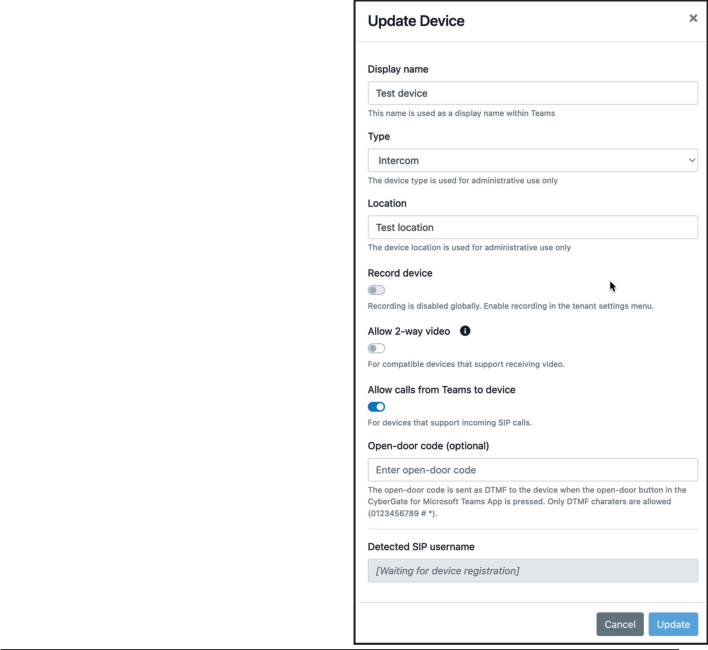
- Modify the Display name
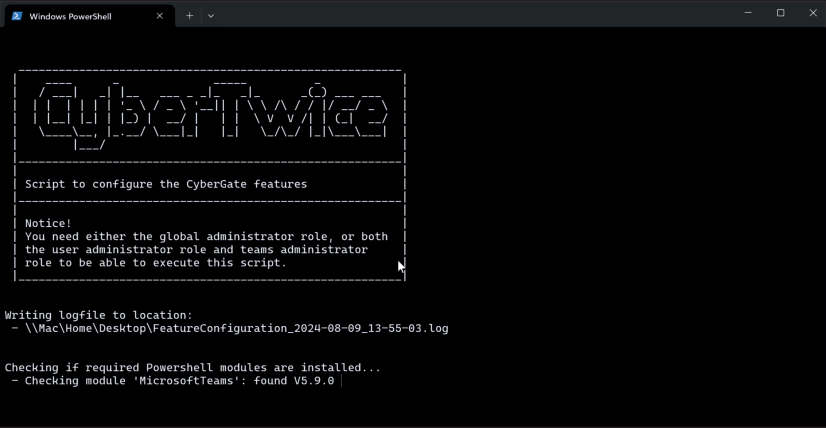
- If a warning symbol appears, download and run the PowerShell script:
Running the PowerShell Script
Section titled “Running the PowerShell Script”-
Ensure Microsoft PowerShell is installed
-
Click ‘Download’ to get the script
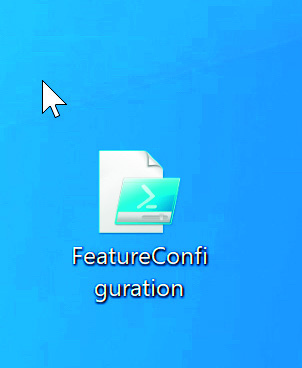
Important: Download a fresh script each time — do not reuse old versions.
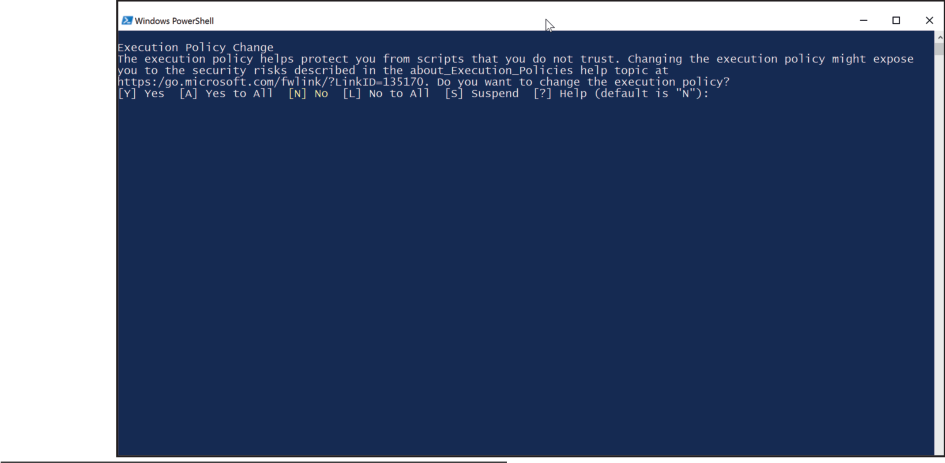
- Right-click PowerShell → ‘Run as Administrator’
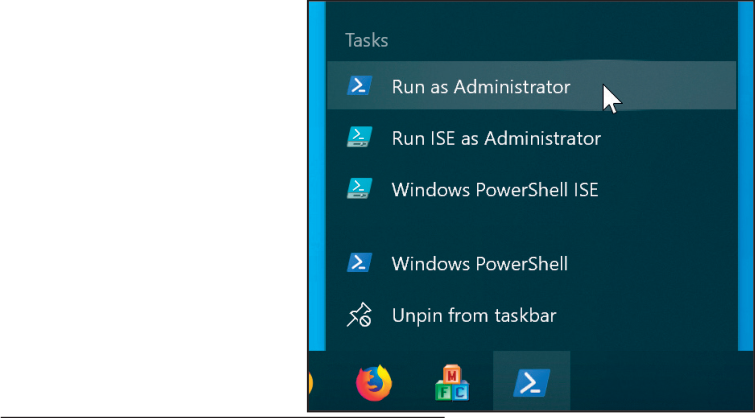
- Accept any execution policy warnings
- Enter your Microsoft account credentials
- Complete two-factor authentication if enabled
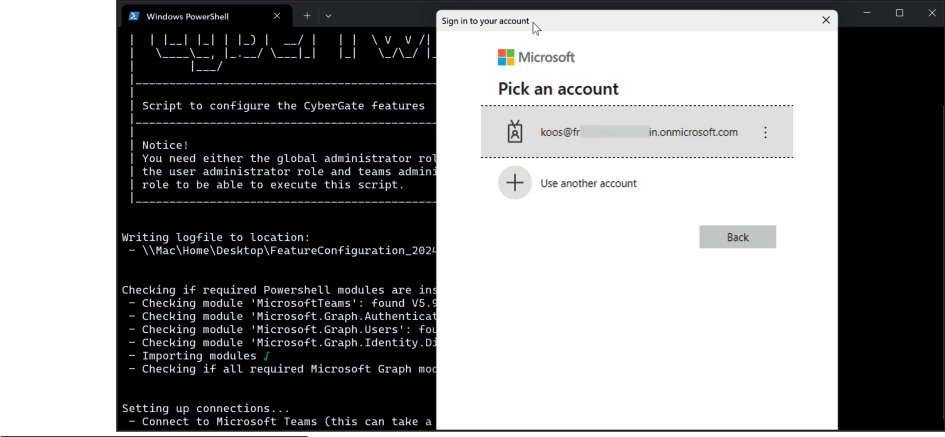
- Wait for “Script successfully done”

Note: Display name changes may take up to 1 hour to appear in Teams.
Appendix C: Call Recording
Section titled “Appendix C: Call Recording”CyberGate offers call recording powered by CyberTwice ATTEST cloud service.
Features
Section titled “Features”- Records all device calls by default (can be disabled per device)
- Stored encrypted in Microsoft Azure (West Europe)
- Retention: 10 days (auto-deleted after)
⚠️ Warning: Check applicable national and state legislation before activating.
Enable Recording
Section titled “Enable Recording”-
Log into the CyberGate Management Portal
-
Navigate to Basic → Global → Call recording
- Click ‘Enable call recording’
Prerequisite: The Feature Configuration PowerShell script must have been run at least once.
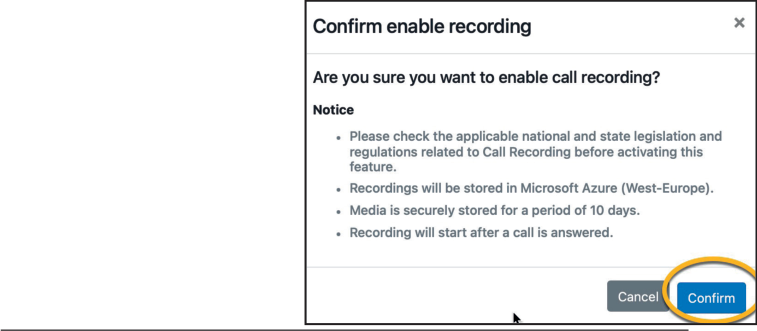
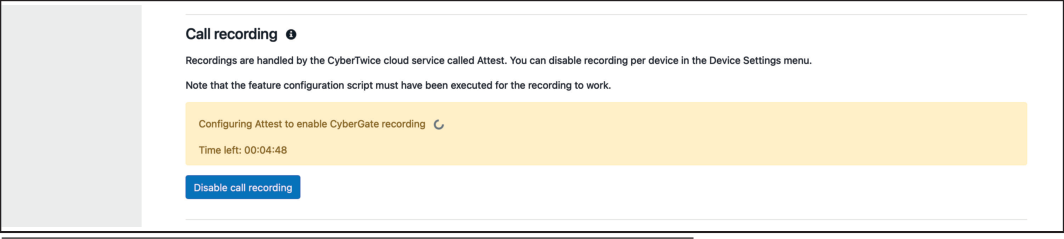
- Click Confirm and wait up to 5 minutes for setup
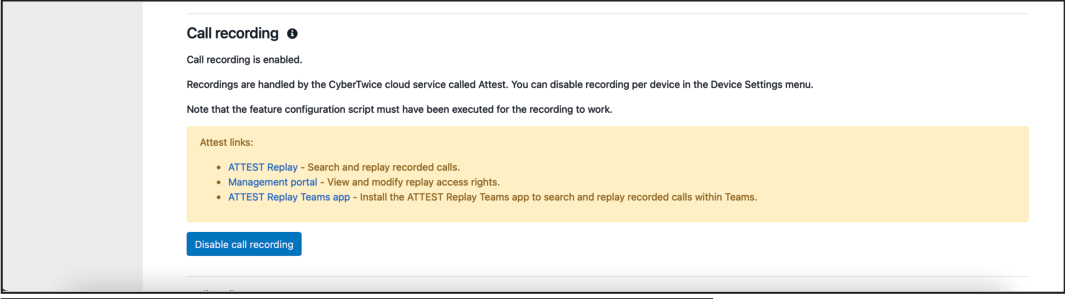
Access Points
Section titled “Access Points”| Resource | URL |
|---|---|
| ATTEST Replay | https://replay.attest.cybertwice.com |
| ATTEST Management | https://admin.attest.cybertwice.com |
| Teams App | Install ATTEST Replay |
Note: Recordings may take up to 15 minutes to appear in ATTEST Replay.
Search and Replay Recordings
Section titled “Search and Replay Recordings”ATTEST Replay Login
Section titled “ATTEST Replay Login”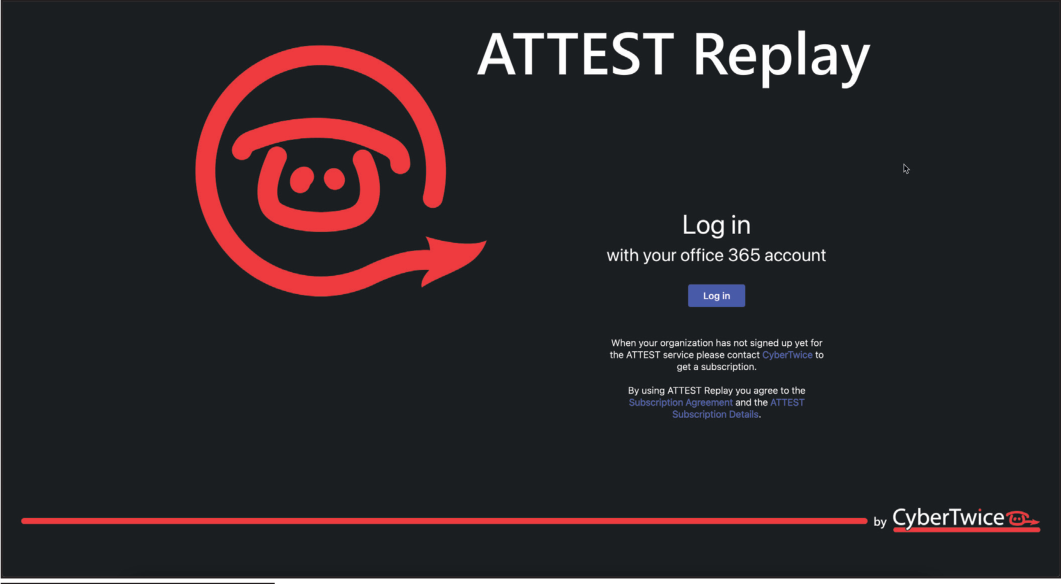
ATTEST Replay Interface
Section titled “ATTEST Replay Interface”Three main sections:
- Search — Search by participant names or transcribed text
- Filters — Filter by various criteria (counts update automatically)
- Results — Sortable card-style display
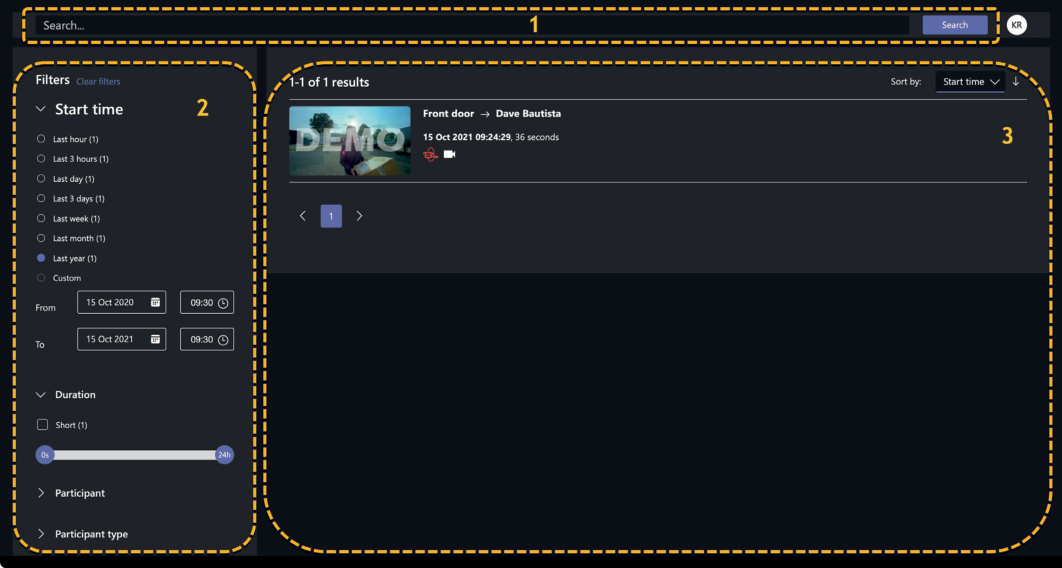
Sort options: Score, Start time, Duration, User, Number of participants
Playback Features
Section titled “Playback Features”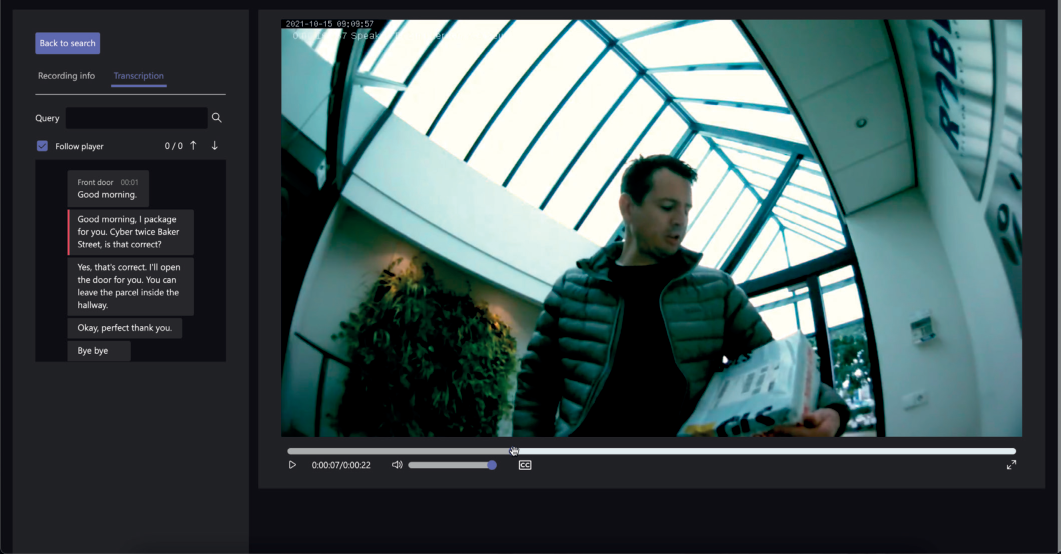
- View recording info and transcription
- Play/pause and skip controls
- Volume control
- Subtitles toggle
- Full-screen mode
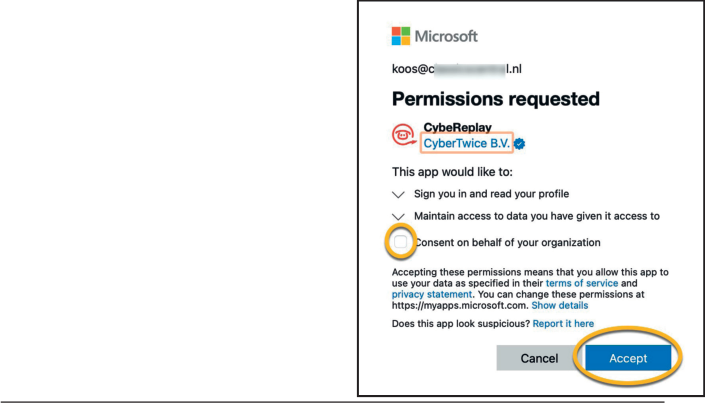
Configure Recording Permissions
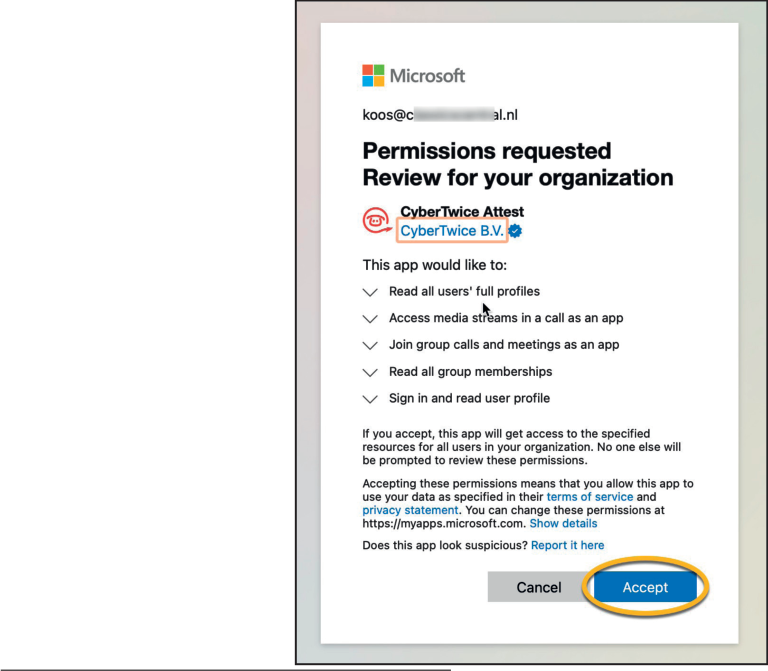
Section titled “Configure Recording Permissions”- Log into ATTEST Management Portal as Administrator
- Accept requested permissions
- Navigate to Dashboard → Consent and click ‘Provide admin consent’
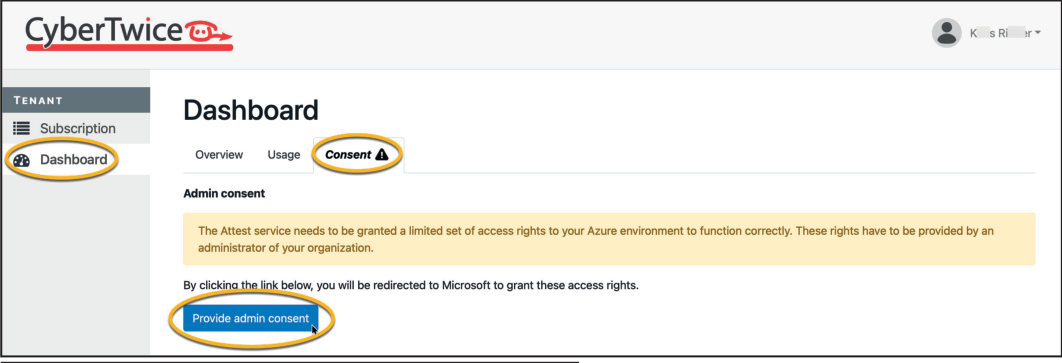
- Go to Replay → Groups tab
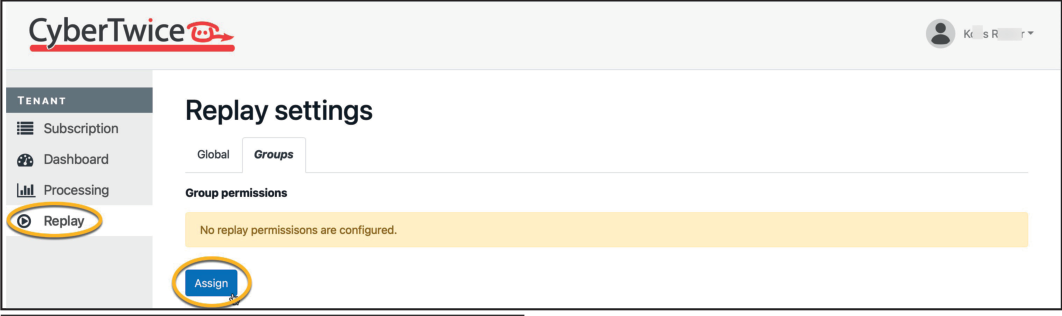
- Click ‘Assign’ to grant permissions to specific groups
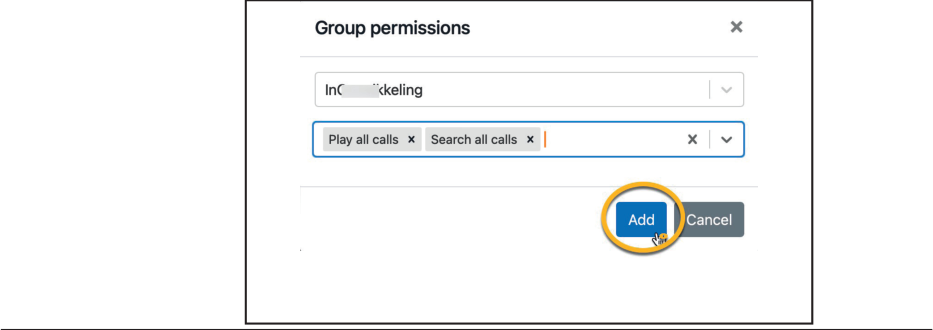
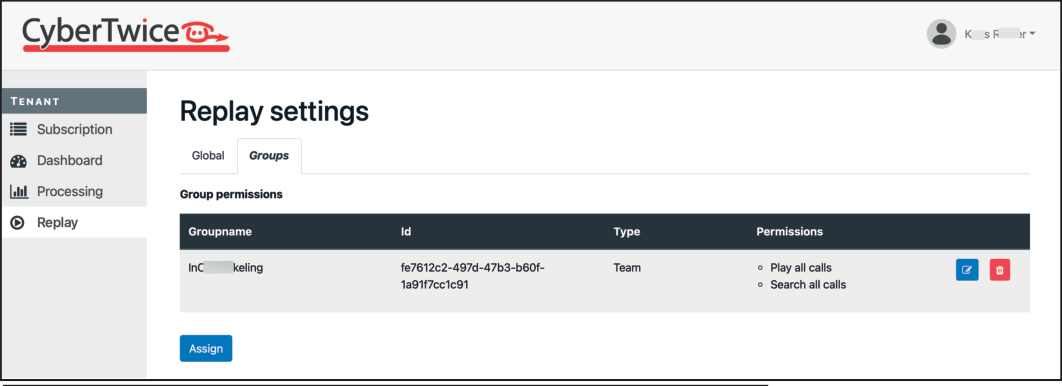
Available permissions:
- Search own calls / Search all calls
- Play own calls / Play all calls
Important: At least one ‘Search’ permission is required to view calls.
Appendix D: Network Requirements
Section titled “Appendix D: Network Requirements”CyberGate is a SaaS solution requiring proper firewall configuration.
Outbound Port Configuration
Section titled “Outbound Port Configuration”| Port(s) / Protocol | Direction | Destination | Purpose |
|---|---|---|---|
| 5060 / TCP | Outbound | cybergate.cybertwice.com | SIP messaging |
| 5061 / TCP | Outbound | cybergate.cybertwice.com | SIP-TLS (secure) |
| 30000-30199 / UDP | Outbound | cybergate.cybertwice.com | (S)RTP audio/video |
⚠️ Important: Use the DNS name
cybergate.cybertwice.com— do not use resolved IP addresses as they may change without notice.
SIP ALG
Section titled “SIP ALG”Recommendation: Disable SIP ALG on your firewall for devices connecting to CyberGate.
SIP ALG (Application Layer Gateway) is often enabled by default but typically causes connectivity issues rather than improving them.
Communication Test Script
Section titled “Communication Test Script”Download the PowerShell test script from the CyberGate Management Portal to diagnose connection issues.
Document History
Section titled “Document History”| Version | Date | Author | Change |
|---|---|---|---|
| 1.0.0 | 2020-07-14 | KR | Initial version |
| 1.1.0 | 2021-09-28 | KR | Revised text and layout |
| 1.2.0 | 2022-05-16 | KR | Document overhaul |
| 1.3.0 | 2023-03-14 | KR | Major overhaul |
| 1.4.0 | 2023-12-28 | KR | Major overhaul |
| 1.4.1 | 2024-01-03 | KR | Added chapter |
| 1.4.2 | 2024-08-06 | KR | Updated screenshots |
| 1.4.3 | 2024-09-13 | KR | Added Network requirements |
| 1.4.4 | 2024-12-06 | KR | Added 2/3 year purchase options |
| 1.5.0 | 2025-04-16 | KR | Major overhaul |
| 1.5.1 | 2025-11-17 | KR | Microsoft Marketplace implementation |