Genetec Sipelia and CyberGate

Genetec Sipelia and CyberGate
This guide describes how to connect Genetec Sipelia (from now on referred to as 'Sipelia') to CyberGate, the CyberTwice service that connects intercom systems to Microsoft Teams. After completing this configuration, intercoms connected to Sipelia — and the Sipelia Security Desk — can make audio and video calls to Microsoft Teams users and answer incoming calls from Teams.
What this guide covers
Connecting Sipelia to CyberGate enables you to make calls from intercoms connected to Sipelia, or directly from the Sipelia Security Desk to Teams users.
Sipelia communicates with CyberGate via a SIP trunk. The SIP trunk is one active connection to CyberGate that allows all intercom systems connected to Sipelia to communicate with Microsoft Teams.
CyberGate has a SIP trunk option that needs to be enabled. It allows you to create a SIP trunk account with unique credentials. Once this SIP trunk account is configured in Sipelia, each device that communicates via Sipelia through the SIP trunk to CyberGate will automatically be added as a 'SIP Trunk device' in CyberGate.
This guide is divided into four sections:
- Configure CyberGate for Sipelia - the necessary configuration in the CyberGate Admin Portal.
- Configure the SIP trunk in Sipelia - the configuration of the SIP trunk on the Sipelia side.
- Complete the final steps in the CyberGate Management Portal
- Install the CyberGate App - Installation of the CyberGate app is highly recommended.
To configure Sipelia for CyberGate, technical knowledge of Sipelia and the connected intercom devices is required.
1 - Configure CyberGate for Sipelia
SIP Trunk device licensing in CyberGate
Each device connecting through the Sipelia SIP Trunk is added automatically and needs a CyberGate license. Each device can be:
- Edited to change its name
- Deleted
If more devices are connecting to CyberGate via Sipelia than licenses available, the newly added devices are disabled by default. You can free up licenses by deleting (no longer used) devices or by adding licenses (in the menu License Overview). Added licenses will be active within a few minutes after adding. As soon as extra licenses become available, the disabled device(s) automatically become active.
Enable SIP trunk support
- Log in to the admin portal of CyberGate: https://admin.cybergate.cybertwice.com
- Navigate to the -Basic-Global- menu. At Features, enable Trunk support. It is disabled by default.
After trunk support is enabled, a new menu is added called SIP trunks.
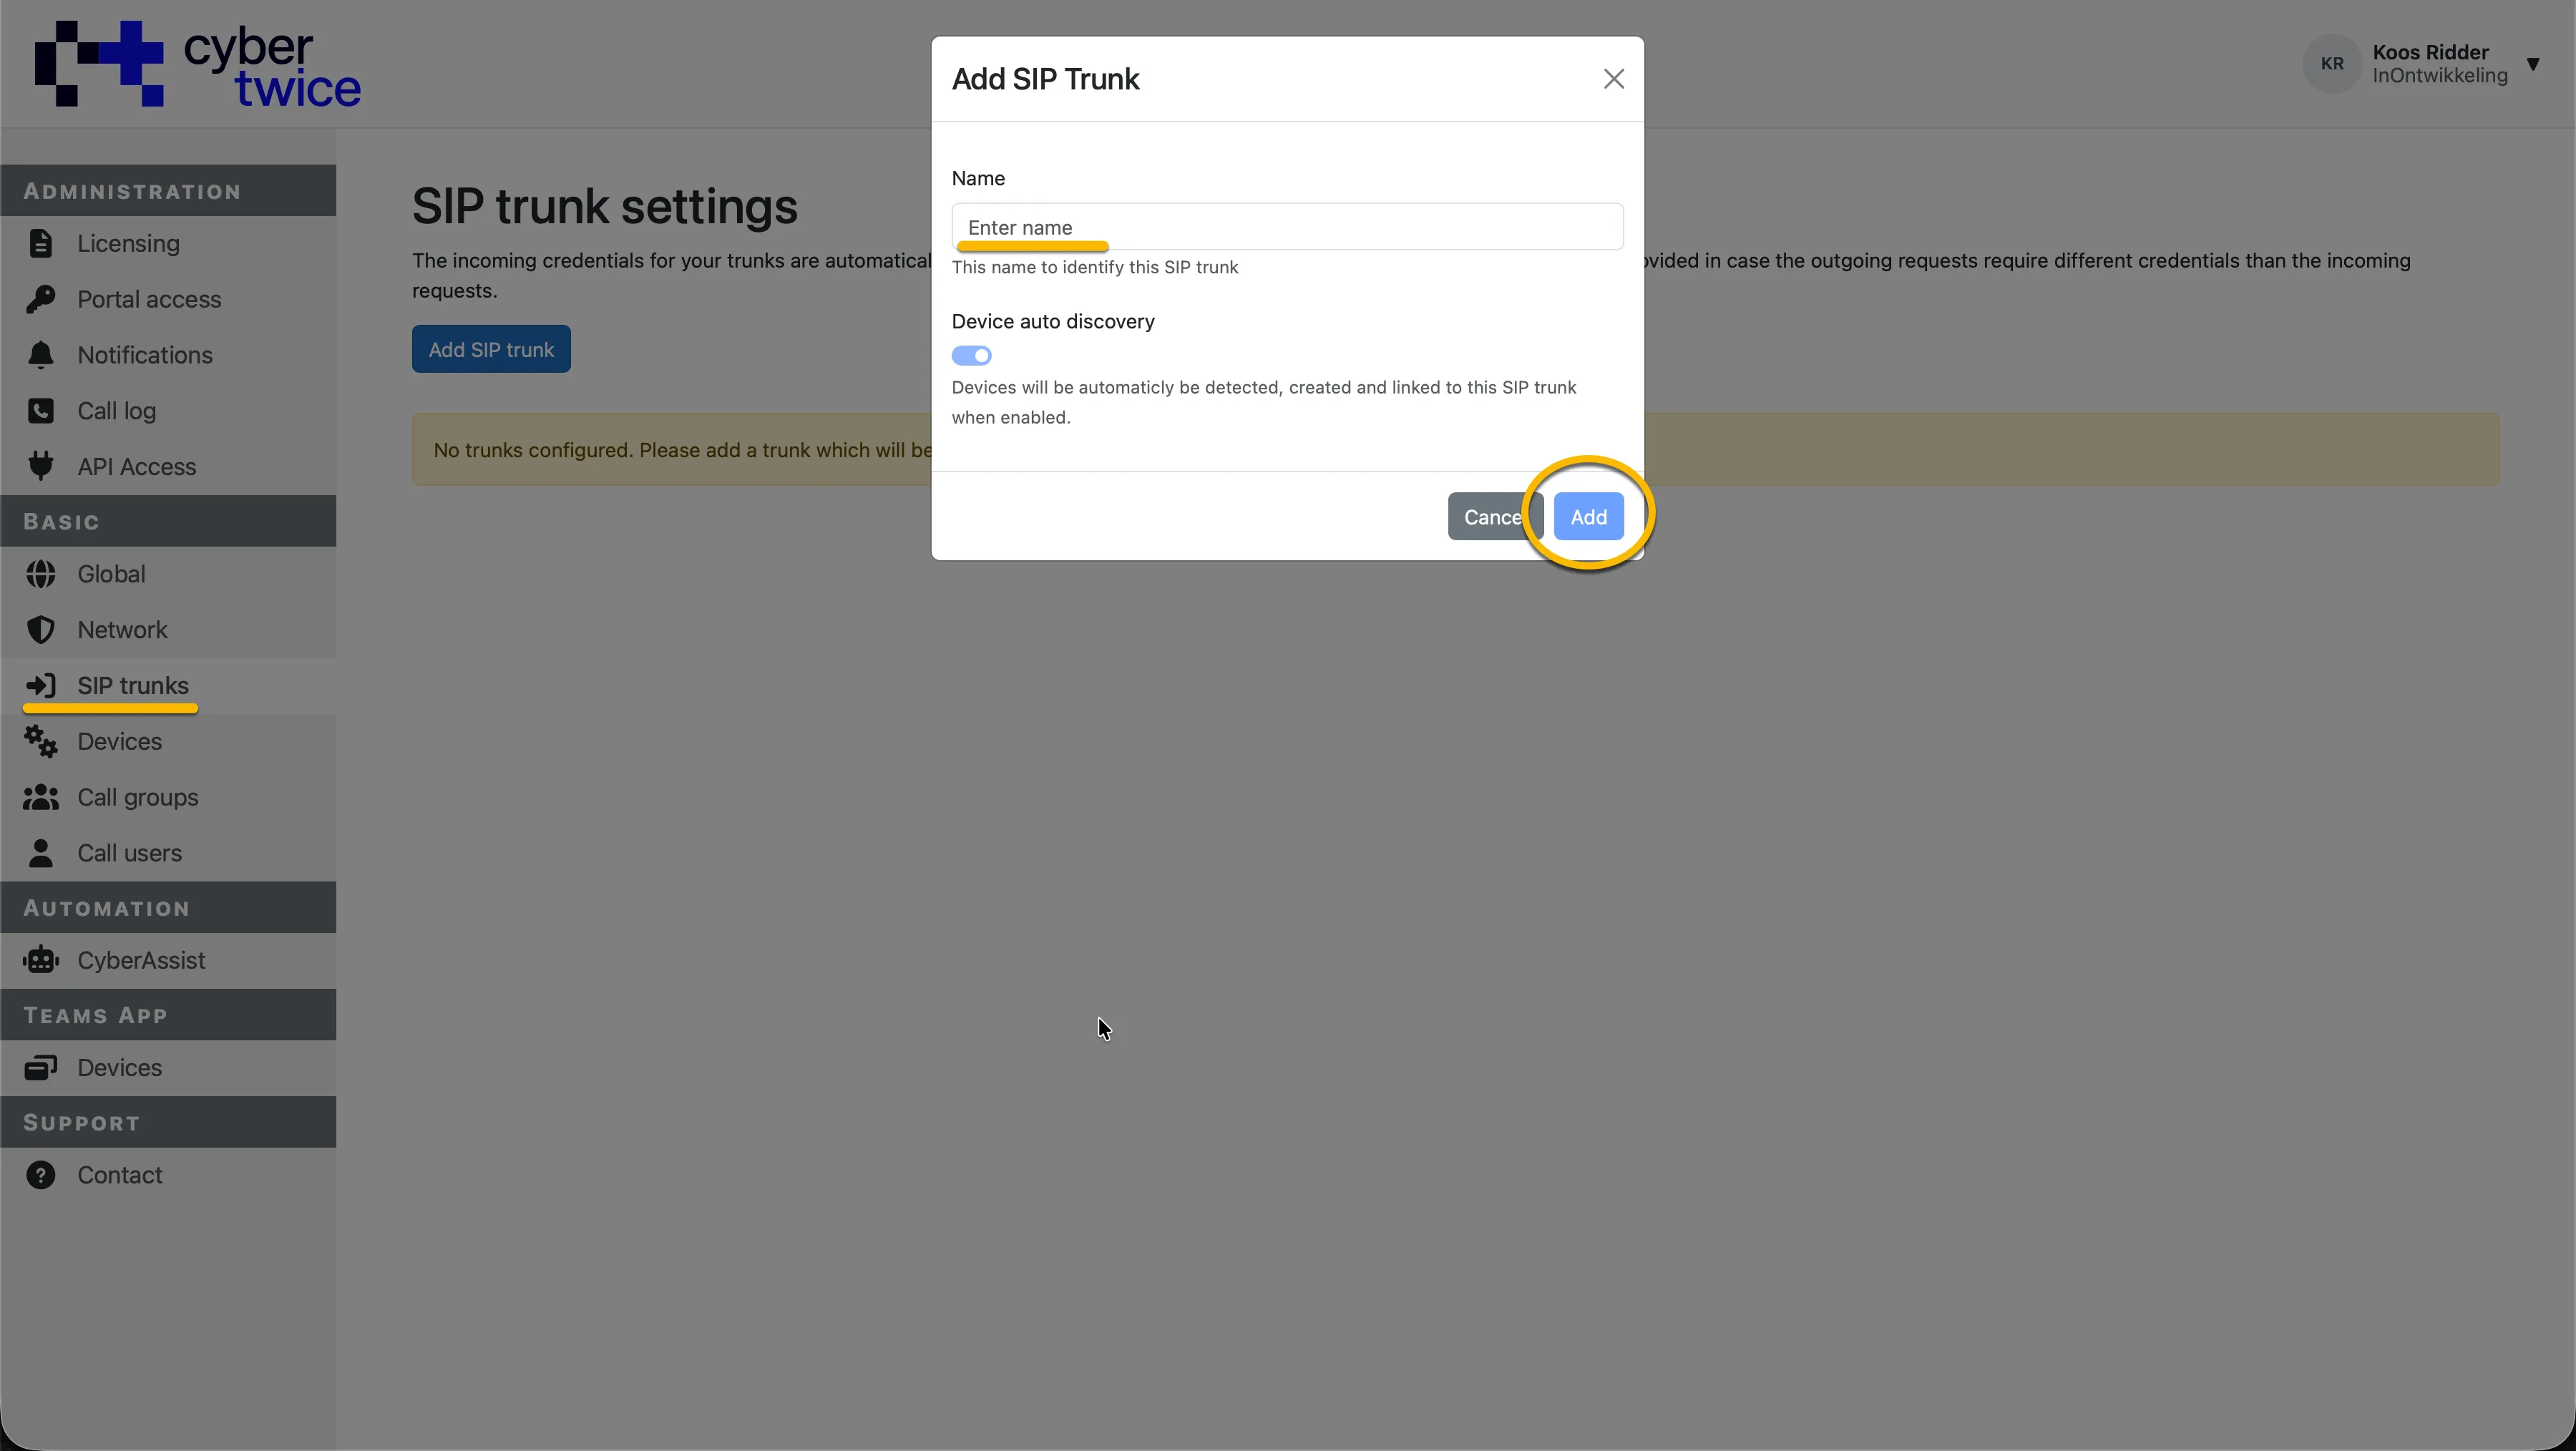
- Navigate to the SIP trunks menu.
- Click the blue Add SIP trunk button to add a SIP trunk.
- Provide the following information:
Add SIP Trunk | |
|---|---|
Name | Name the SIP trunk (in this example we name it Sipelia) |
- Click the blue Add button when done.
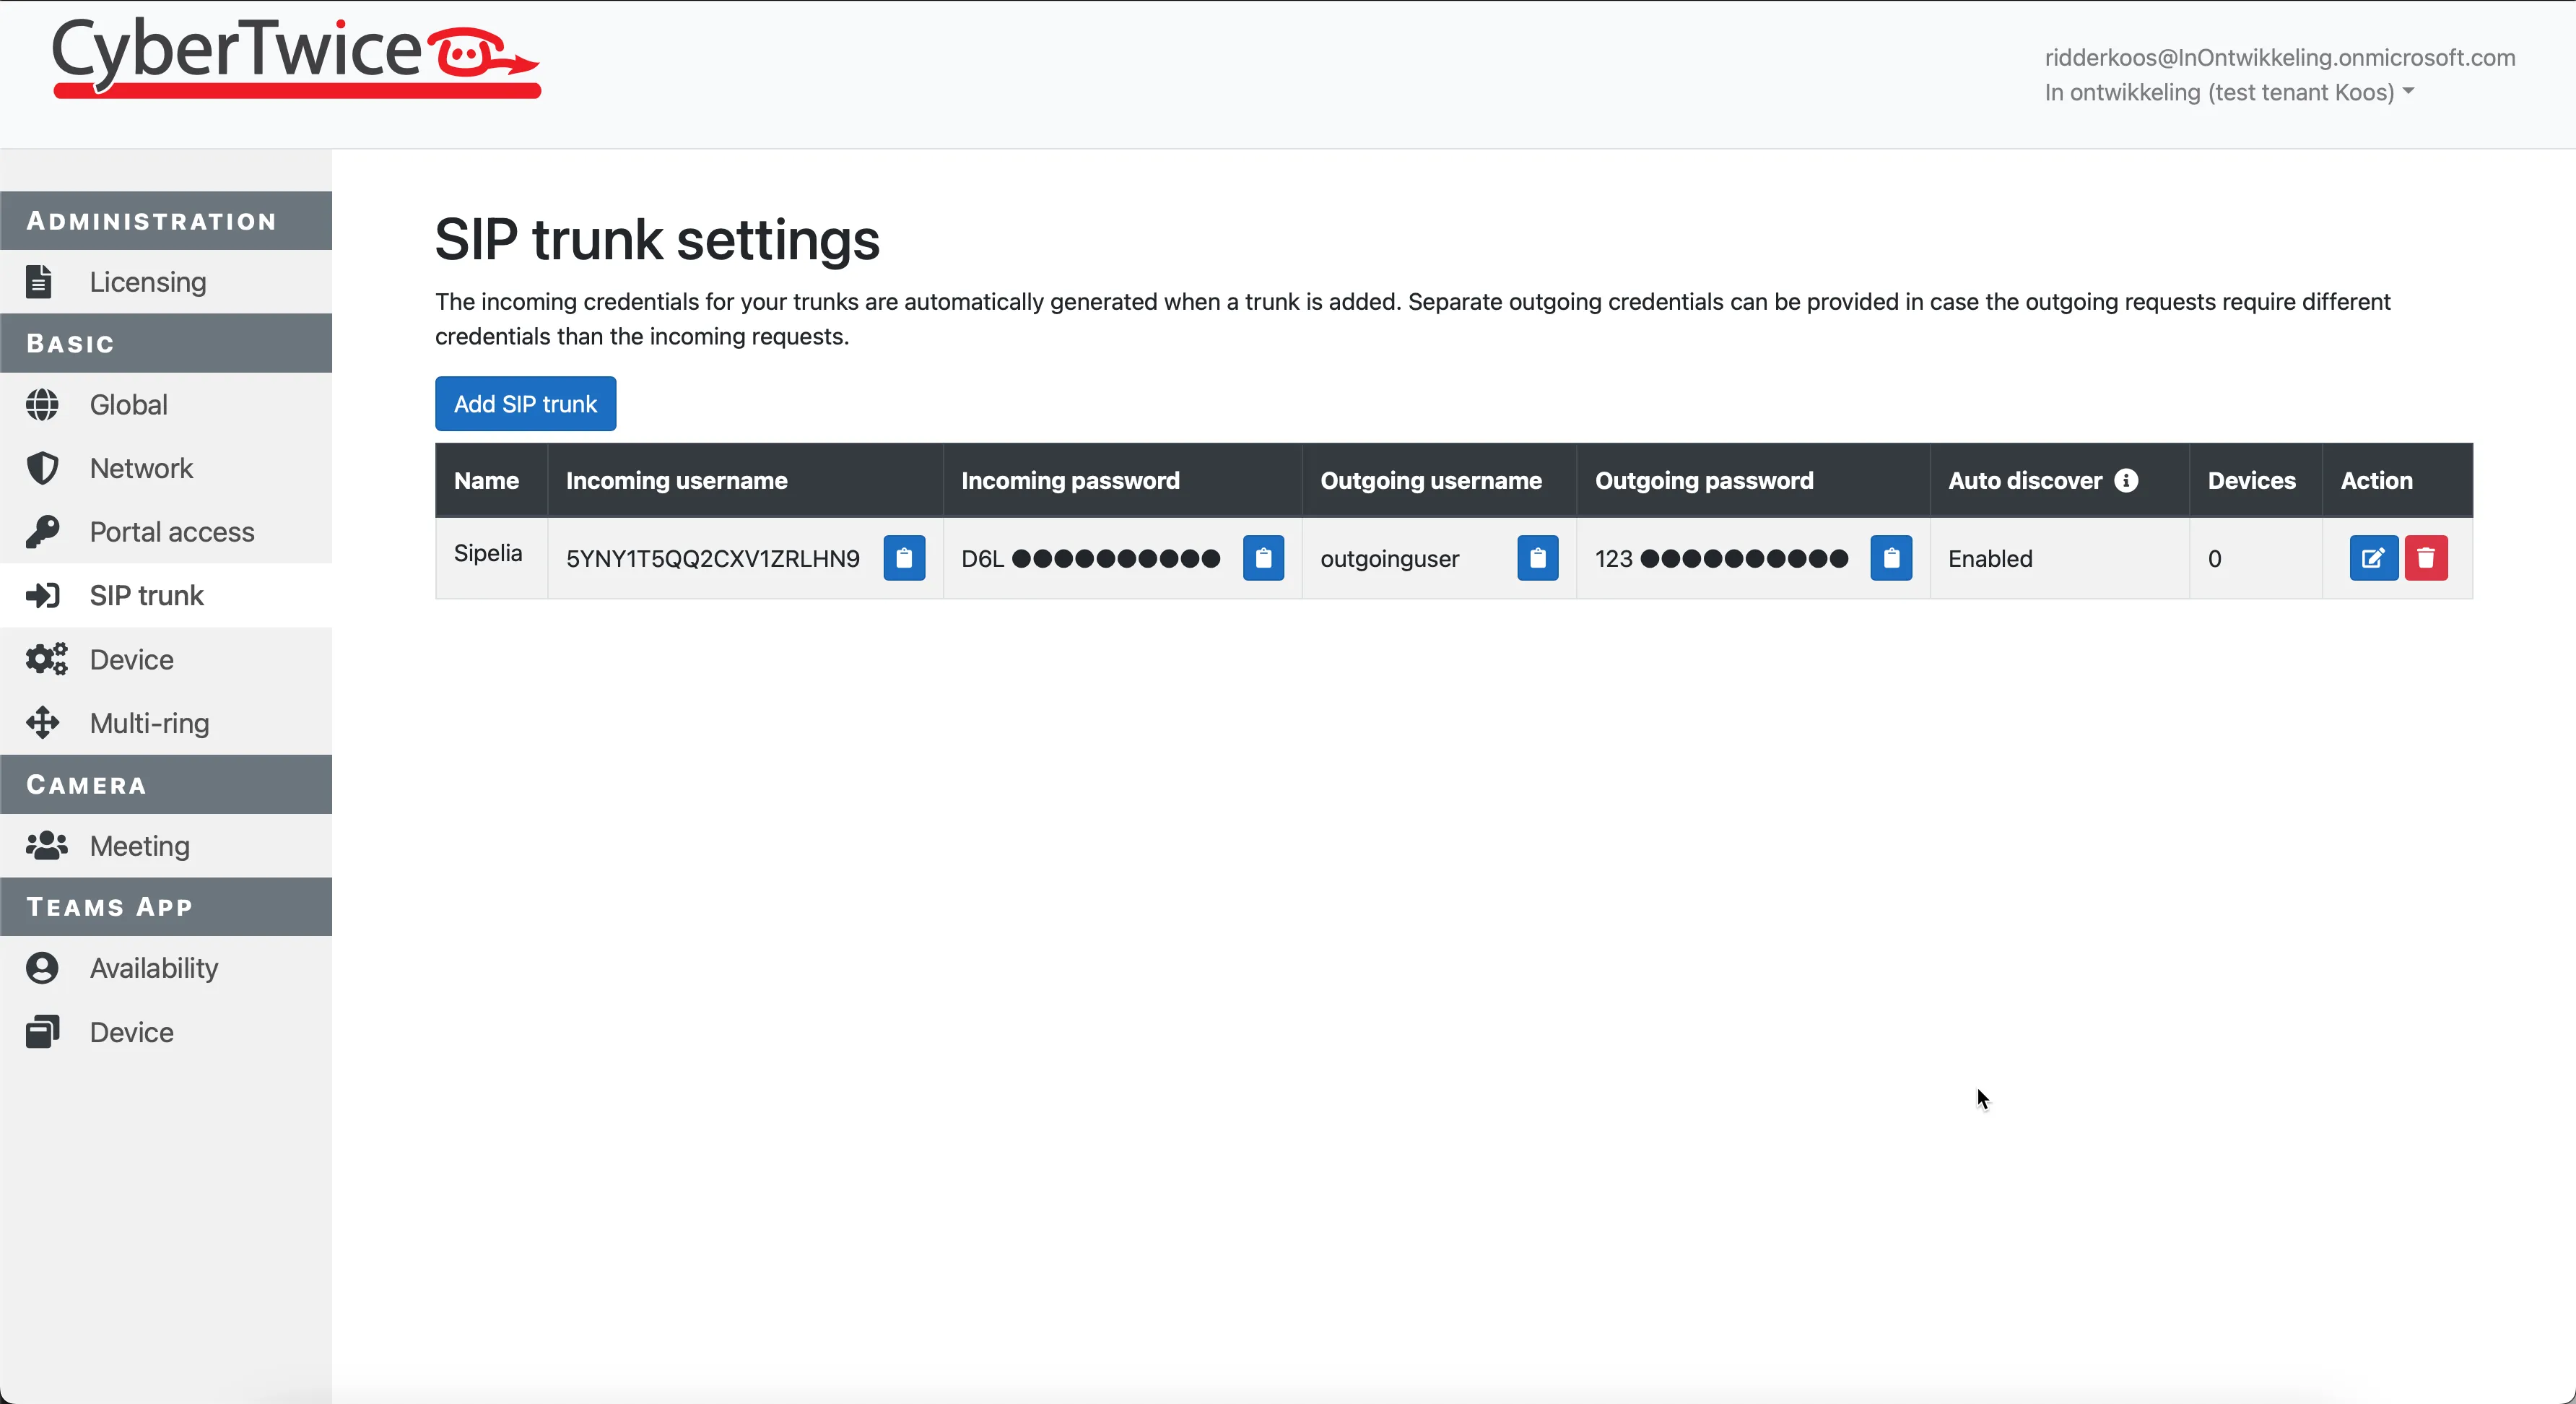
A SIP trunk with the provided name is generated. The Incoming username and Incoming password are automatically generated; you need them later to configure VirtuoSIS.
You can copy the Incoming username and Incoming password with the blue Copy buttons.
Check the SIP trunk in Device settings
Navigate to the Device settings menu.
The SIP trunk is shown, but no devices are detected yet. Each device that calls to Microsoft Teams through CyberGate will be automatically added.
Create a Call group in CyberGate
The Sipelia SIP trunk and the calls that have to be routed through that SIP trunk are always addressed as numbers. As Teams only uses Teams usernames (e.g. [email protected]), you'll need to create one (or more) Call group(s) in the CyberGate Management portal. A Call group must have a number as a name (e.g. 5001) so it can be addressed in the intercom devices. When called from a device behind Sipelia, it will then ring the participants in the Call group.
Follow the steps in the manual CyberGate Call Group Settings on this site on how to create a Call group and add Teams users to it.
You can add as many Call groups as you have destinations to call. In this guide, we'll use a Call group ([email protected]) in the configuration of Sipelia.
2 - Configure Sipelia
The configuration of Sipelia for use with CyberGate consists of four steps:
- Create a SIP trunk in Sipelia
- Create a Dial Plan rule
- Create a range of extensions for CyberGate
- Add an account to Security Center Sipelia
1 - Create a SIP trunk in Sipelia
- Under the SIP trunking tab, click the + sign to add a SIP trunk.
- Give the SIP trunk a name.
- (Optional) Enable Transport Layer Security (TLS).
- (Optional) If using TLS, use SIP port 5061.
- Under Outbound requests, enter the incoming username and incoming password from the SIP trunk you configured in the CyberGate Management Portal (the Update SIP trunk screen, described in Add and configure the SIP trunk).
- Enable registration to the trunk.
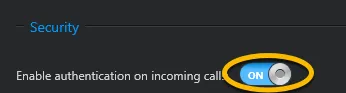
- (Optional) Under Inbound requests, enable Authenticate requests for additional security.
Authentication on incoming calls must be enabled under the General tab of Sipelia for this security feature to work.
- Enable Allow registration.
- Under Inbound requests, enter the Outgoing authentication username and Outgoing password you defined in the Update SIP trunk screen of the CyberGate Management Portal (see Enable SIP trunk support ).
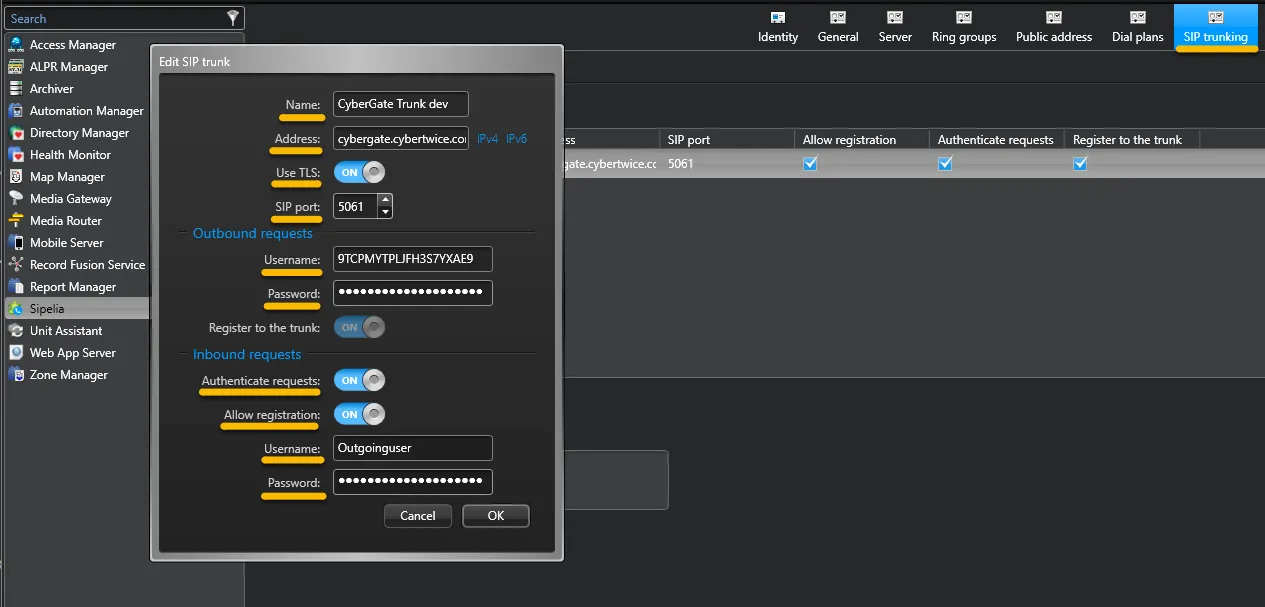
- Click OK.
- Click Apply.
The trunk state should be green, indicating that it is online.

2 - Create a Dial Plan rule
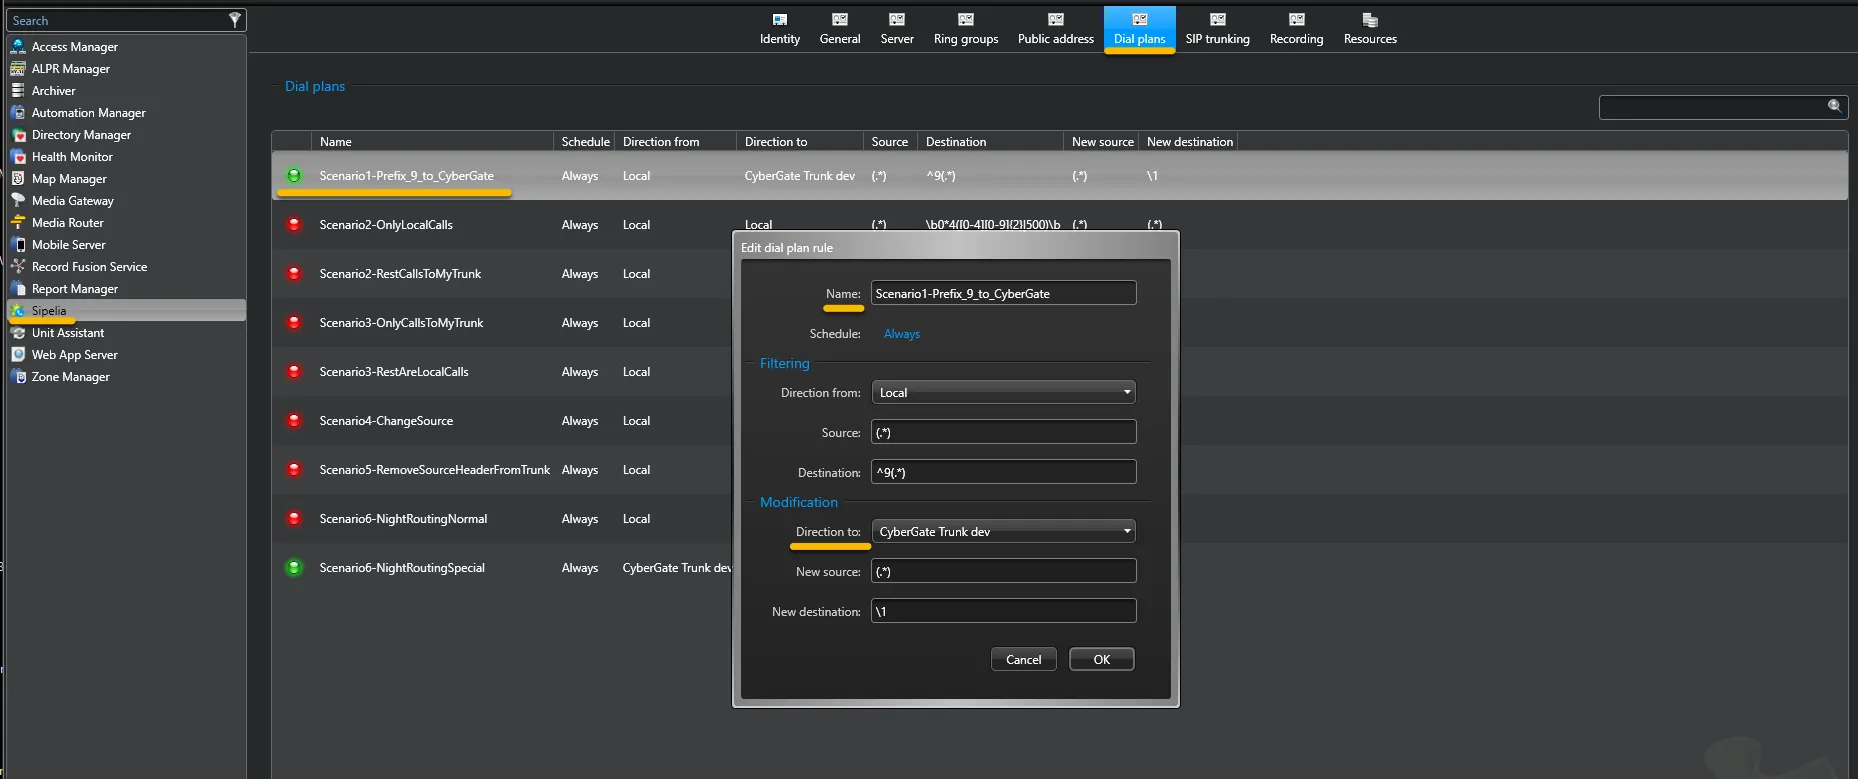
- Under Dial plans, use one of the available templates.
- Modify the rule accordingly.
- Configure the Direction to be the CyberGate SIP trunk.
- Click OK.
- Click on the green dot (•) to activate the rule.
- Click Apply.
3 - Create a range of extensions for CyberGate
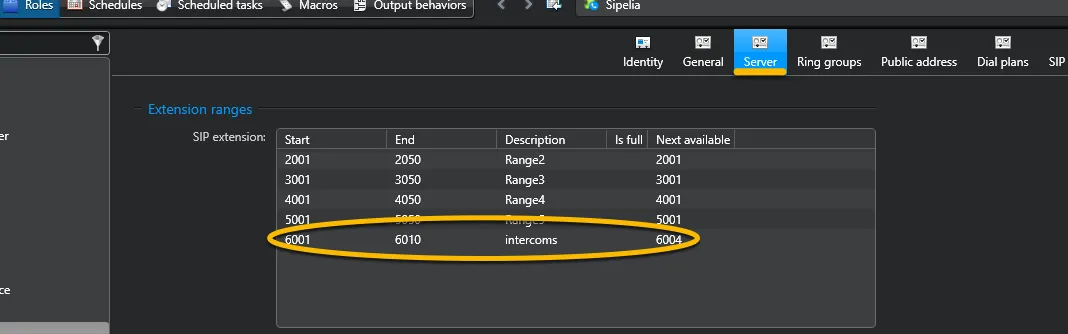
Create a range of extensions that is defined within your dial plan in order to call Teams users or user groups.
- Go to the Extension ranges section under the Server tab.
- Click the + sign to add a range.
- Select a start and an end for your extension range.
- (Optional) Add a description.
- Add a password.
4 - Add an account to Security Center Sipelia
To identify the Teams user(s) in the Sipelia address book, you must add the Call group created in CyberGate as SIP intercom in Security Center Sipelia.
- From the Config Tool homepage, select the Sipelia plugin role.
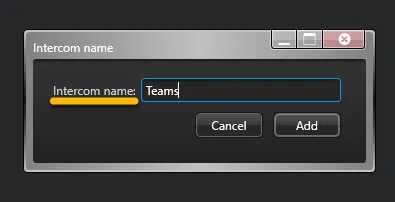
- At the bottom of the page, click Add intercom.
- Enter a name and click Add.
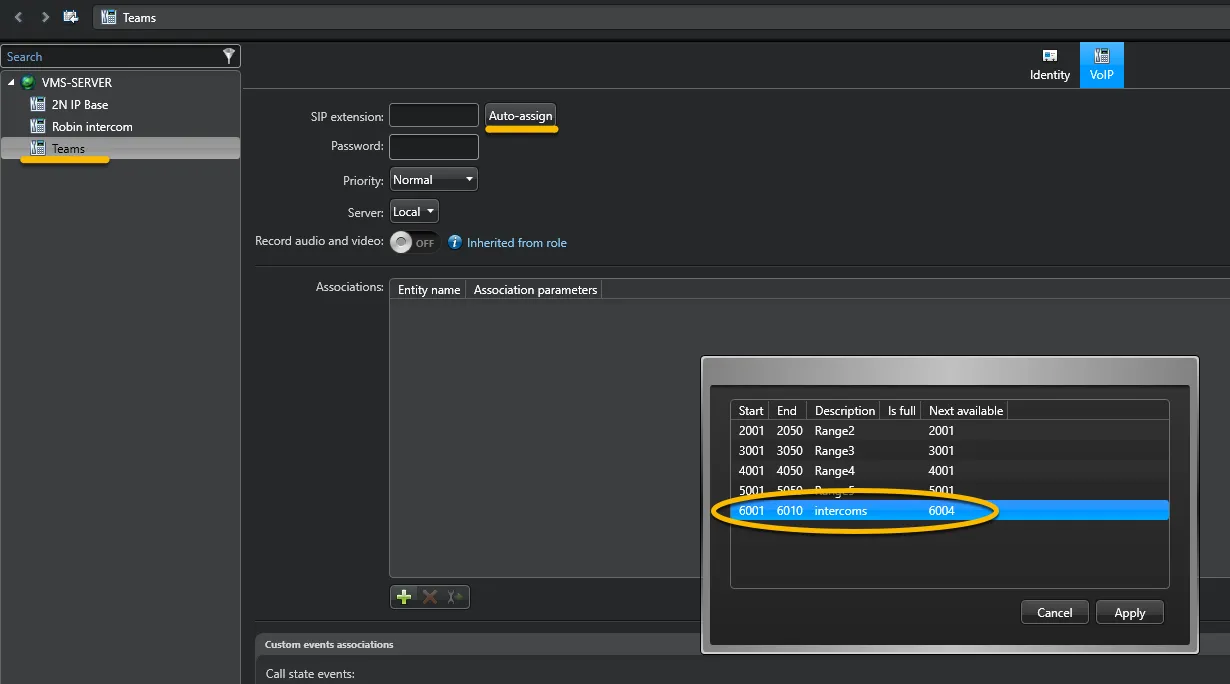
- Click the VoIP tab and assign a SIP extension and a password to your SIP Teams virtual user group. To communicate with other SIP endpoints within Sipelia, every SIP intercom or user in Security Center must have a unique SIP extension assigned to it. Assign the extension in one of two ways:
- Auto-assign (recommended): Click Auto-assign and choose the existing designated range of SIP extensions for Teams users. The SIP intercom is automatically assigned to the next available SIP extension in the range and the correct password for the range is populated.
- Assign the extension manually by entering:
- SIP extension: The extension number of the SIP intercom.
- Password: The password for the extension. This password was specified when creating the extension range. Each SIP extension within a given range has its password automatically set to match the default password for that range.
- Under Server, select the SIP trunk name previously created for the SIP trunk with CyberGate.
- Click Apply.
- Repeat steps 1 to 5 for each Call group created in CyberGate.
Verify the Sipelia configuration
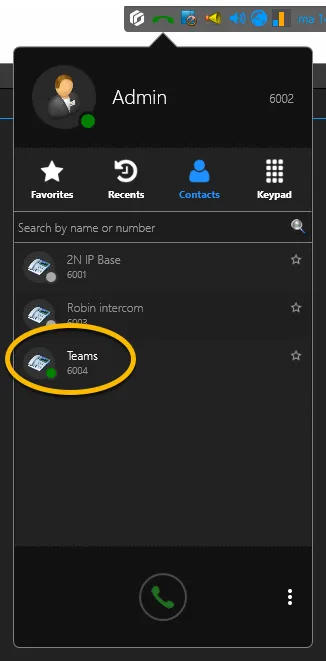
The virtual intercoms for the Teams Call groups should display an online status with a green dot in Security Desk.
Each created virtual intercom has an extension assigned to it. Dialing this extension using Sipelia will trigger an outgoing call to CyberGate. Within CyberGate, this same extension corresponds with a Multi-ring group and the users in this Multi-ring group will be called.
3 - Complete the final steps in the CyberGate Management Portal
After the Sipelia configuration is complete, calls can be made to Teams users via CyberGate. All device(s) registered to Sipelia (including Security Desk users) used to call Teams destinations via CyberGate will be added to CyberGate automatically.
All devices that are added to CyberGate will need corresponding licenses in CyberGate. So, for instance, if you use 5 devices to call Teams destinations, you will need 5 CyberGate licenses.
Once all devices are created, one step must be taken: download and run the (PowerShell) Feature Configuration script in the CyberGate Management Portal. The Feature Configuration script enables display names to appear in the Teams environment and is required to enable outgoing calls from Teams to the device(s) in Sipelia.
See the Feature Configuration script manual on this site for instructions on how to download and run the Feature configuration script.
4 - CyberGate App for Microsoft Teams
The CyberGate App for Microsoft Teams offers more CyberGate features directly from Microsoft Teams. One of these features is the Open-door button. This button can be utilized during a call to CyberGate and lets you open the the door by clicking just one button.
For a description on how to install the CyberGate app and use the Open door button please see the CyberGate App for Teamsmanual.